
When your organization gets to the point that you have a) leads coming in on a regular basis and b) multiple sales reps, you quickly realize you need a way to divide up those leads among your reps. If you're using Salesforce, you may have noticed a built-in feature called Lead Assignment Rules. Sounds perfect, right? Sort of. We'll walk you through it.
Here's our agenda:
- The basics of lead assignment rules
- Matching and assigning with rule entries
- Issues and challenges with lead assignment rules
The basics of lead assignment rules in Salesforce
Let's take a look at lead assignment rules in Salesforce. Go to your Salesforce org's Setup section and search for "lead assignment" in the Quick Find box. You'll find these buried under Feature Settings > Marketing > Lead Assignment Rules. If you don't see it, make sure you have permissions for "View Setup and Configuration" and "Customize Application".
 Let's start with some basics:
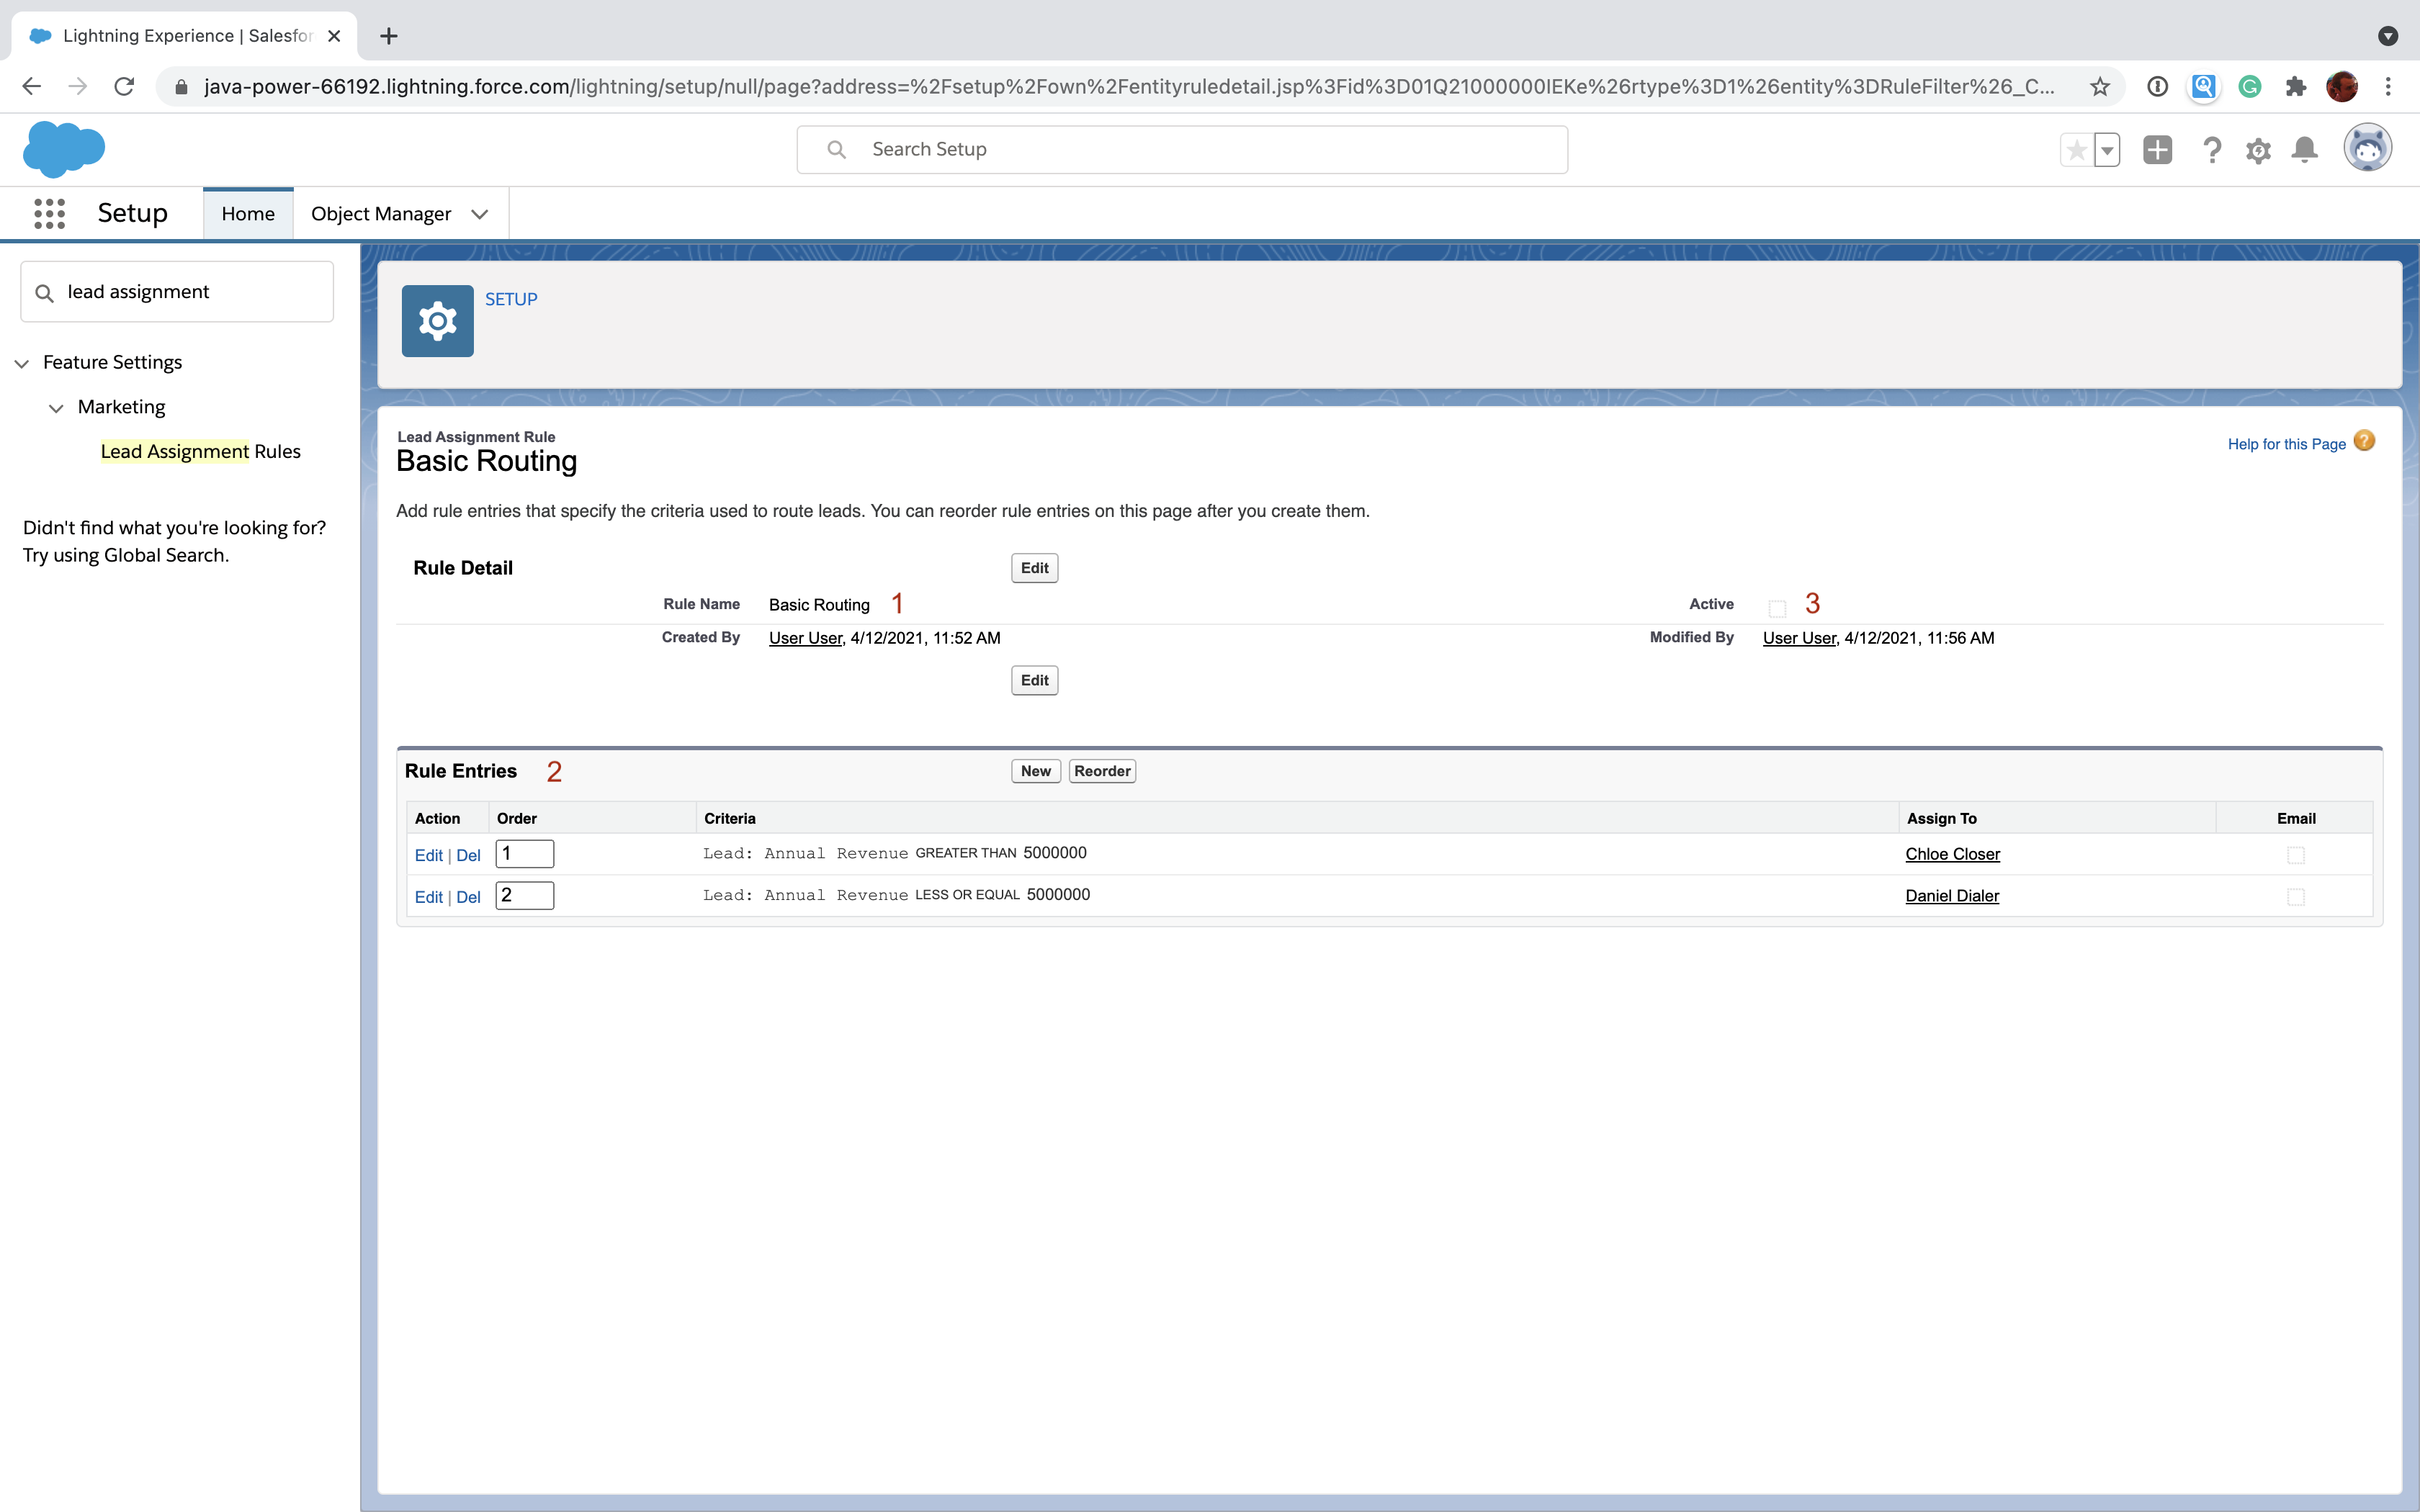
- Unique names - Every lead assignment rule has a unique name [1].
- A lead assignment rule is really a list of "rule entries" - Salesforce calls each of the individual rules in the list a "rule entry" [2]. Each rule entry allows you to say something along the lines of: "if a lead meets these criteria, assign it to this user (or queue - more on that in a moment)".
- Rule entry order matters - The list of rule entries [2] is processed in a specific order you define. Salesforce will process each rule entry until it finds a match. Once it finds a match, it will assign the lead based on how the rule entry is configured.
- Only one active rule at a time - You can only have one lead assignment rule set to active [3].
Now that we've got a decent idea about what a lead assignment rule looks like, let's dive into rule entries.
Matching and assigning with rule entries
Every rule entry has three parts:
- Order - This is a number that indicates where the entry exists in the list. Rule entries are evaluated starting at 1 and then processing until one of the rules matches.
- Matching Criteria - Leads are compared to the matching criteria for each rule to determine if the lead matches. The first rule that matches is used to determine assignment.
- Assignment - This tells Salesforce what you want to do once a lead has matched the matching criteria. Usually, you'll tell Salesforce to assign it to a user or a queue.
Order is pretty straightforward. The complexity really lies in matching criteria and assignment. let's spend some time on those.
Matching criteria
There are two types of matching criteria: filter criteria and formulas. You'll probably use filter criteria the most, so let's start with that one:
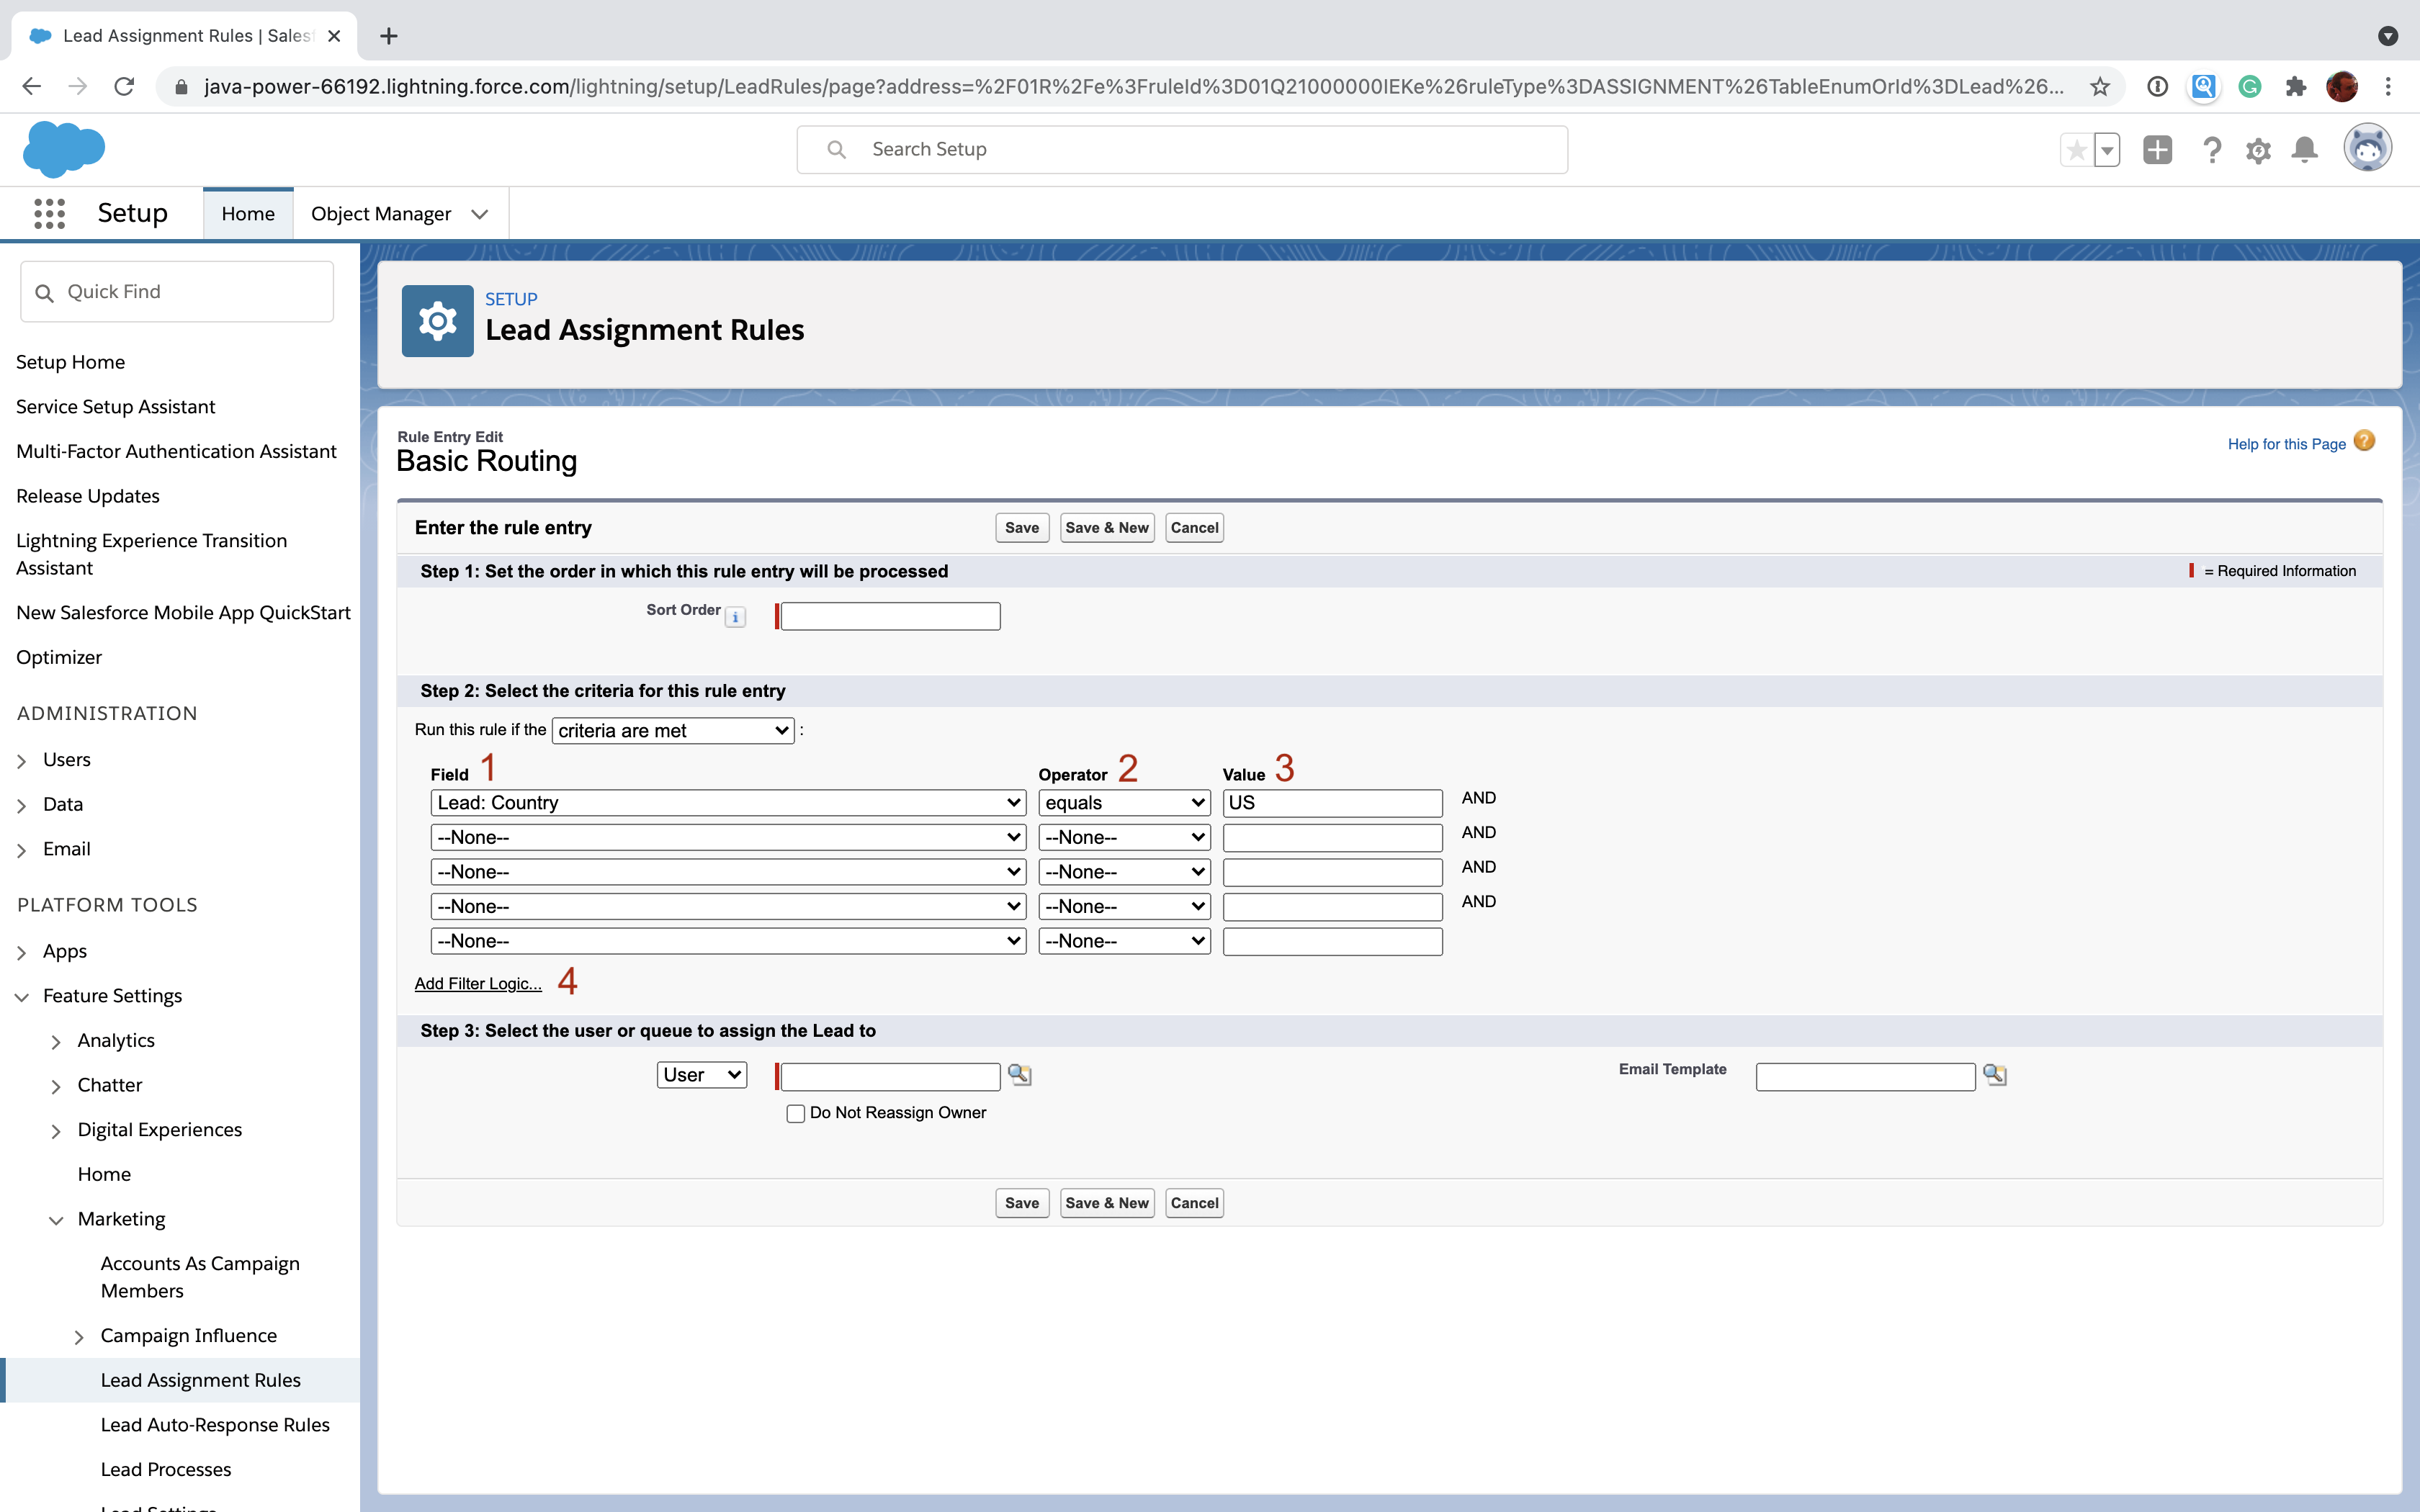 Filter criteria work a lot like a classic Salesforce report. You specify a field [1], an operator [2], and a value [3] for matching purposes. Unless you use custom logic [4], all the criteria must be true before this rule will match. In the example above the "Country" field on Lead must exactly equal "US" in order to match.
One key limitation is that you can only configure criteria using fields from the lead, the current user, and the campaign associated with the lead.
Here's what it looks like to create a formula rule entry:
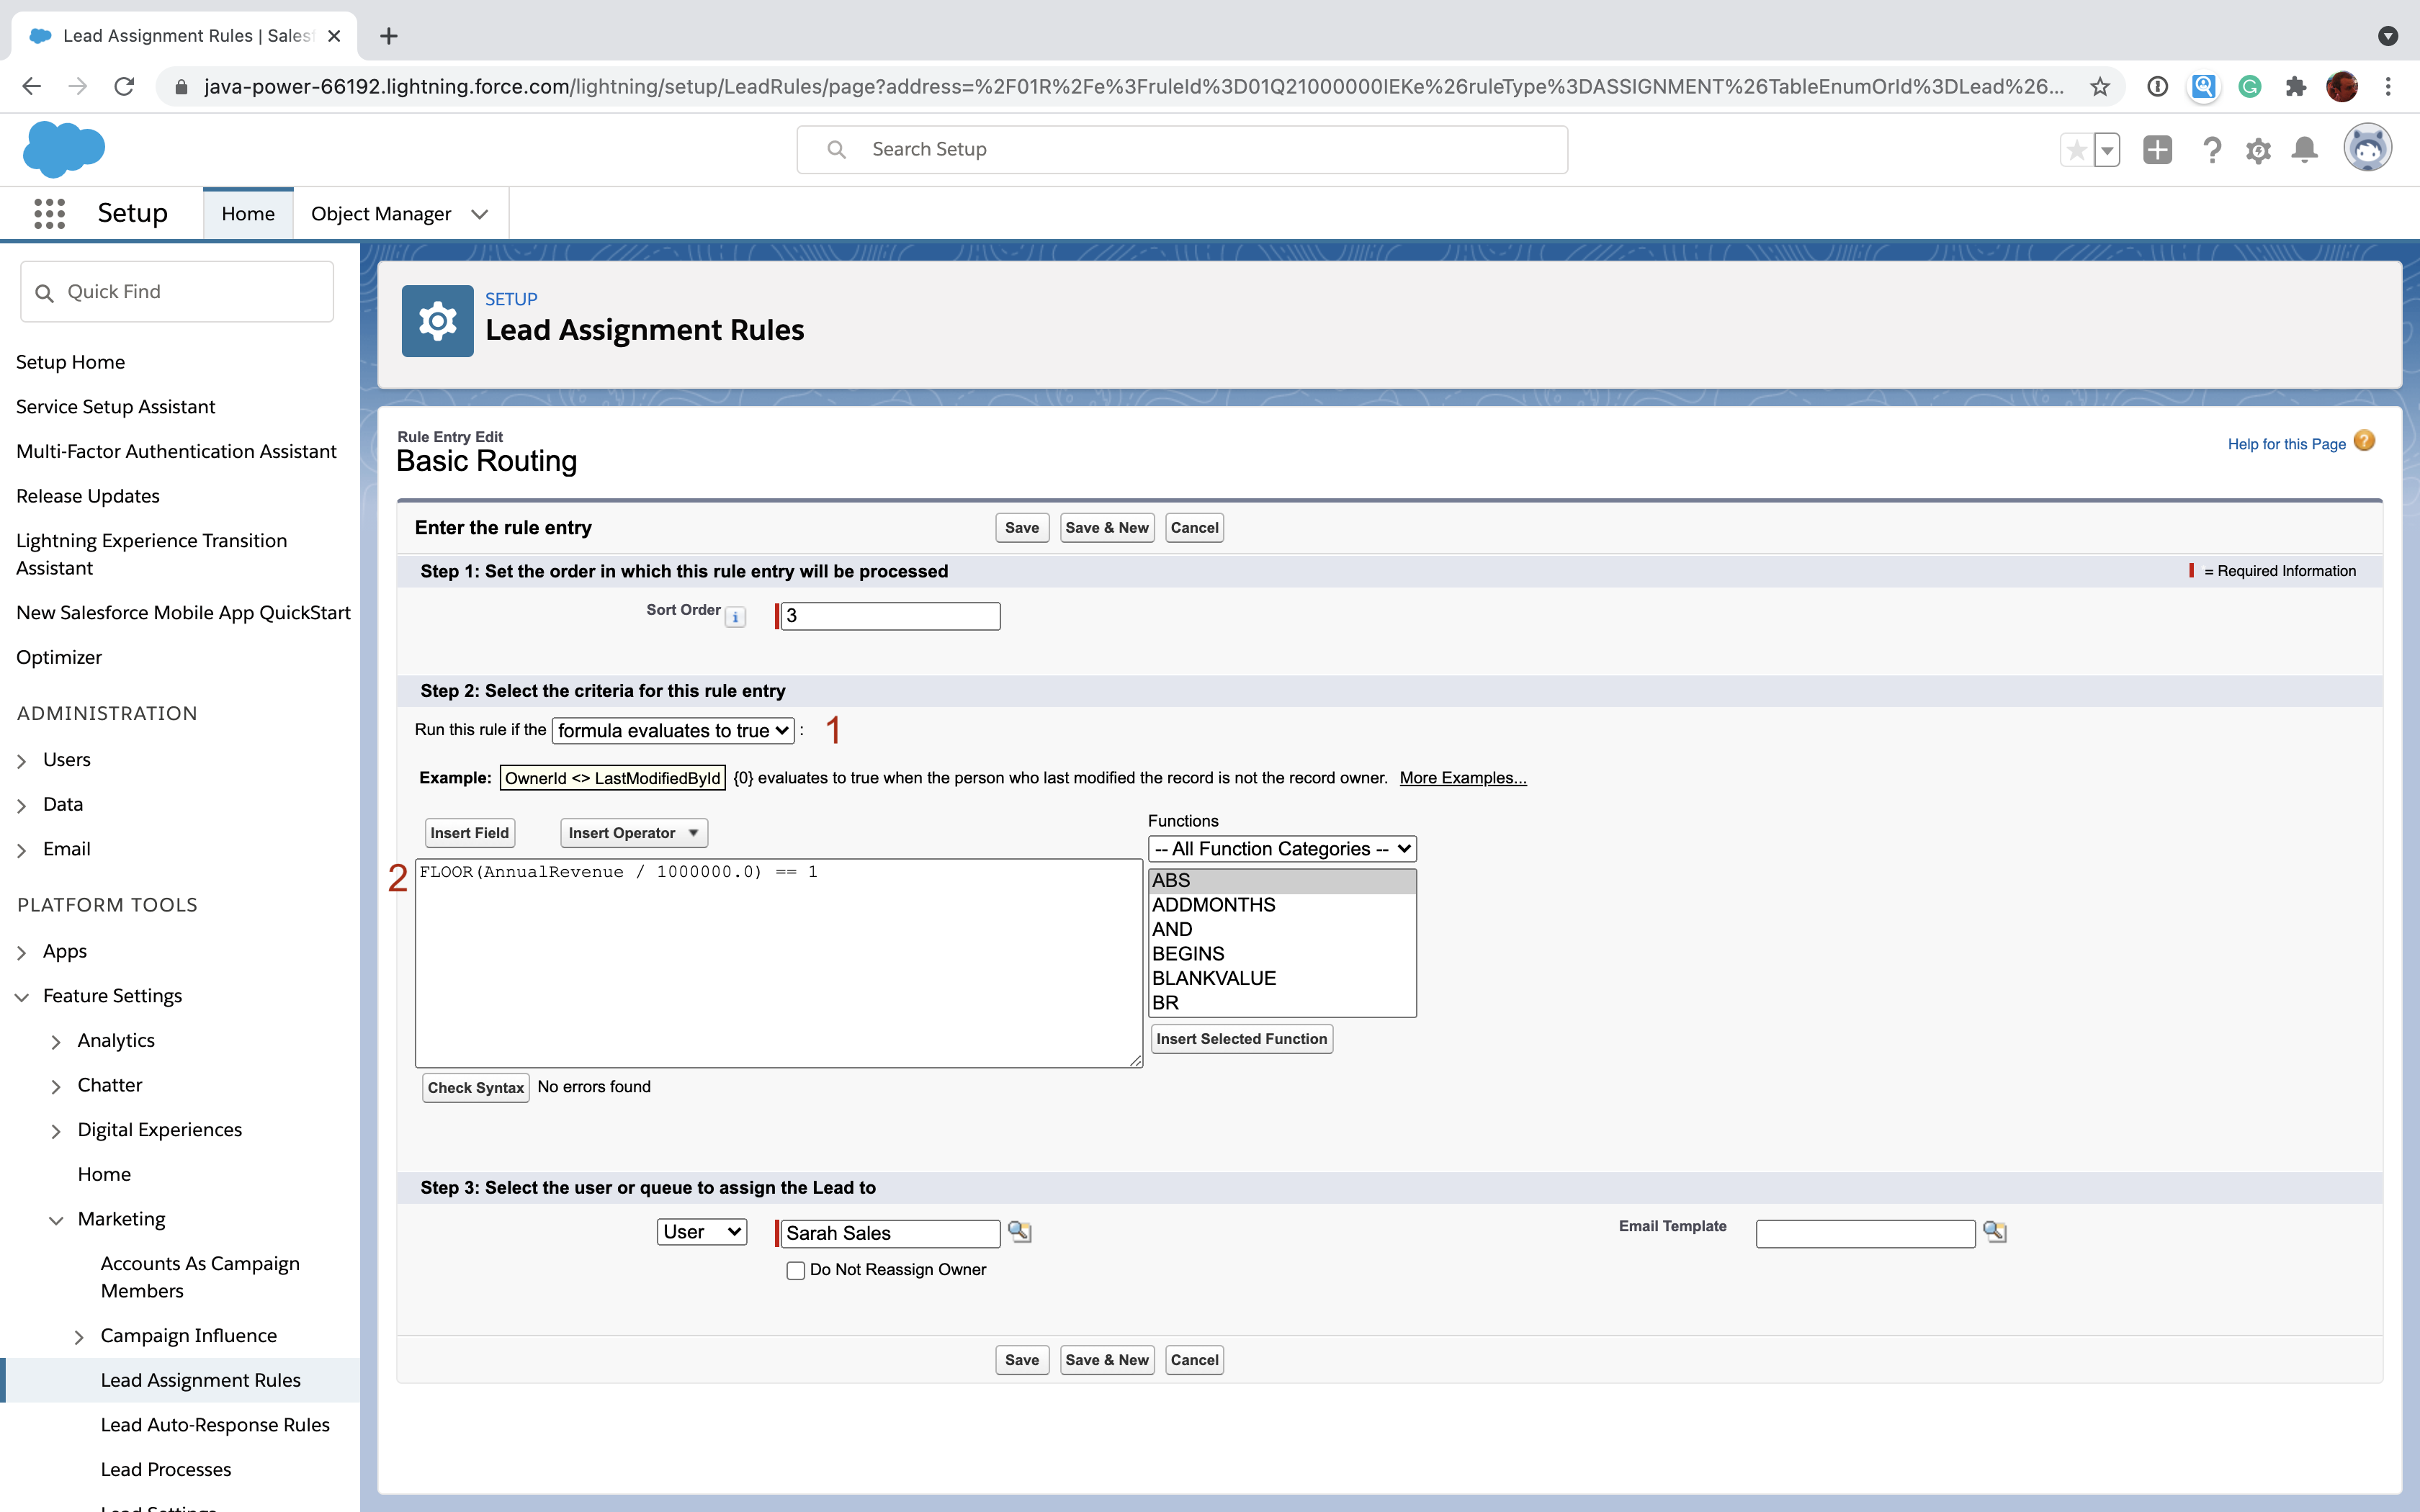 Instead of using filter criteria, this rule uses a formula [1]. Formulas can get pretty complex. The one here will evaluate to true if the "AnnualRevenue" field of the Lead is at least $1MM but less than $2MM. Just remember that your formula must evaluate to true/false. Formulas allow for a lot of flexibility but can be hard to debug, especially if you have a lot of rule entries.

Assignment
Let's go back to the rule entry screen and focus on the assignment section:
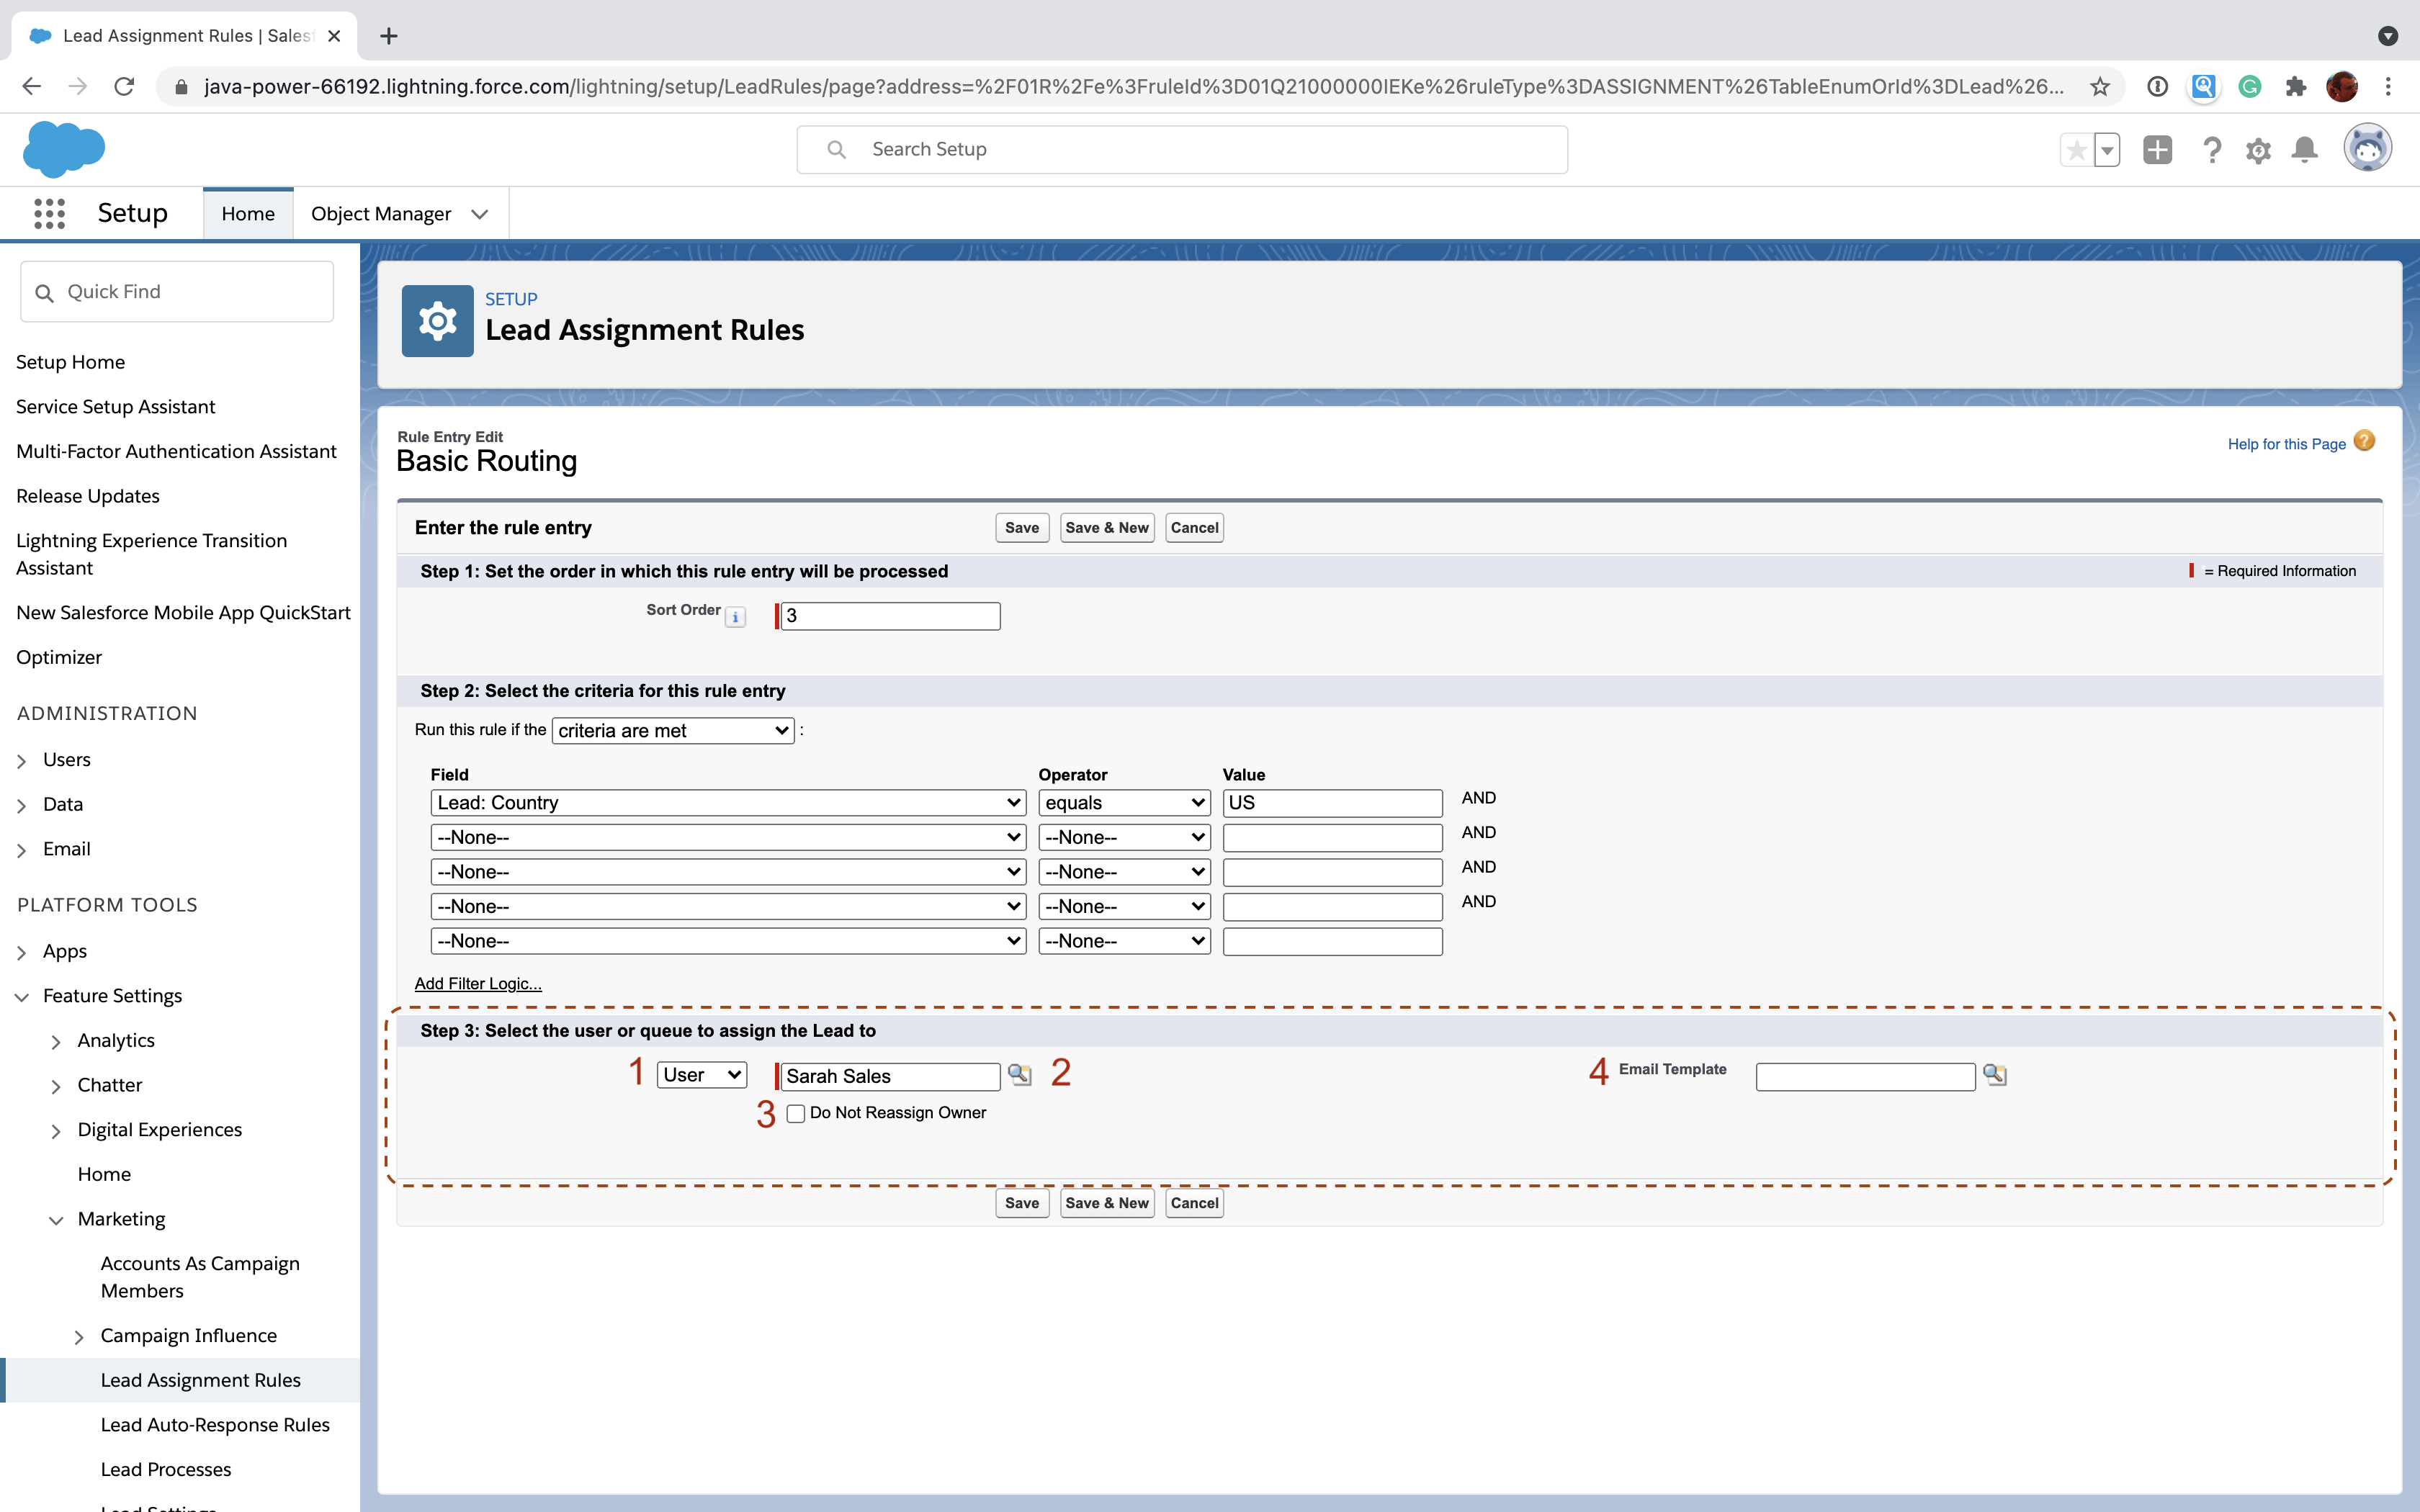 Before we go any further let's clarify what we mean by assign. In this case, it means we're going to set the Owner field on the particular Lead record to either a User or a Queue. Depending on which type of object you choose [1], you will need to specify the specific user or queue you want to use [2].
So, what's the difference between a user and a queue?
- User - In business terms, this is a particular sales rep who will be responsible for managing the lead. In technical terms, this is an active Salesforce user configured in your Salesforce org.
- Queue - A Queue is a list of records (usually Leads, but not always) that are accessible to a specific group of users. Each of those users can take ownership of a record from the queue, removing it for the others. When you assign ownership of a Lead to a Queue, you're effectively making it first-come, first-serve for a group of users. This is not the same as a "round-robin" assignment where you assign the Lead to one person from a list of users.
There's one last thing to know about assigning ownership. Note the checkbox labeled "Do not Reassign Owner"[3]. This controls what happens when a lead is updated and matches the criteria. If this is checked, the assignment will essentially be ignored. Use this to prevent toggling users back and forth.
The last field, "Email Template" [4] allows you to specify a particular email template to use for notifying the new assignee when the assignment is complete.
Issues and challenges
Lead Assignment Rules are a reasonable choice for a small team with simple rules. They work and the only cost to you is the administrative overhead of creating and maintaining them. Unfortunately, they're extremely limited and don't cover many common use cases. They also become very brittle as your team size and lead velocity increase. Here are a few common issues and challenges:
- Leads only - They only apply to the Lead object (there are Case Assignment Rules for Cases, but that's it). This may make them a poor fit for your sales process if you need to do lead-to-account matching or you're pursuing an account-based strategy. If you need to assign other things besides Leads, you'll need to try a more flexible automation solution like Flow.
- Hard to test - Unlike Process Builder or Flow, your Lead Assignment Rules don't provide any form of versioning or debugging so it's hard to test them without just doing it live.
- Hard to audit - There's no record of why a lead was assigned in a particular way. You'll have to go look through your rule entries to figure it out. This can quickly get painful as the number of rules increases.
- One rule at a time - If your company has very different rules for different leads (e.g. from different campaign sources or applicable to different product lines), it can be very challenging to craft your rule entries in a way that handles more than one lead routing flow.
- No round-robin - It's technically possible to do a very poor version of round-robin with Lead Assignment Rules, we don't recommend it. It's extremely brittle and will break without lots of maintenance.
Where to go from here?
If you've got a small team with simple processes, give Salesforce lead assignment rules a try; they may give you just what you need. If you find yourself needing to assign other objects besides Leads, perform round-robin rep assignments or maintain a full audit trail, you might want to consider Gradient Works.