This post is part of a technical series to help Salesforce Admins automate business processes using Flow.
Salesforce Flow is the future of Salesforce automation. It's been around for several years and gets more powerful with each Salesforce release. Unfortunately, many Salesforce Admins are still more comfortable using older automation tools like Process Builder. That's not surprising. Flow is more powerful and has a bit of a learning curve. But hey, that's why we're writing these posts. So, let's learn how to get started with Salesforce Flow for your automation tasks.
Flow vs Process Builder
While Flow is a no-code tool, it's more like "programming" than Process Builder. Process Builder limits you to a "waterfall" approach of "if-condition-then-steps-else-next-condition". Flow, on the other hand, takes a much more free-form approach. You control the entire process. Think of it like making a flow chart that, instead of just defining a process, actually runs the process. You define the steps, the decisions, the logic, etc. It's a little bit more complex to learn, but it's very much worth it because Flow can do everything Process Builder can do - and way more.
Creating a Flow
You get to Flows by going to Setup in your Salesforce org. On the home tab, search for "Flows". You'll find it under "Process Automation". Click it and you'll be taken to the Flow Listing. Like Process Builder, each Flow can have multiple versions and only one version can be active at any time.
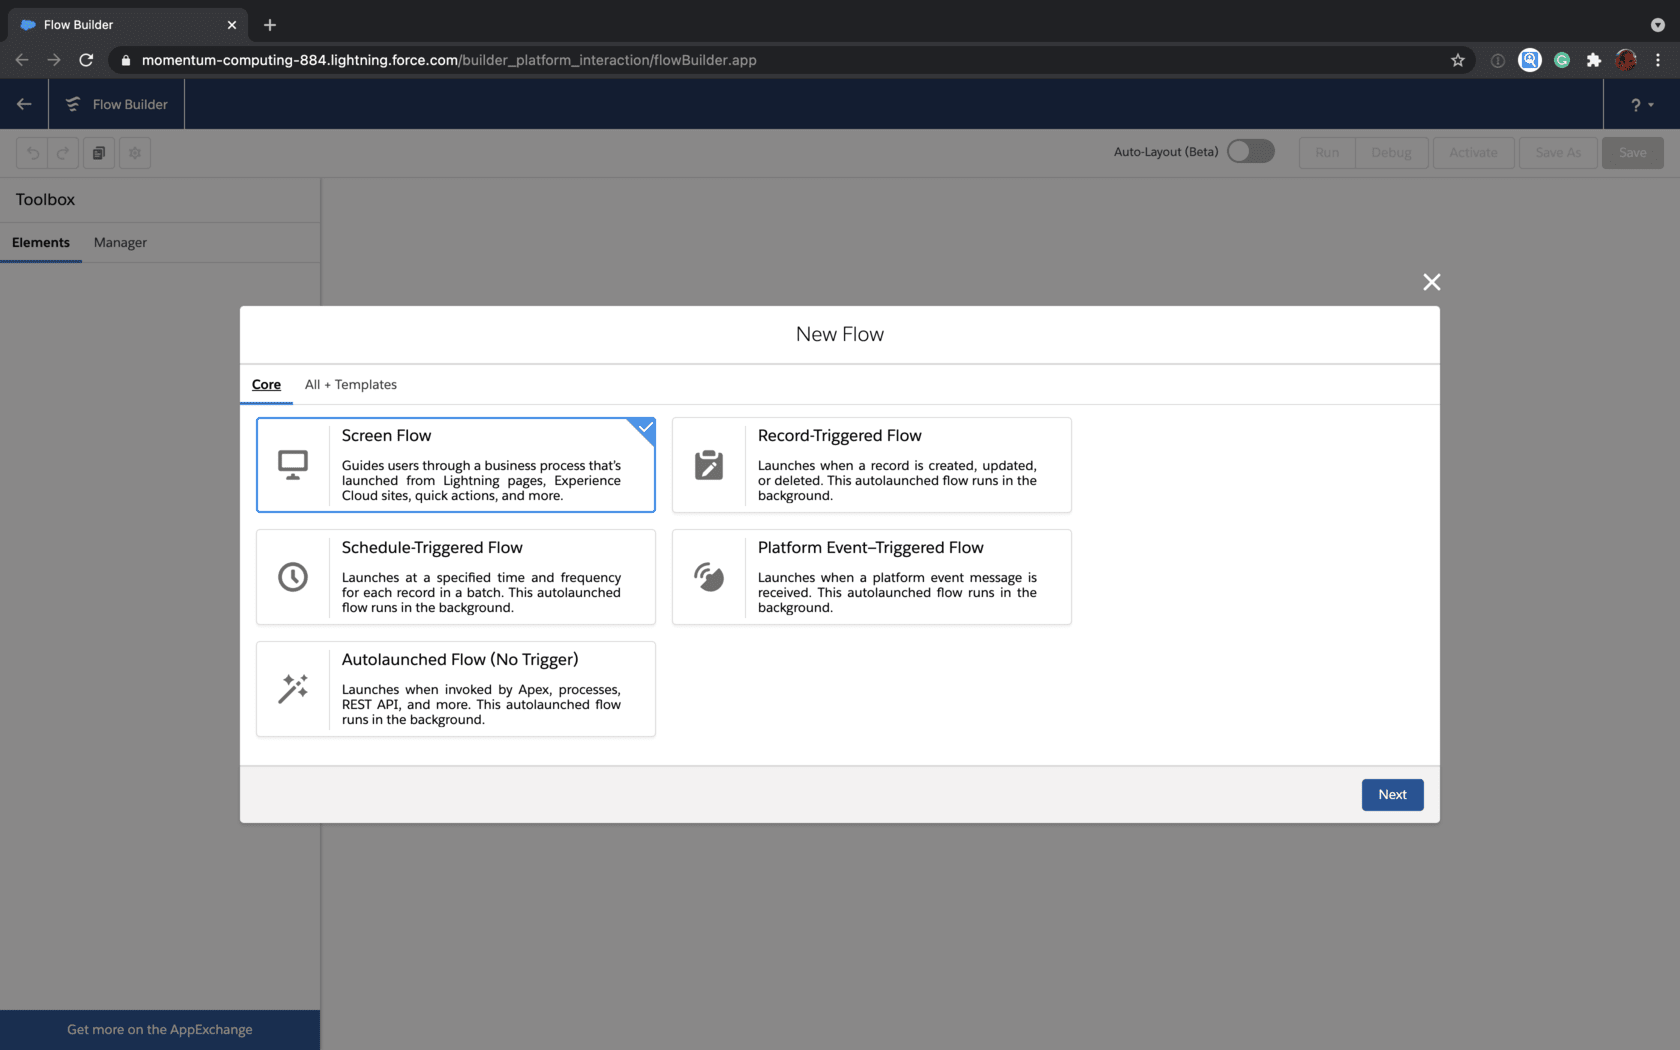
Click "New Flow" in the top right corner to get started.
Boom! you're immediately confronted with this screen. It's a lot to take in so let's break it down.
 Let's stay focused on the "Core" Flow types that you see listed and ignore the "All + Templates" tab for now. So what are these core types? For the most part, they have to do with how the Flow runs. Instead of covering them in the order they're presented on the screen, we'll cover them in the order you're likely to actually use them.
- Record-Triggered Flow - Let's face it, most of the time we want to kick off automation when a record changes: e.g. an Opportunity hits a certain stage or an Account is saved. That's what this type does. This kind of Flow is essentially the same as a Process Builder that starts when a record changes.
- Schedule-Triggered Flow - This kind of Flow works like a background job that kicks off at a particular time. Schedule-Triggered Flows are best for infrequent batch processes like a daily or weekly data cleanup.
- Screen Flow - This is where Flow got its start, so it ends up as the first option in the list. Screen Flows allow you to create interactive applications that your users can use where they answer questions, confirm data and generally do user stuff. This is definitely something you can't do in Process Builder but it's kind of an advanced use case. We'll cover Screen Flows in another set of posts.
- Autolaunched (No Trigger) - This type of Flow is intended to be launched by some other process. You can actually launch this kind of Flow from Process Builder, from other Flows and from Apex. It's similar to a Process Builder set up to start when "it's invoked by another process".
- Platform Event-Triggered Flow - Depending on your Salesforce edition you may not even see this one. This is very similar to the record-triggered Flow but it allows you to execute a Flow when a Salesforce Platform Event is received. You'll probably only need to worry about this type if you're working with a developer.
For now, select Record-Triggered Flow and click "Next".
The Flow Builder
Boom! Yet another screen! Now it's asking you "How do you want to start building?"
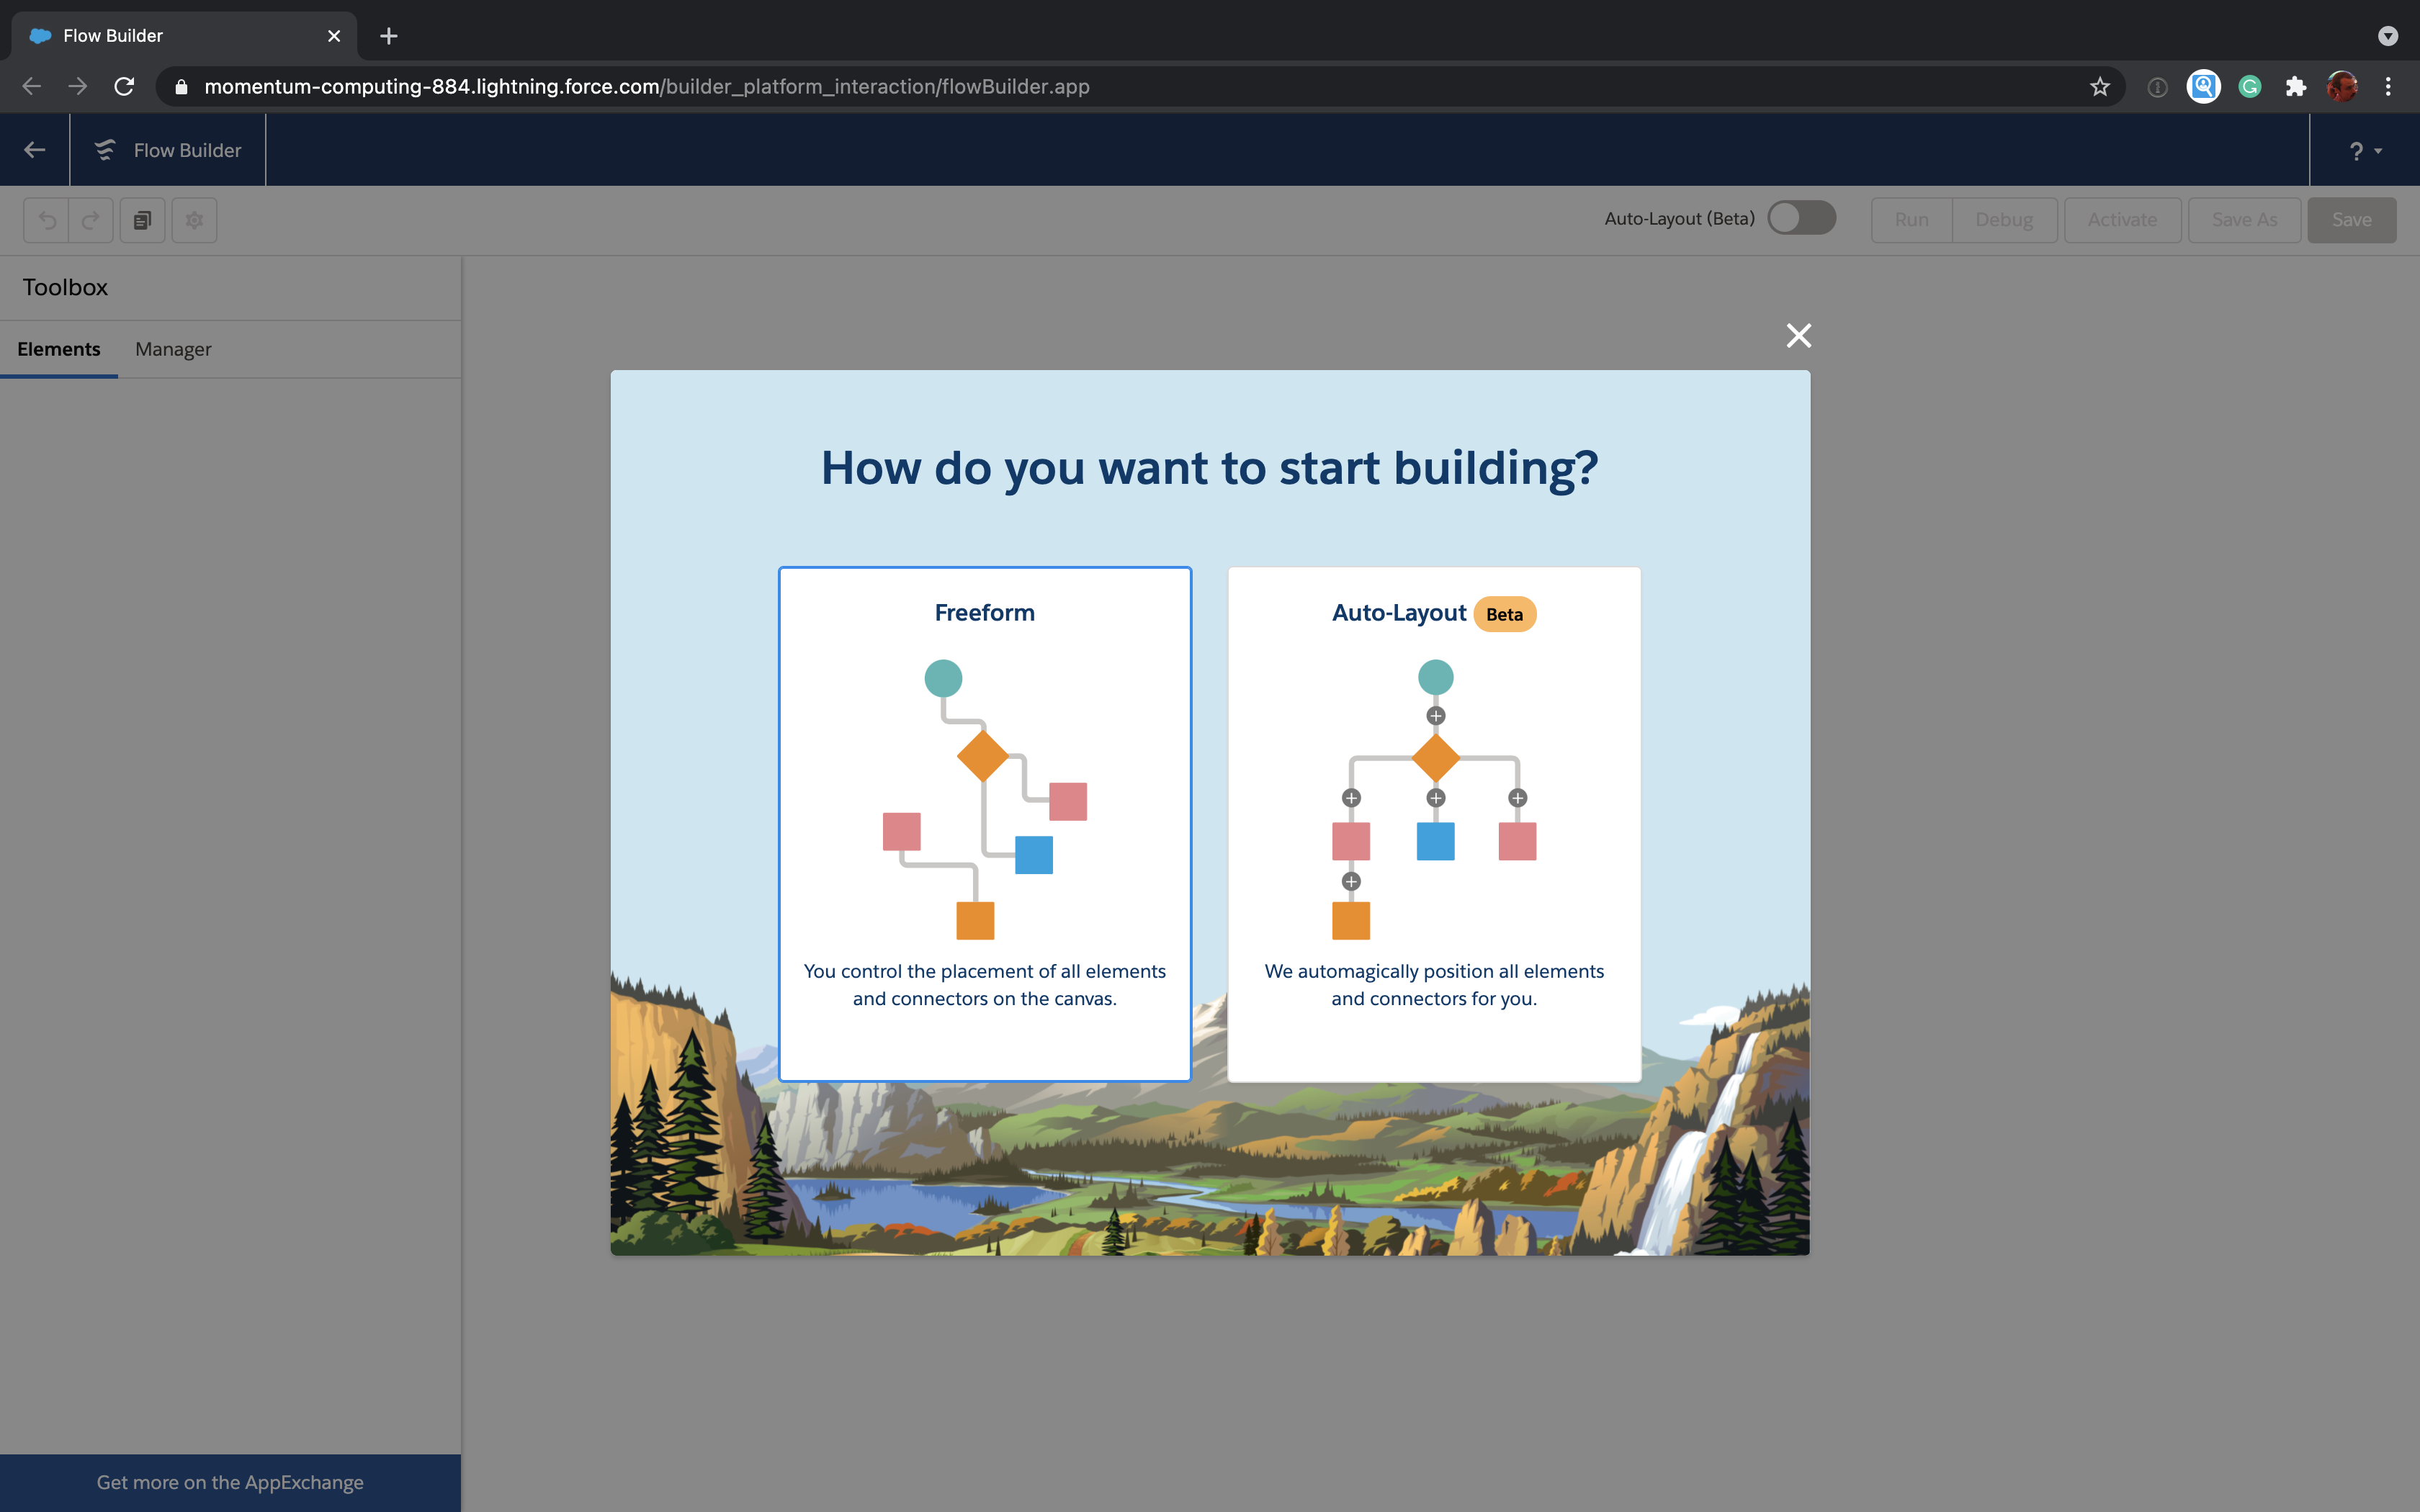 Since Salesforce makes you think about this up front, we'll tell you this up front. Building Flows is a lot like building a flowchart. You connect various steps and decisions together with lines to describe your process. If you've ever drawn out a flowchart by hand, you know they can get messy. It sure would be nice to have something keep everything nice and organized for you. Well that's what Auto-Layout does; it keeps everything organized. We recommend you use Auto-Layout but be aware that it's in Beta and there are still times when it can do some odd things.
For now, just click the "Auto-Layout" box and let's be on our way.
Ok, we've finally arrived at the Flow Builder. Let's have a look around.
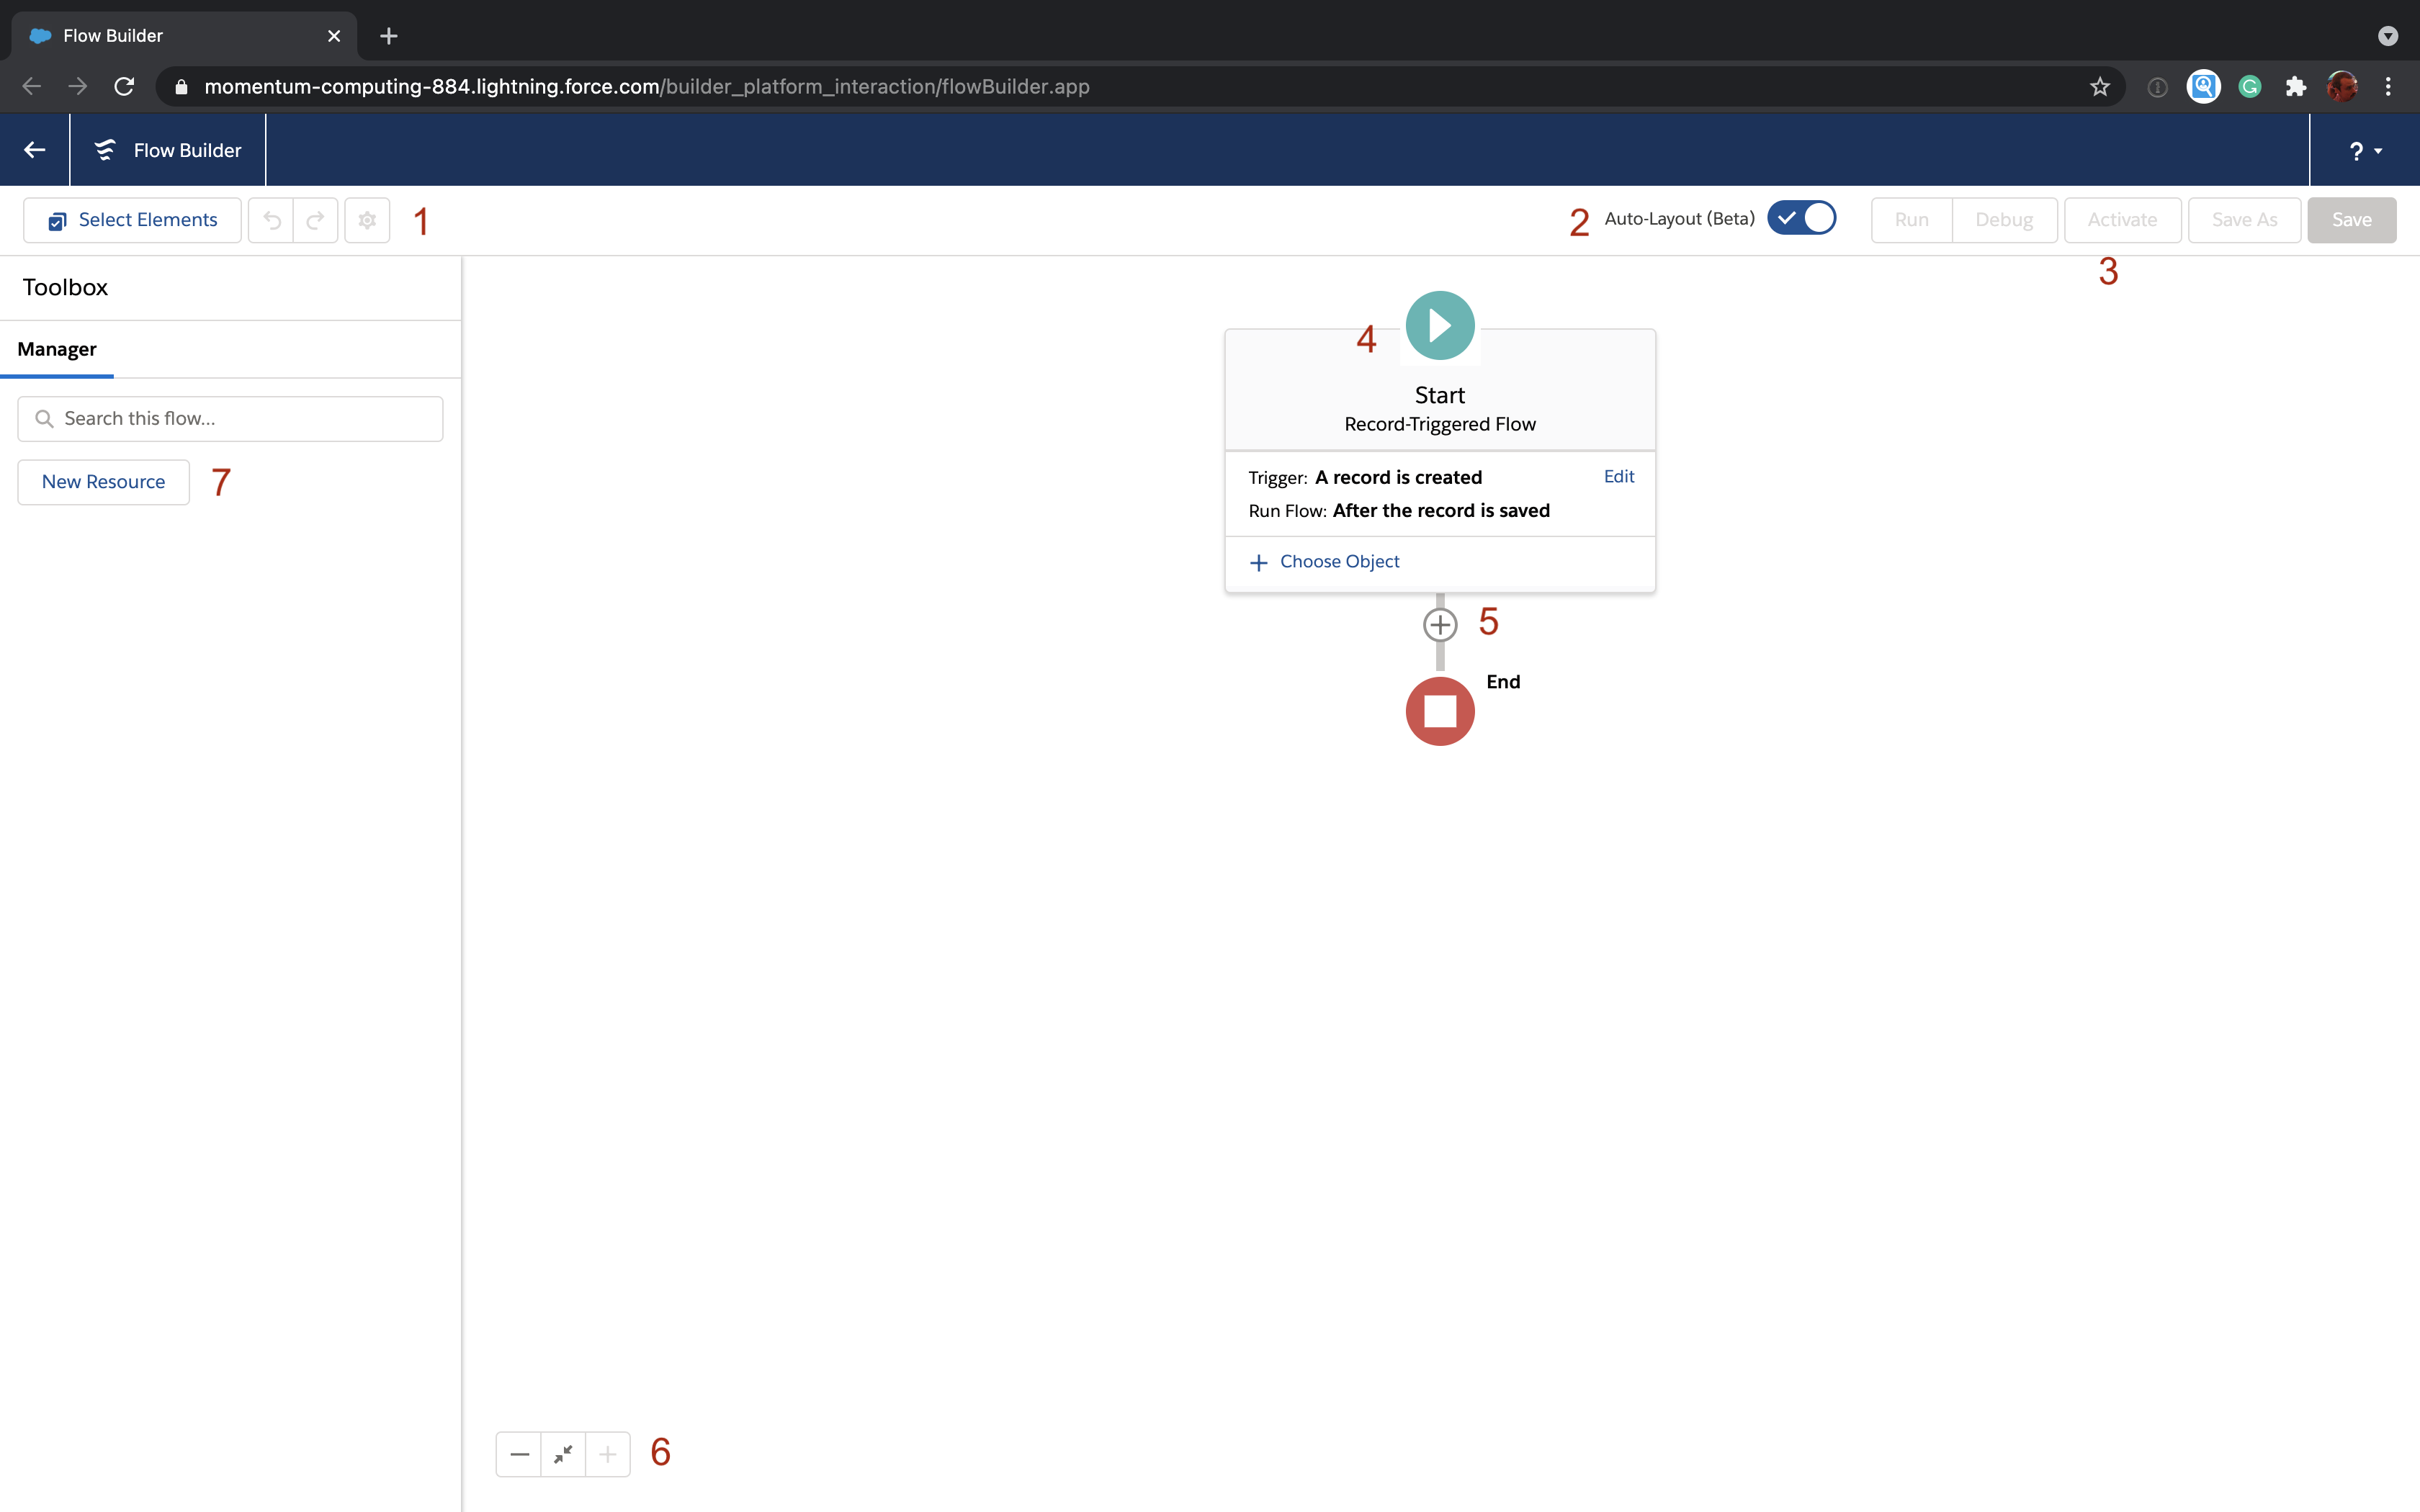
Let's break it down into three main sections:
- Toolbar - This is the strip of buttons going across the top. On the left you have some controls [1] that let you select, copy, paste and get to some settings. On the right you have a toggle to turn off Auto-Layout [2] and buttons [3] that you'll use to test your flow, save it for later and activate it.
- Canvas - This is where all the dragging and dropping and editing takes place. You'll see there's already a start element [4]. There's also a + button in a circle [5]. You click that to add new elements. But wait, what's an element? For now, just think of it as a "step" in your Flow. We'll get into more detail later. The little buttons down at the bottom left [6]? Those let you zoom in and out of the canvas as your Flow gets bigger.

The anatomy of a Flow
Before we actually build anything, let's talk about the two main components of any Flow: elements and resources.
Elements
Elements are "steps" in your Flow. They tell the Flow to do something. It could be to get a record that meets some criteria (the Get Record element), set the value of a field (Assignment) or even send a chatter message (one of many available Action elements).
There are also a couple of special elements that don't just tell the Flow what to do in that step, they tell it which steps to do next. These are decisions (if something is true, do these steps, if false, do these other steps) and loops (do some set of steps for each thing in a list).
Resources
Resources are things your Flow uses to get the job done. This is probably where a Flow most feels like programming. You can actually use resources to define custom variables, use formulas or even do complicated things in UIs. It's a lot.
Build a Flow
Now that you're in the Flow Builder, we might as well build a Flow to show how it all works.
Suppose your demand generation team uses their marketing automation software to sync leads to Salesforce. One of the fields that marketing requires is the number of employees. Your BDR team wants to jump on these inbounds quickly and has asked that you flag any lead with 100 or more employees with a rating of Hot. Since time is of the essence on an inbound lead, you want to automate this process. Let's do it with Flow.
There are 3 steps here:
- Configure our Start element to make sure we're dealing with only Leads that have at least 100 employees and aren't already set to Hot
- Set the Rating field on the Lead record to Hot
- Update the Lead record
Configure the start element
First of all we want to make sure that we run this Flow whenever a record is created or updated. To do that, we click "Edit" on the start element, bringing up this dialog.
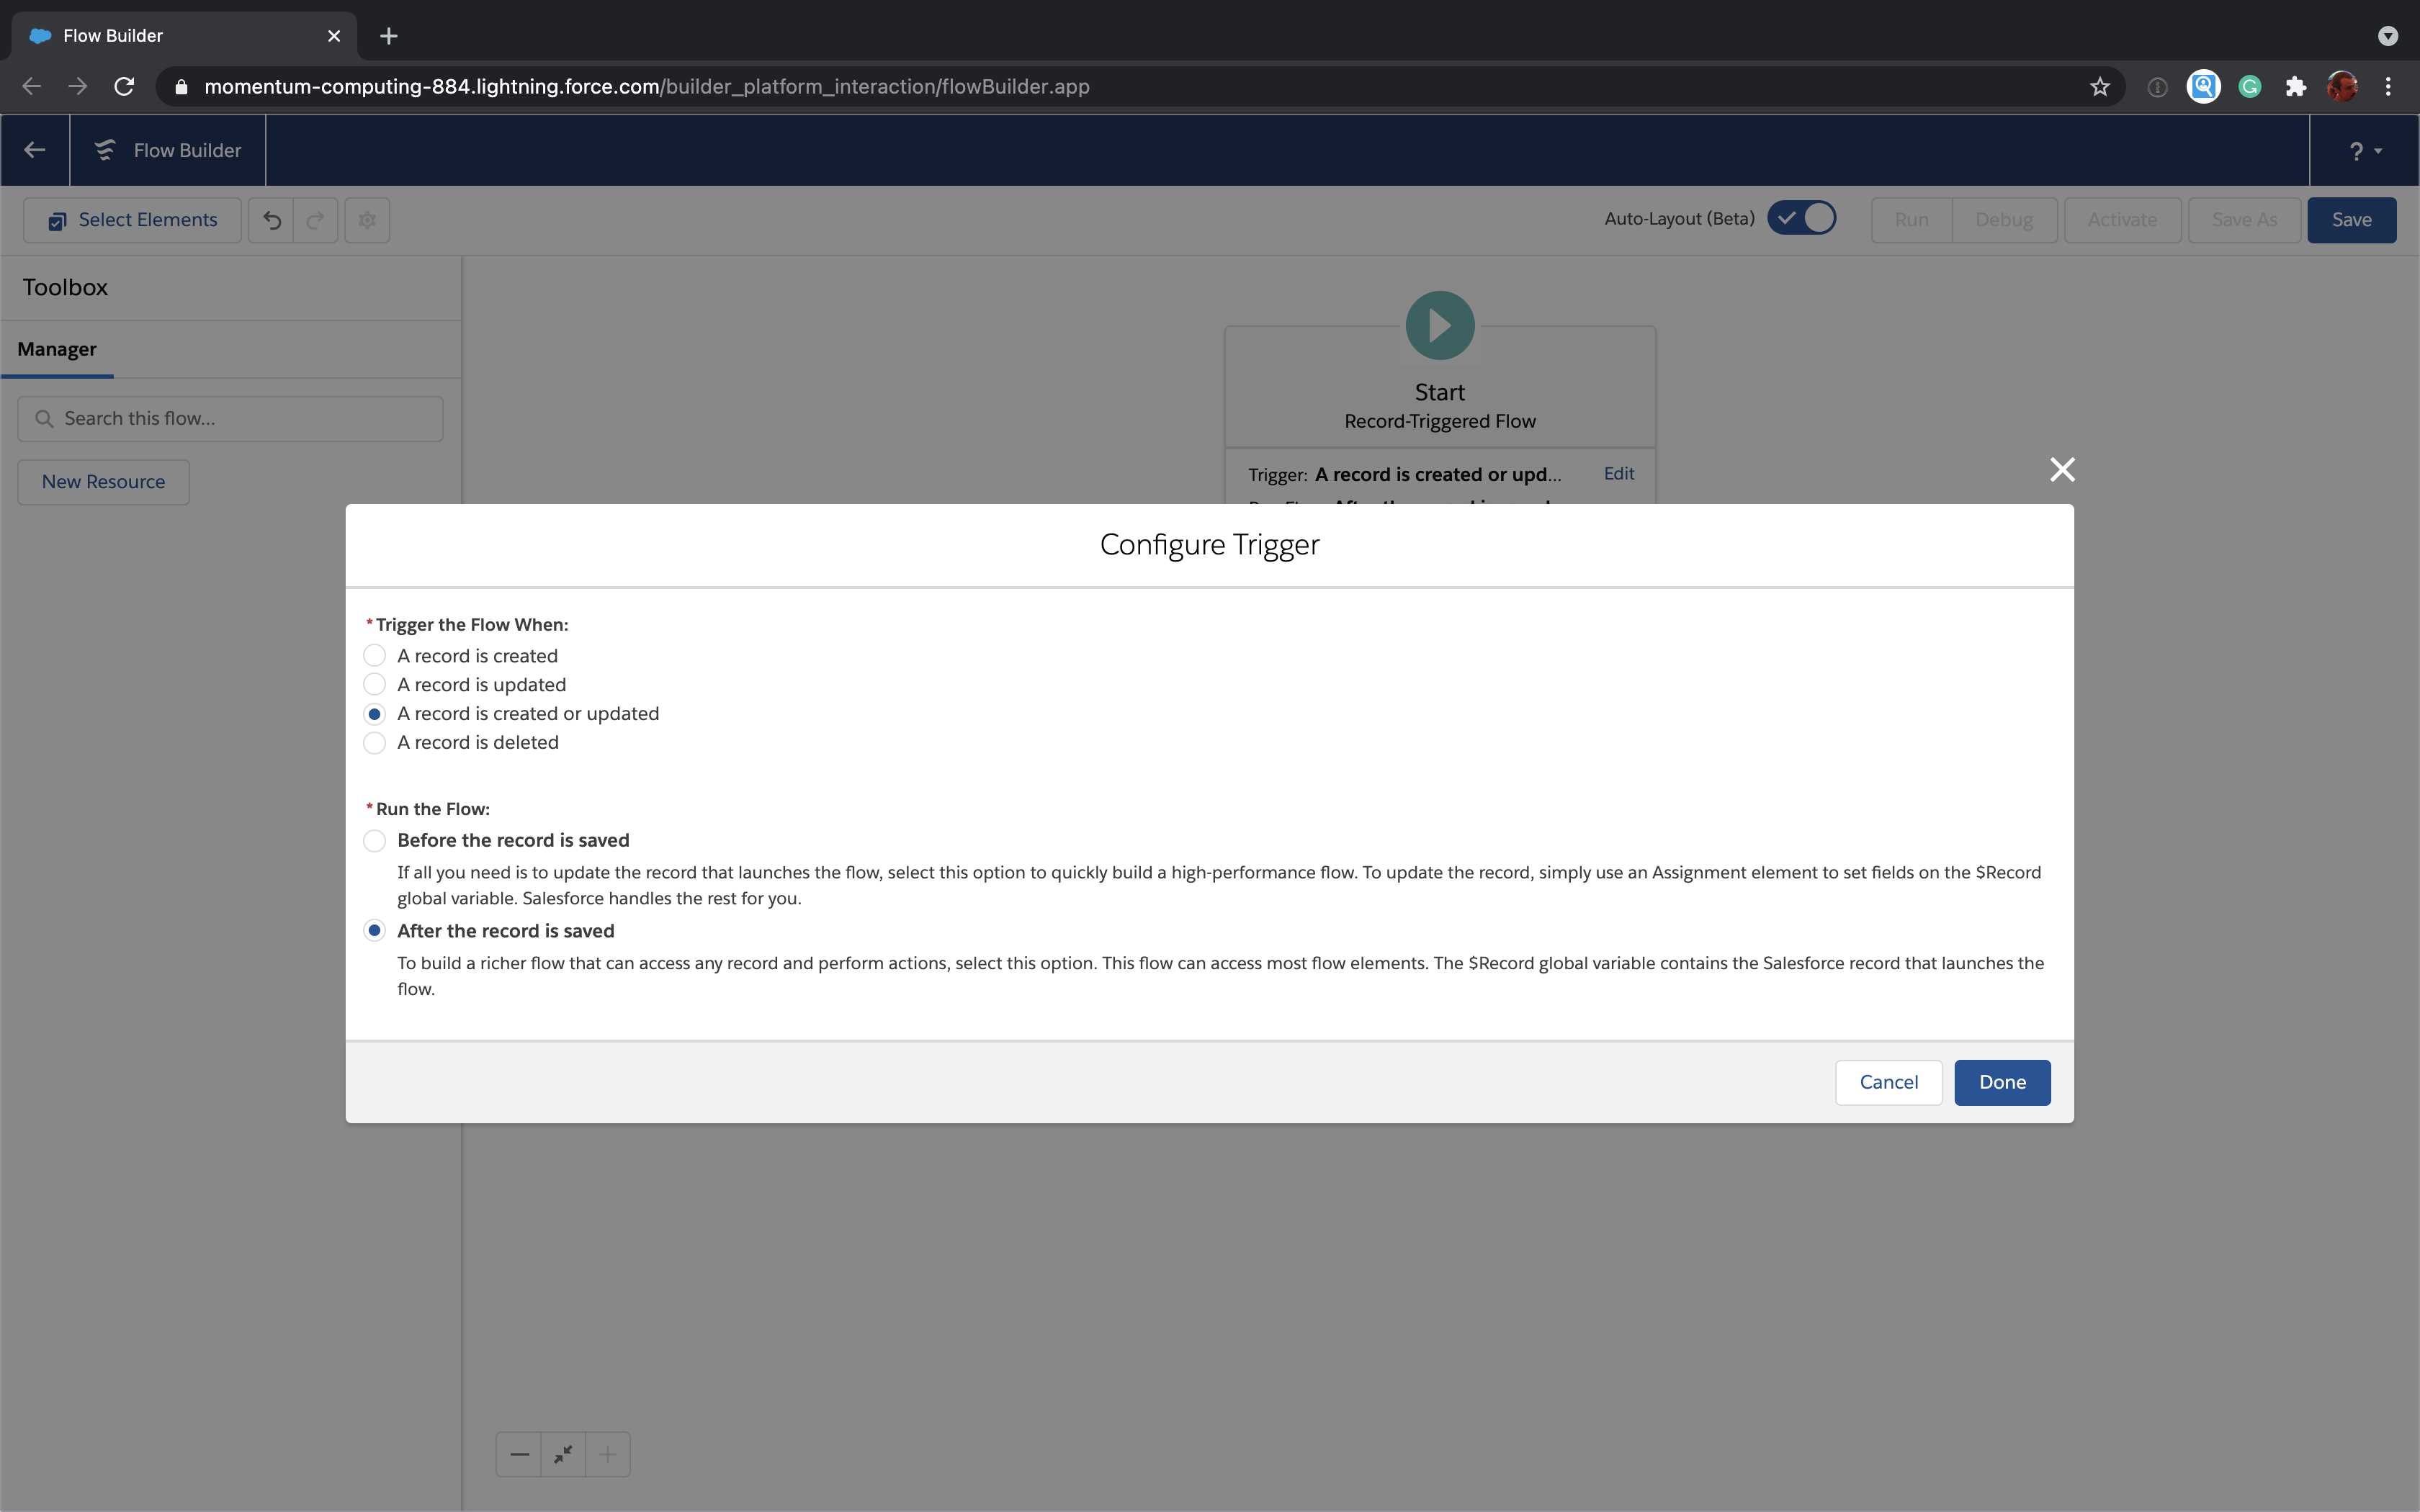 Make sure to select "A record is created or updated". This means we'll run this Flow every single time the record changes. Click "Done".
Next, we need to choose the Object. Click the 2nd "Edit" link on the start element.
You'll be asked to choose an Object. Select Lead and then you'll see this screen.
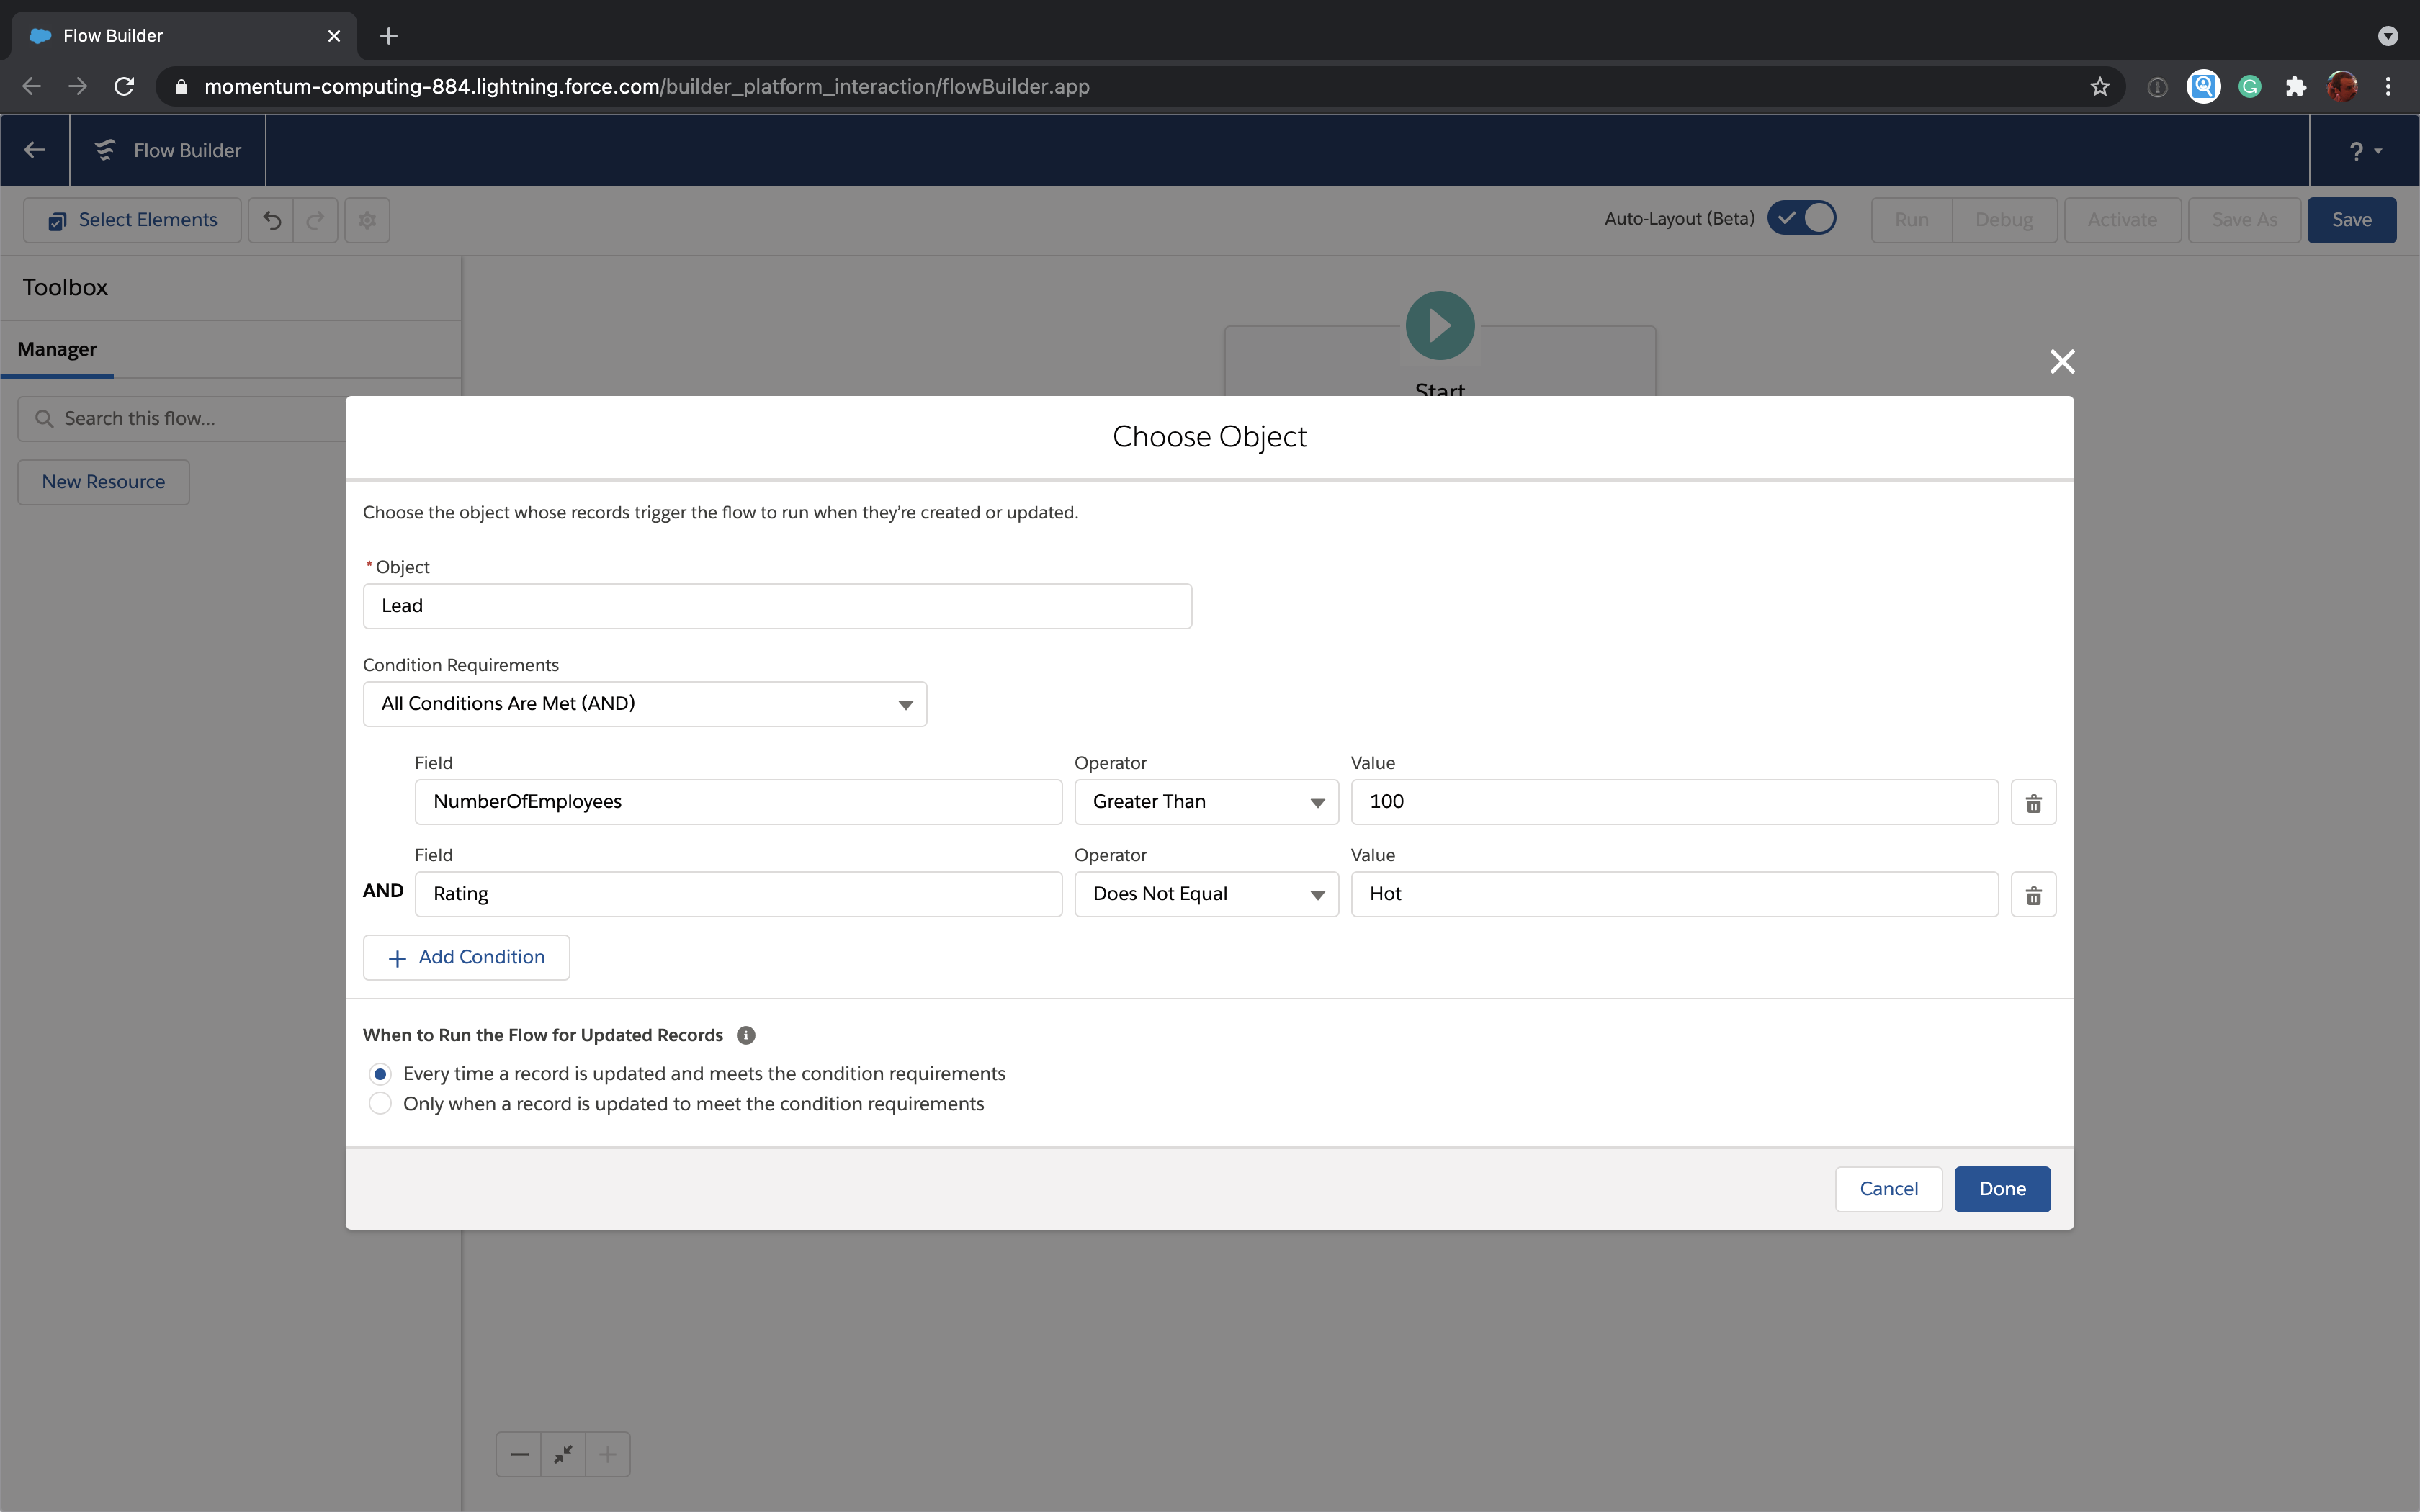 We know we only want this to run when the number of employees on the lead is greater than or equal to 100 so we add that criteria. We also know that we want to change the rating to Hot so we also want to run this when the Rating isn't already set to Hot.
Ignore the "when to Run the Flow for Updated Records" section for now and click "Done".
Awesome, now we're only going to start the Flow for Leads that have 100 or more employees and aren't rated Hot.
Set the rating
Click the + just under the Start element and select "Assignment" from the list.
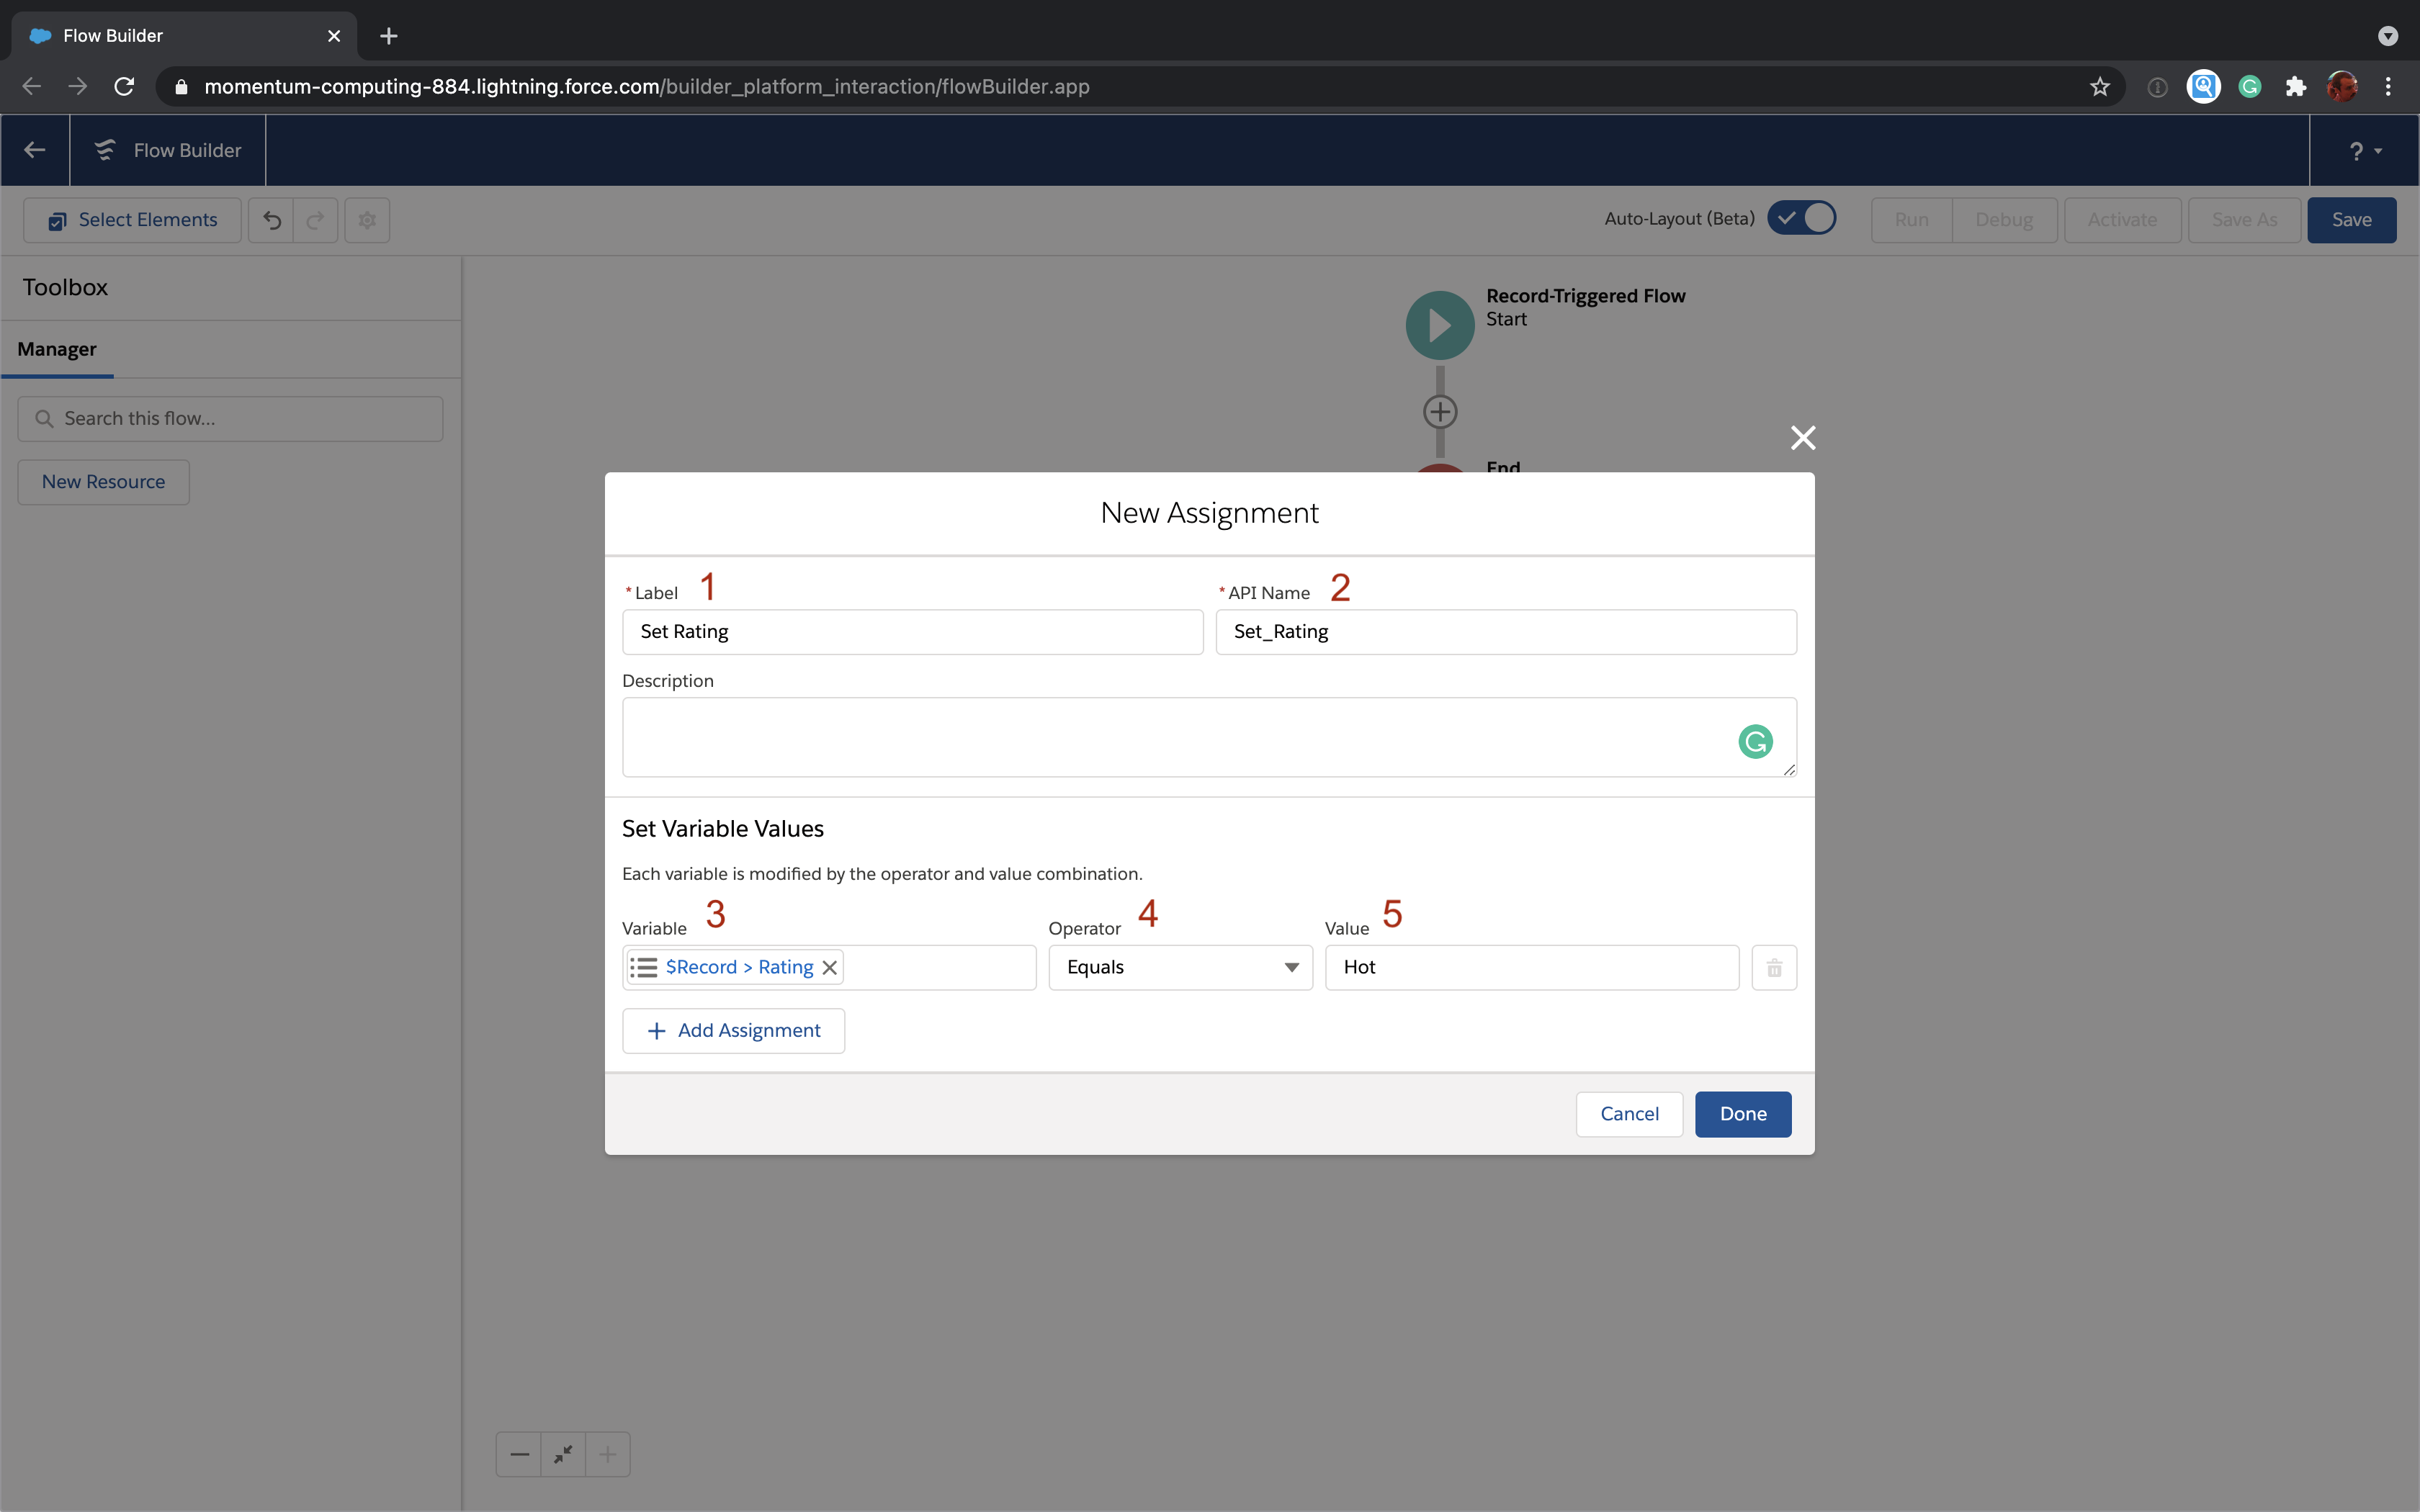 Every element needs a label [1] and an API Name [2]. We set them to "Set Rating" and "Set_Rating", respectively. Note that API Names can't contain spaces.
Now we need to set the Rating field on the Lead. To do that we click into the Variable [3] field. Flow gives the object that triggered the Flow a special name, $Record. Start typing $Record, select it in the dropdown, then look for Rating and select it. Leave the operator [4] as "Equals" and set the value [5] to "Hot". This works pretty well as a sentence: "Set the Rating field on $Record (the Lead) equal to Hot".
Click "Done".
Update the lead
We've changed the Rating value to Hot but we haven't actually saved the Lead yet; that takes one more step. Click the + below the newly added "Set Rating" element. Scroll down and choose "Update Records".
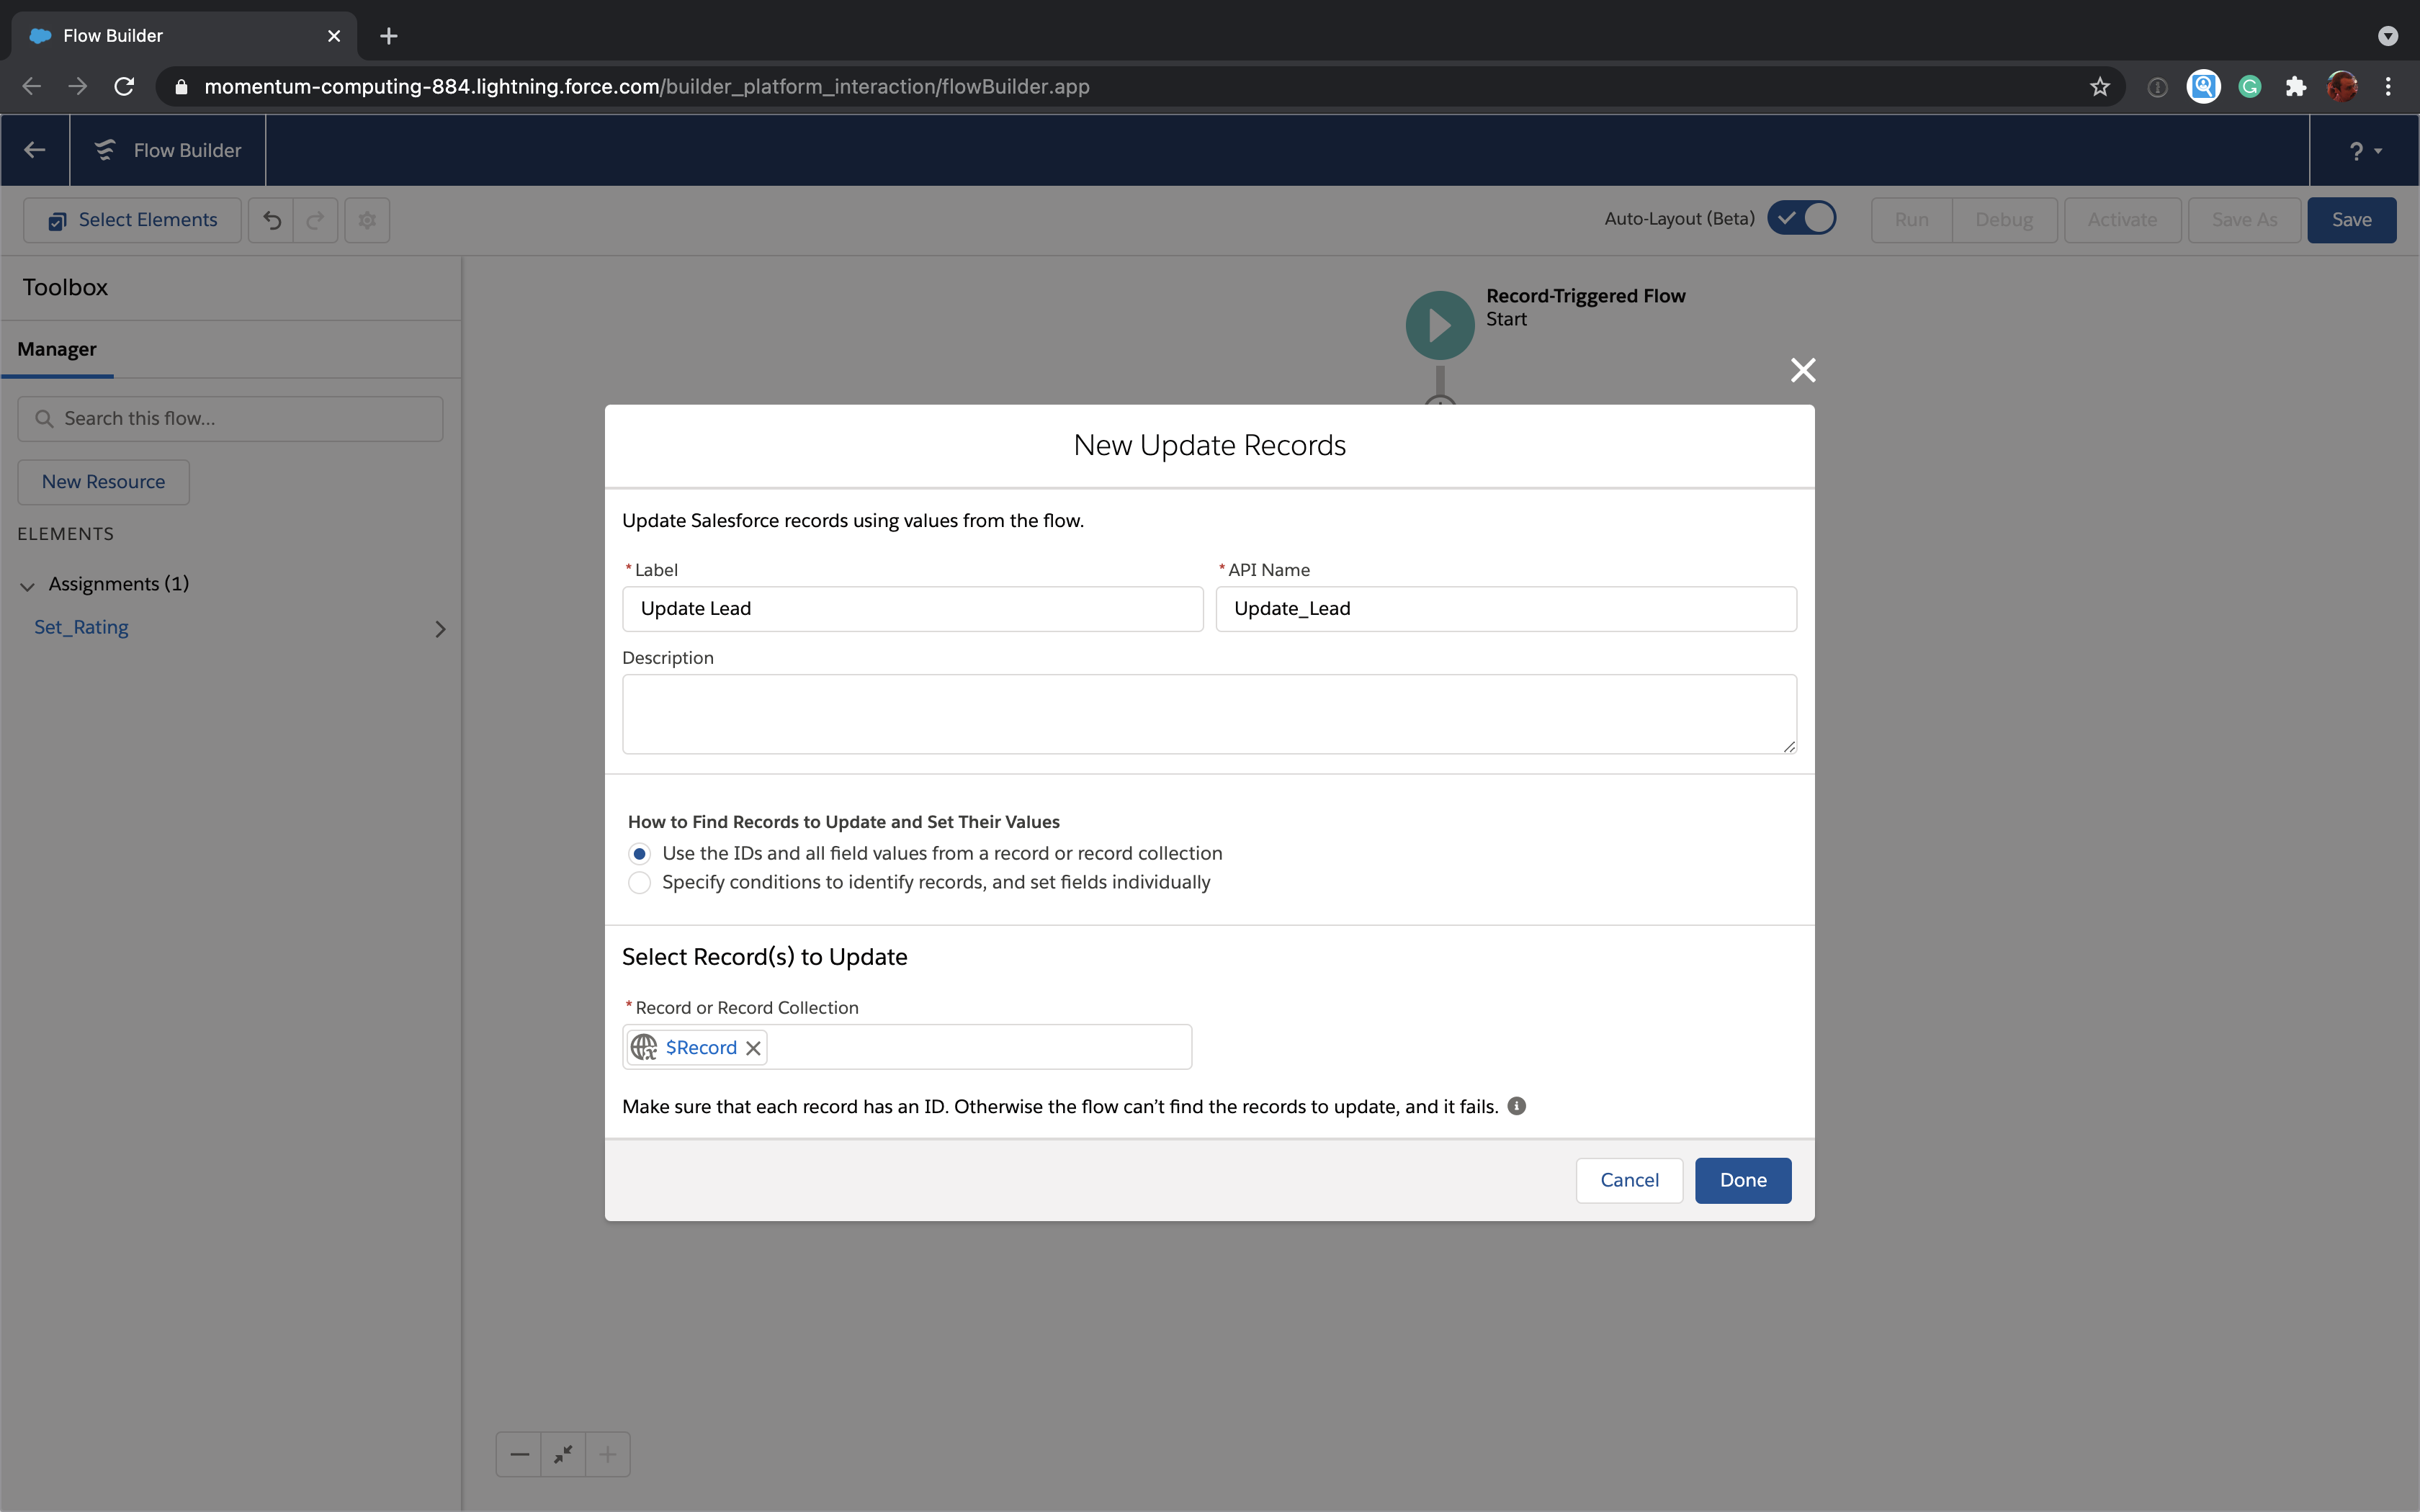
We've got the Label and API Name again. Call them something sensible like "Update Lead" and "Update_Lead".
Leave the default selected for "How to Find Records to Update and Set Their Values". This is a powerful option we'll discuss another day.
The key thing here is to tell Flow your want to save our Lead. Remember, this is called $Record which is what you want to put in the "Record or Record Collection" field so Flow knows what to save.
Click "Done".
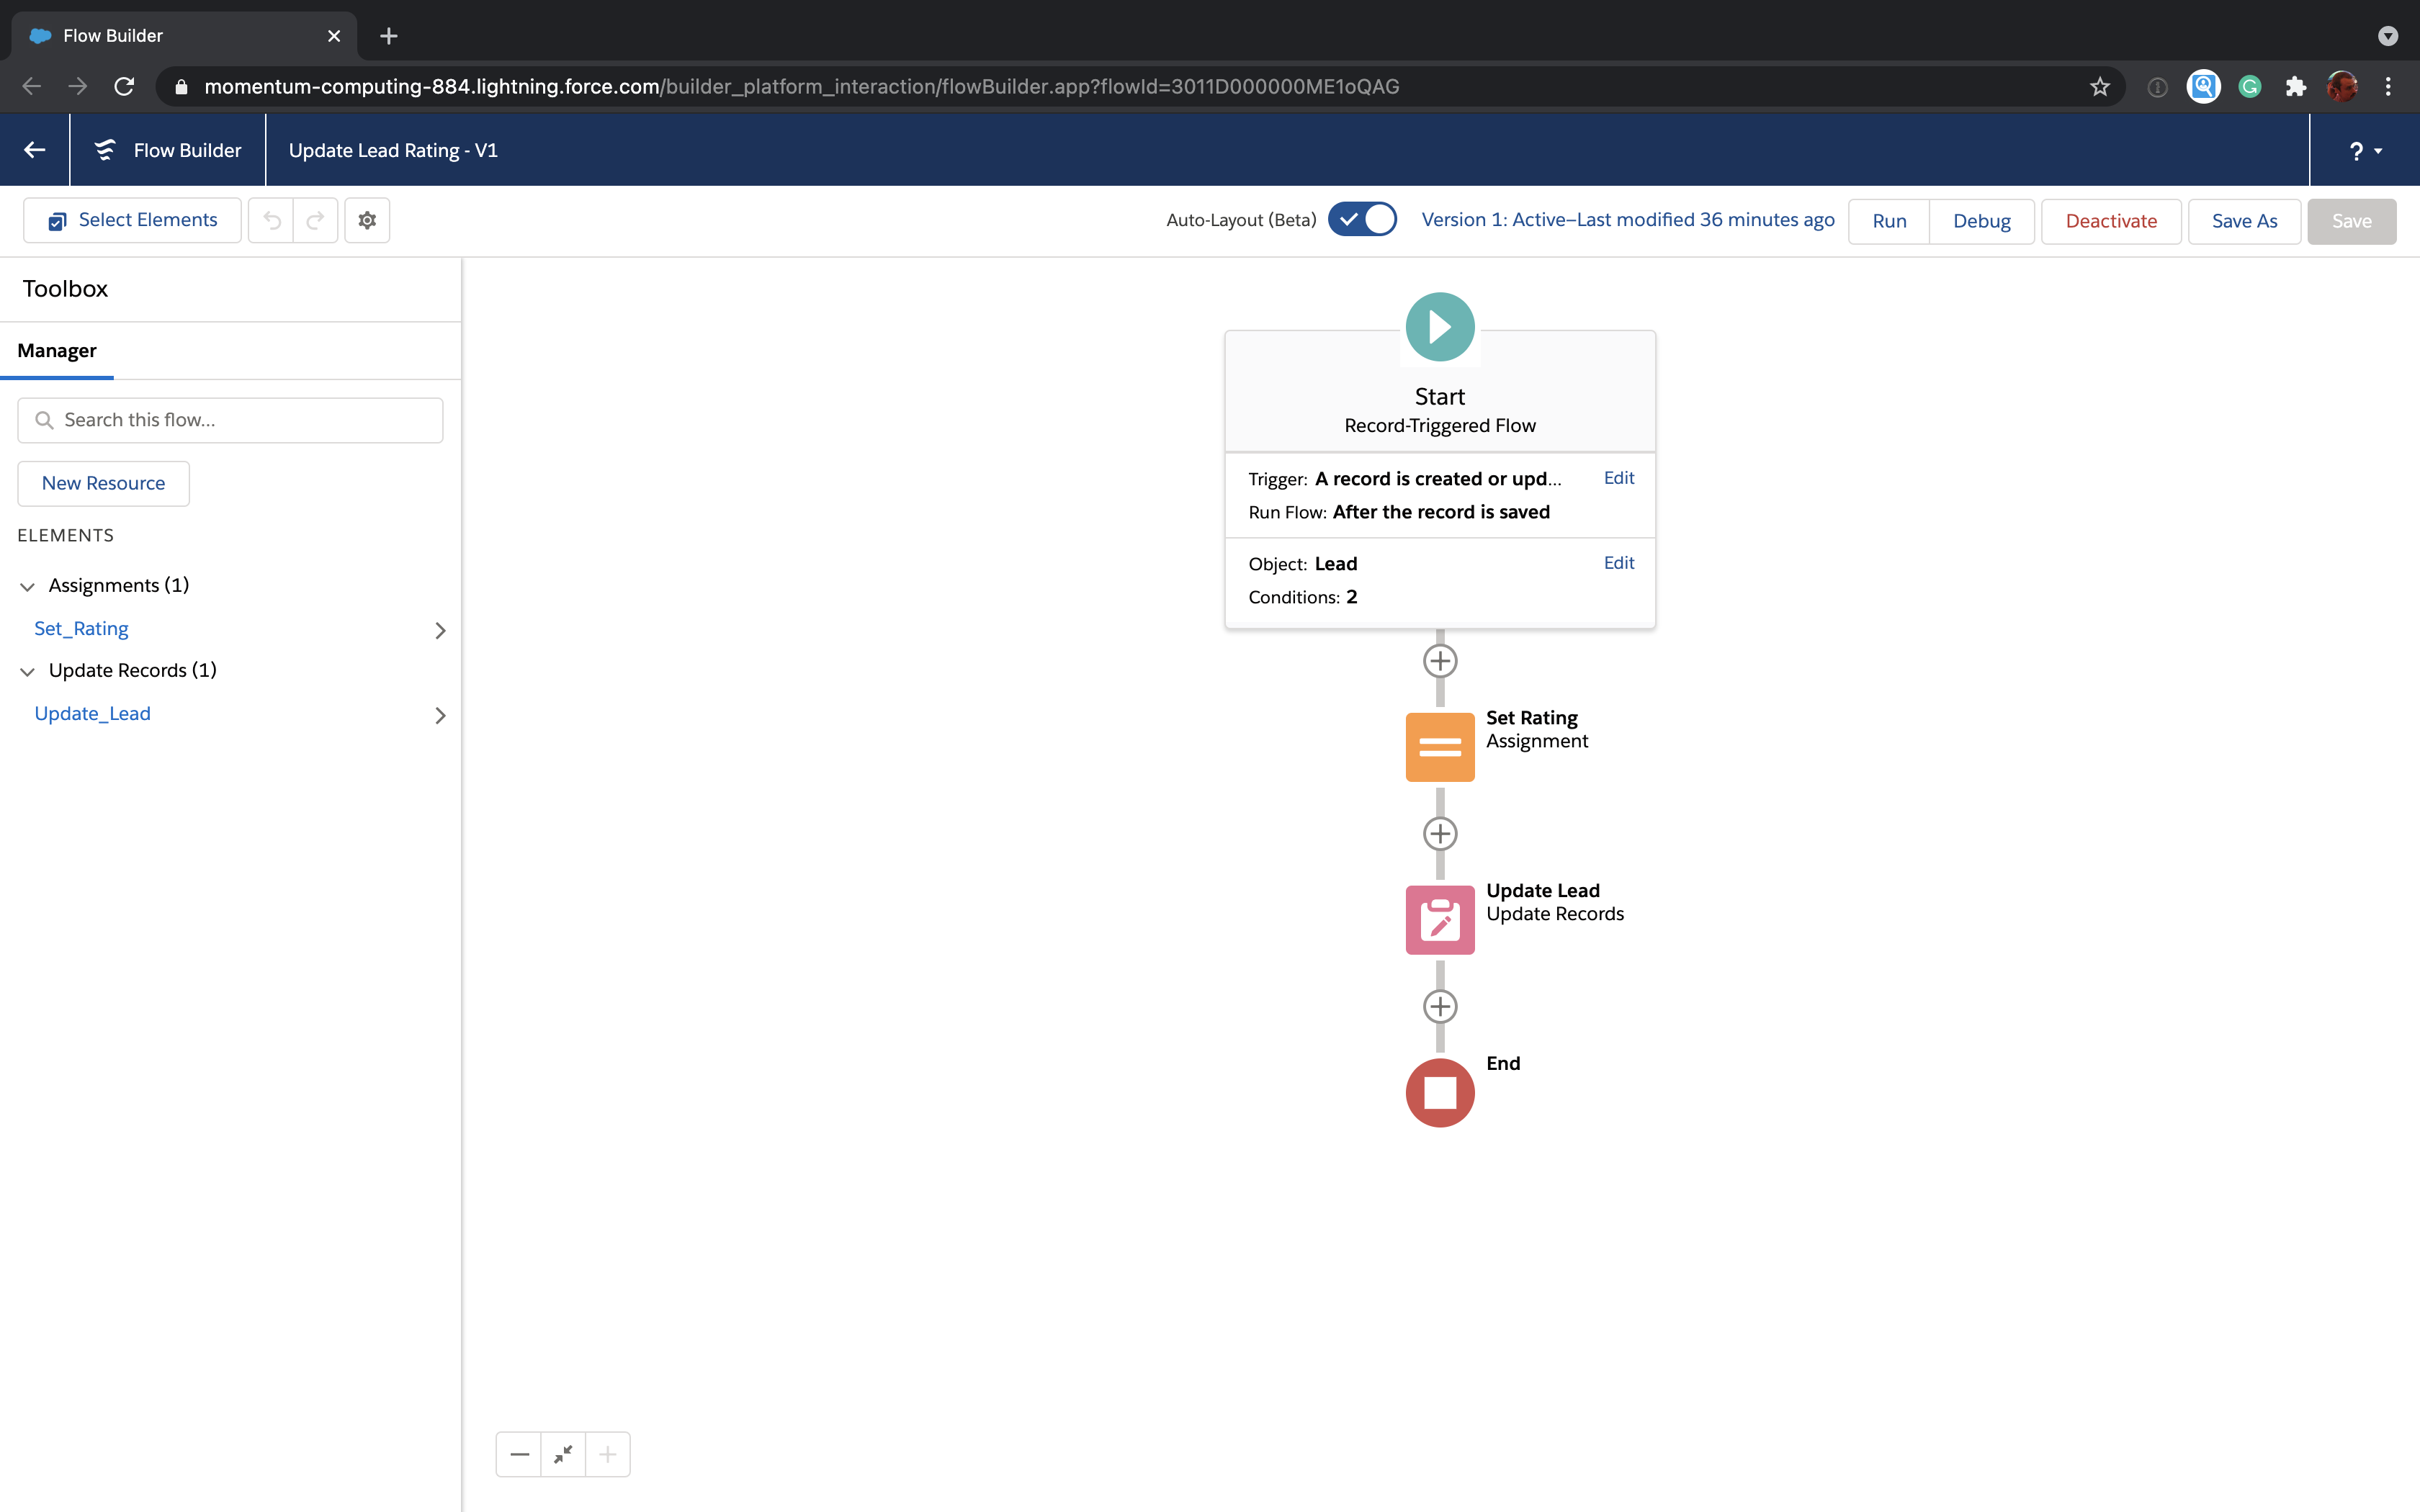
Save and activate
Click the "Save" button at the top right of the Flow Builder. When prompted, set the Flow Label to "Update Lead Rating" and "Flow API Name" to "Update_Lead_Rating". It's also a good idea to enter a description so you'll know what you did. Click "Save".
A word of warning: if you do the next step in production, your Flow will be live for all Leads.
Once saving is complete, click "Activate". Congratulations, your Flow is now Active. Here's what it should look like.
 Test it out
Go find yourself an existing Lead or create a new one. Set the Number of Employees to 100 or more and save. If the Lead didn't already have a Rating of "Hot", it will now. Pretty cool, right?
Where to go from here
First, here's an exercise for the reader. Our example makes it impossible to update a Lead that has at least 100 employees to any other rating besides Hot. Think about how you might change that.
Second, we've only scratched the surface of what's possible with Flow. Our example only used one flow type ("Record-Triggered"), two elements ("Assignment" and "Update Records") and we didn't didn't even use resources at all. There's a lot more to learn. Take a look at our posts about using Flow variables, Flow formulas and Flow loops. Salesforce also provides some solid trailhead content.
Happy Flowing.