This post explains the basics of an under-documented feature of custom Flow actions: Custom Property Editors (CPEs). These allow you to create a tailored user experience for admins who build Flows using your custom actions.
One of the great things about Salesforce Flow is that you can extend it with custom code that makes it even more powerful. This is how Gradient Works turns Flow into a powerful matching, routing and assignment workflow engine. So let's talk about how you can build Custom Property Editors for more powerful workflows.
Custom Property Editors are Lightning Web Components (LWCs) that you can associate with your custom invocable actions that use Apex (you can also create custom screen component editors, but that's a post for another day). Whenever an admin uses your custom action, the Flow Builder will display your component instead of the standard editor. This gives you a tremendous amount of control to create a great admin user experience.
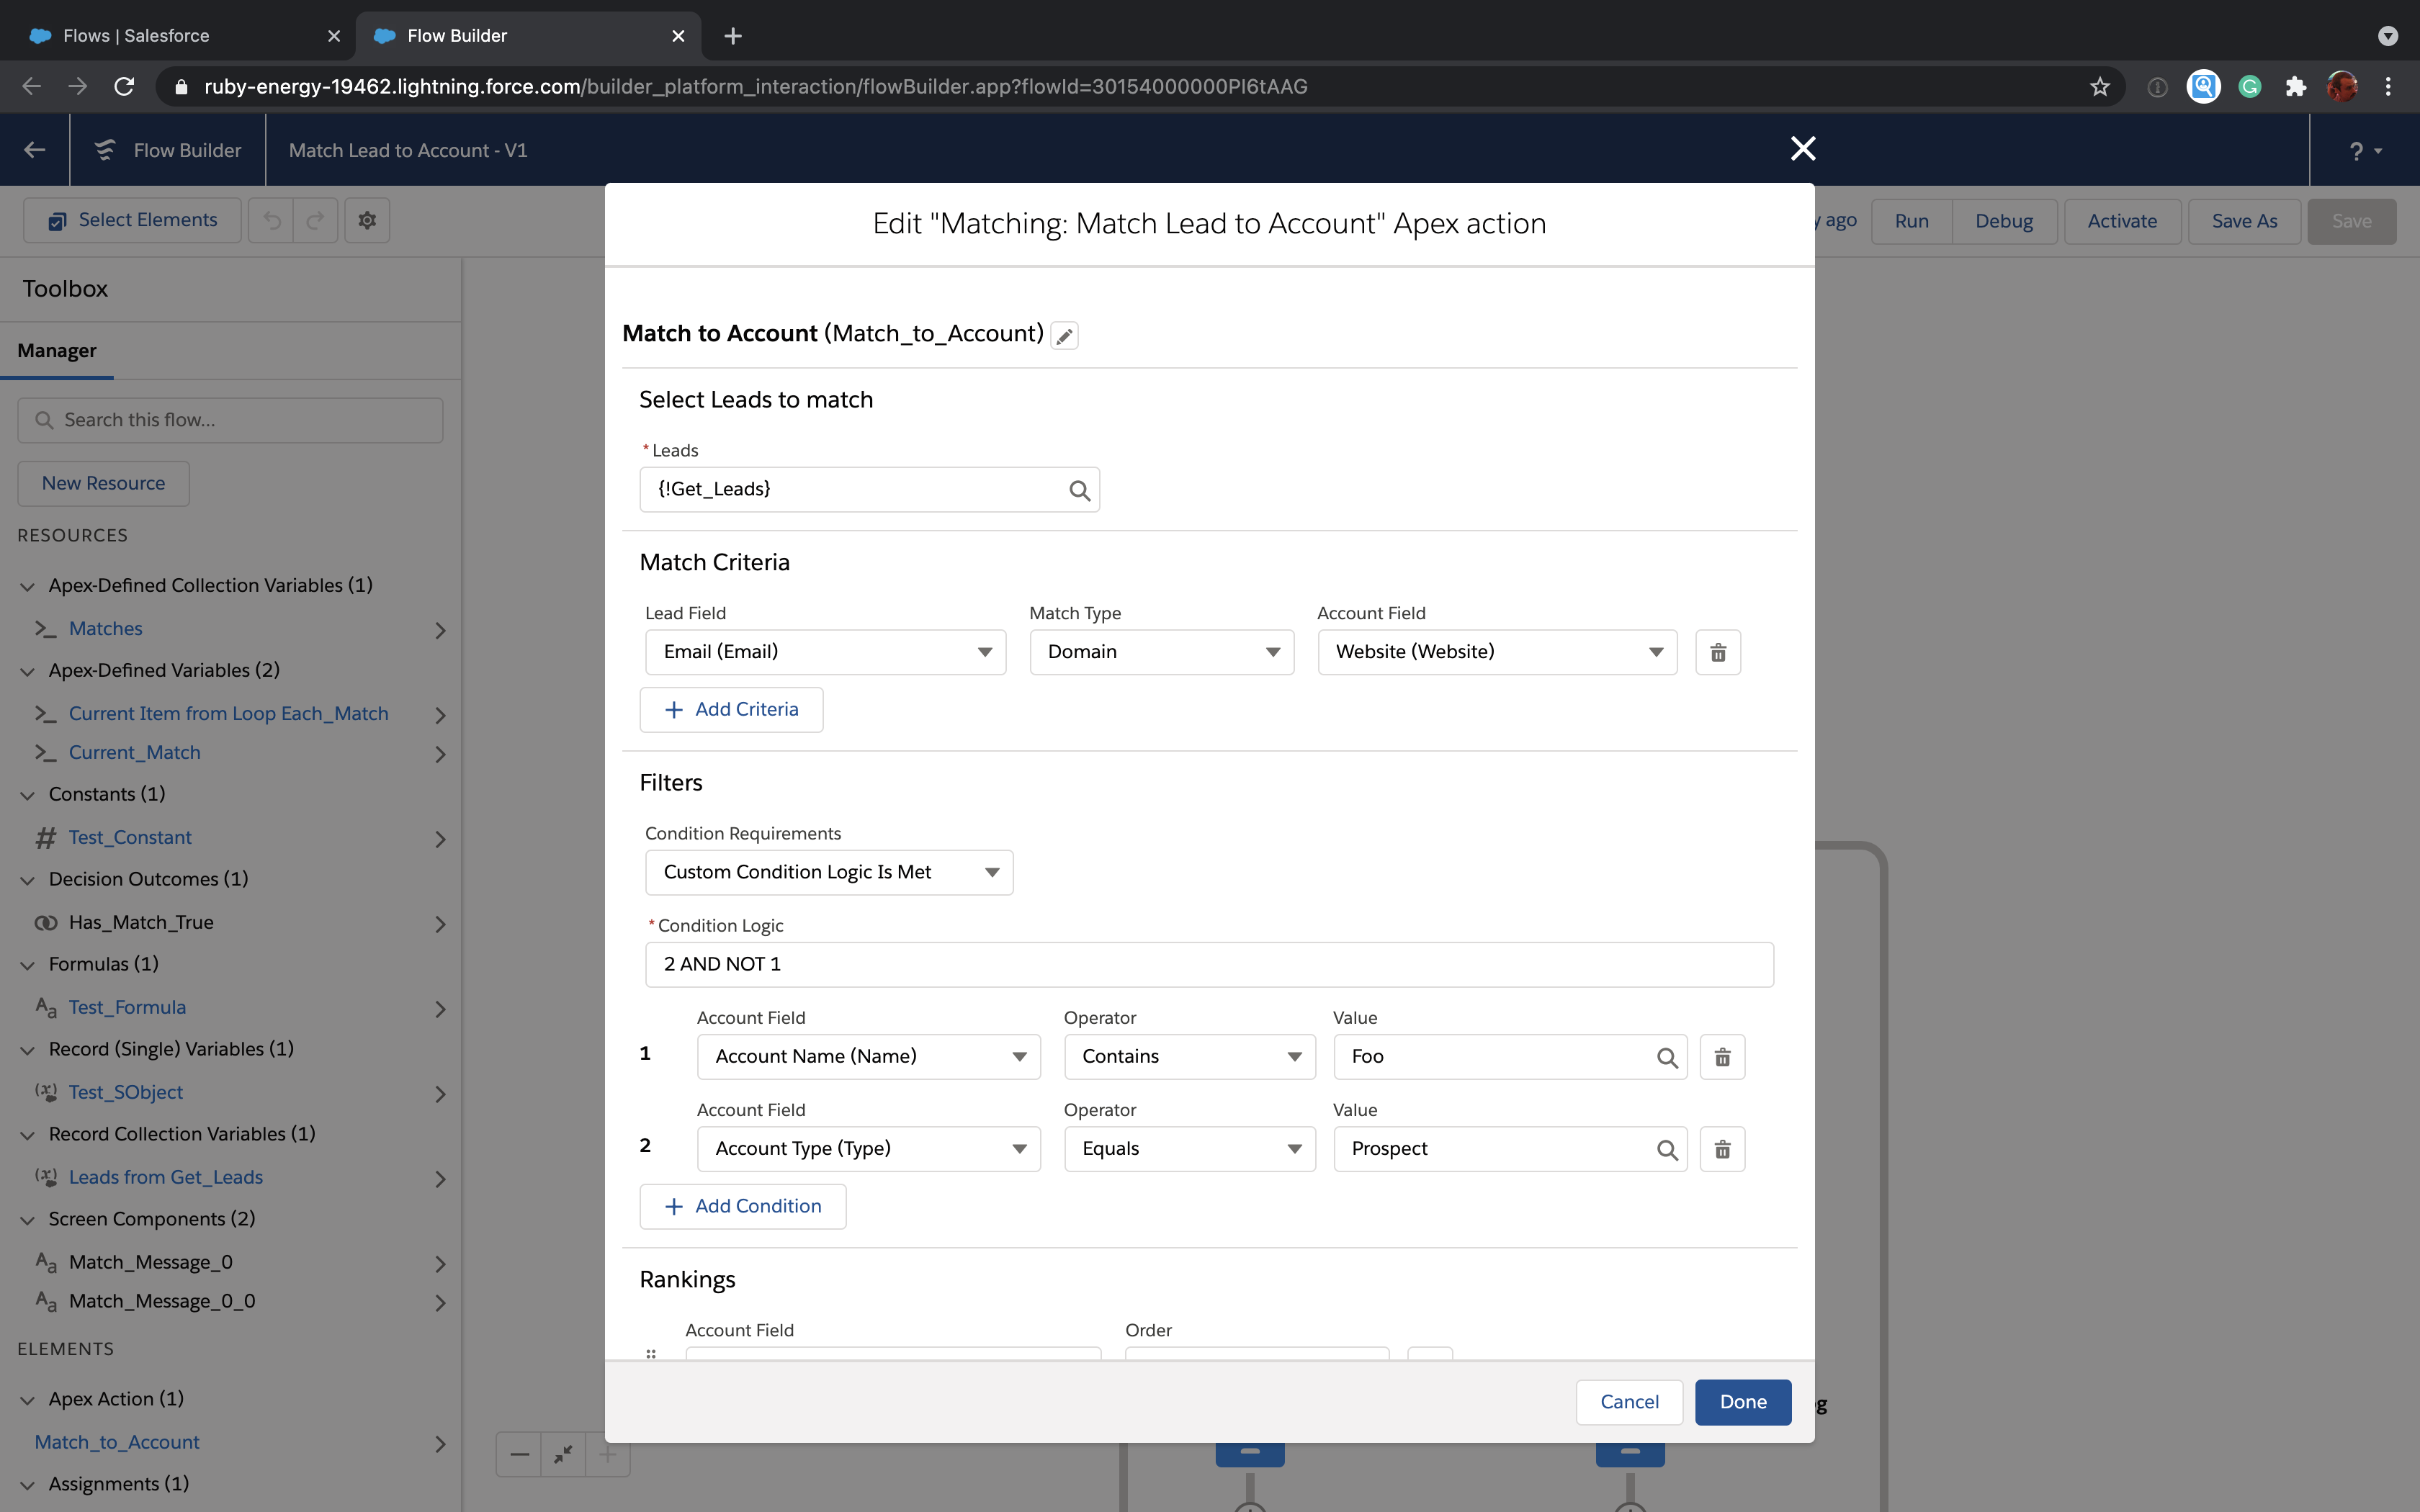
You can make these editors as sophisticated as you want. For example, here's the editor for the lead-to-account matching Flow action in Gradient Works:
To implement these components, you use a mix of basic LWC and a specialized javascript interface. The official Salesforce documentation on CPEs discusses the specialized interface at a high level but then links to the Flow Metadata API for many details, seeming to assume you'll somehow connect the dots. In our experience, the javascript data doesn't really match the Metadata API so you're left to figure it out by trial and error.
This post is an effort to clarify the things you need to do to turn an Apex action into a full-fledged Flow citizen. We're assuming you've got a working knowledge of Apex and LWC. If you don't, you might want to consult some other resources first.
Here's what's on the agenda:
- Introducing an example action
- Connecting the CPE
- Reading input variables to set up your CPE UI
- Notifying the Flow Builder when users change things
- Validating user input
One last thing before we get started; you can find all the code in this post on GitHub.
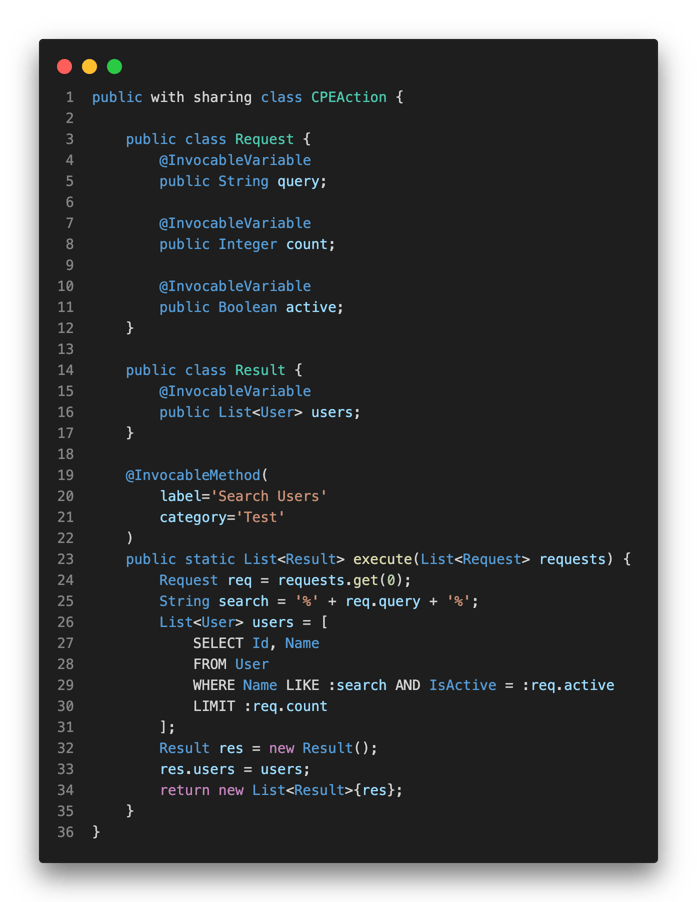
An example action
For our example here, we're going to create a simple custom action that searches users and returns a list of users that match the query. It has three inputs:
- Query - The search query to use to retrieve users
- Count - The maximum number of results to return
- Active - When true, search only active users, when false search inactive users
Here's the Apex code:
If the above doesn't look familiar to you at all, you should take a look at some of these resources.
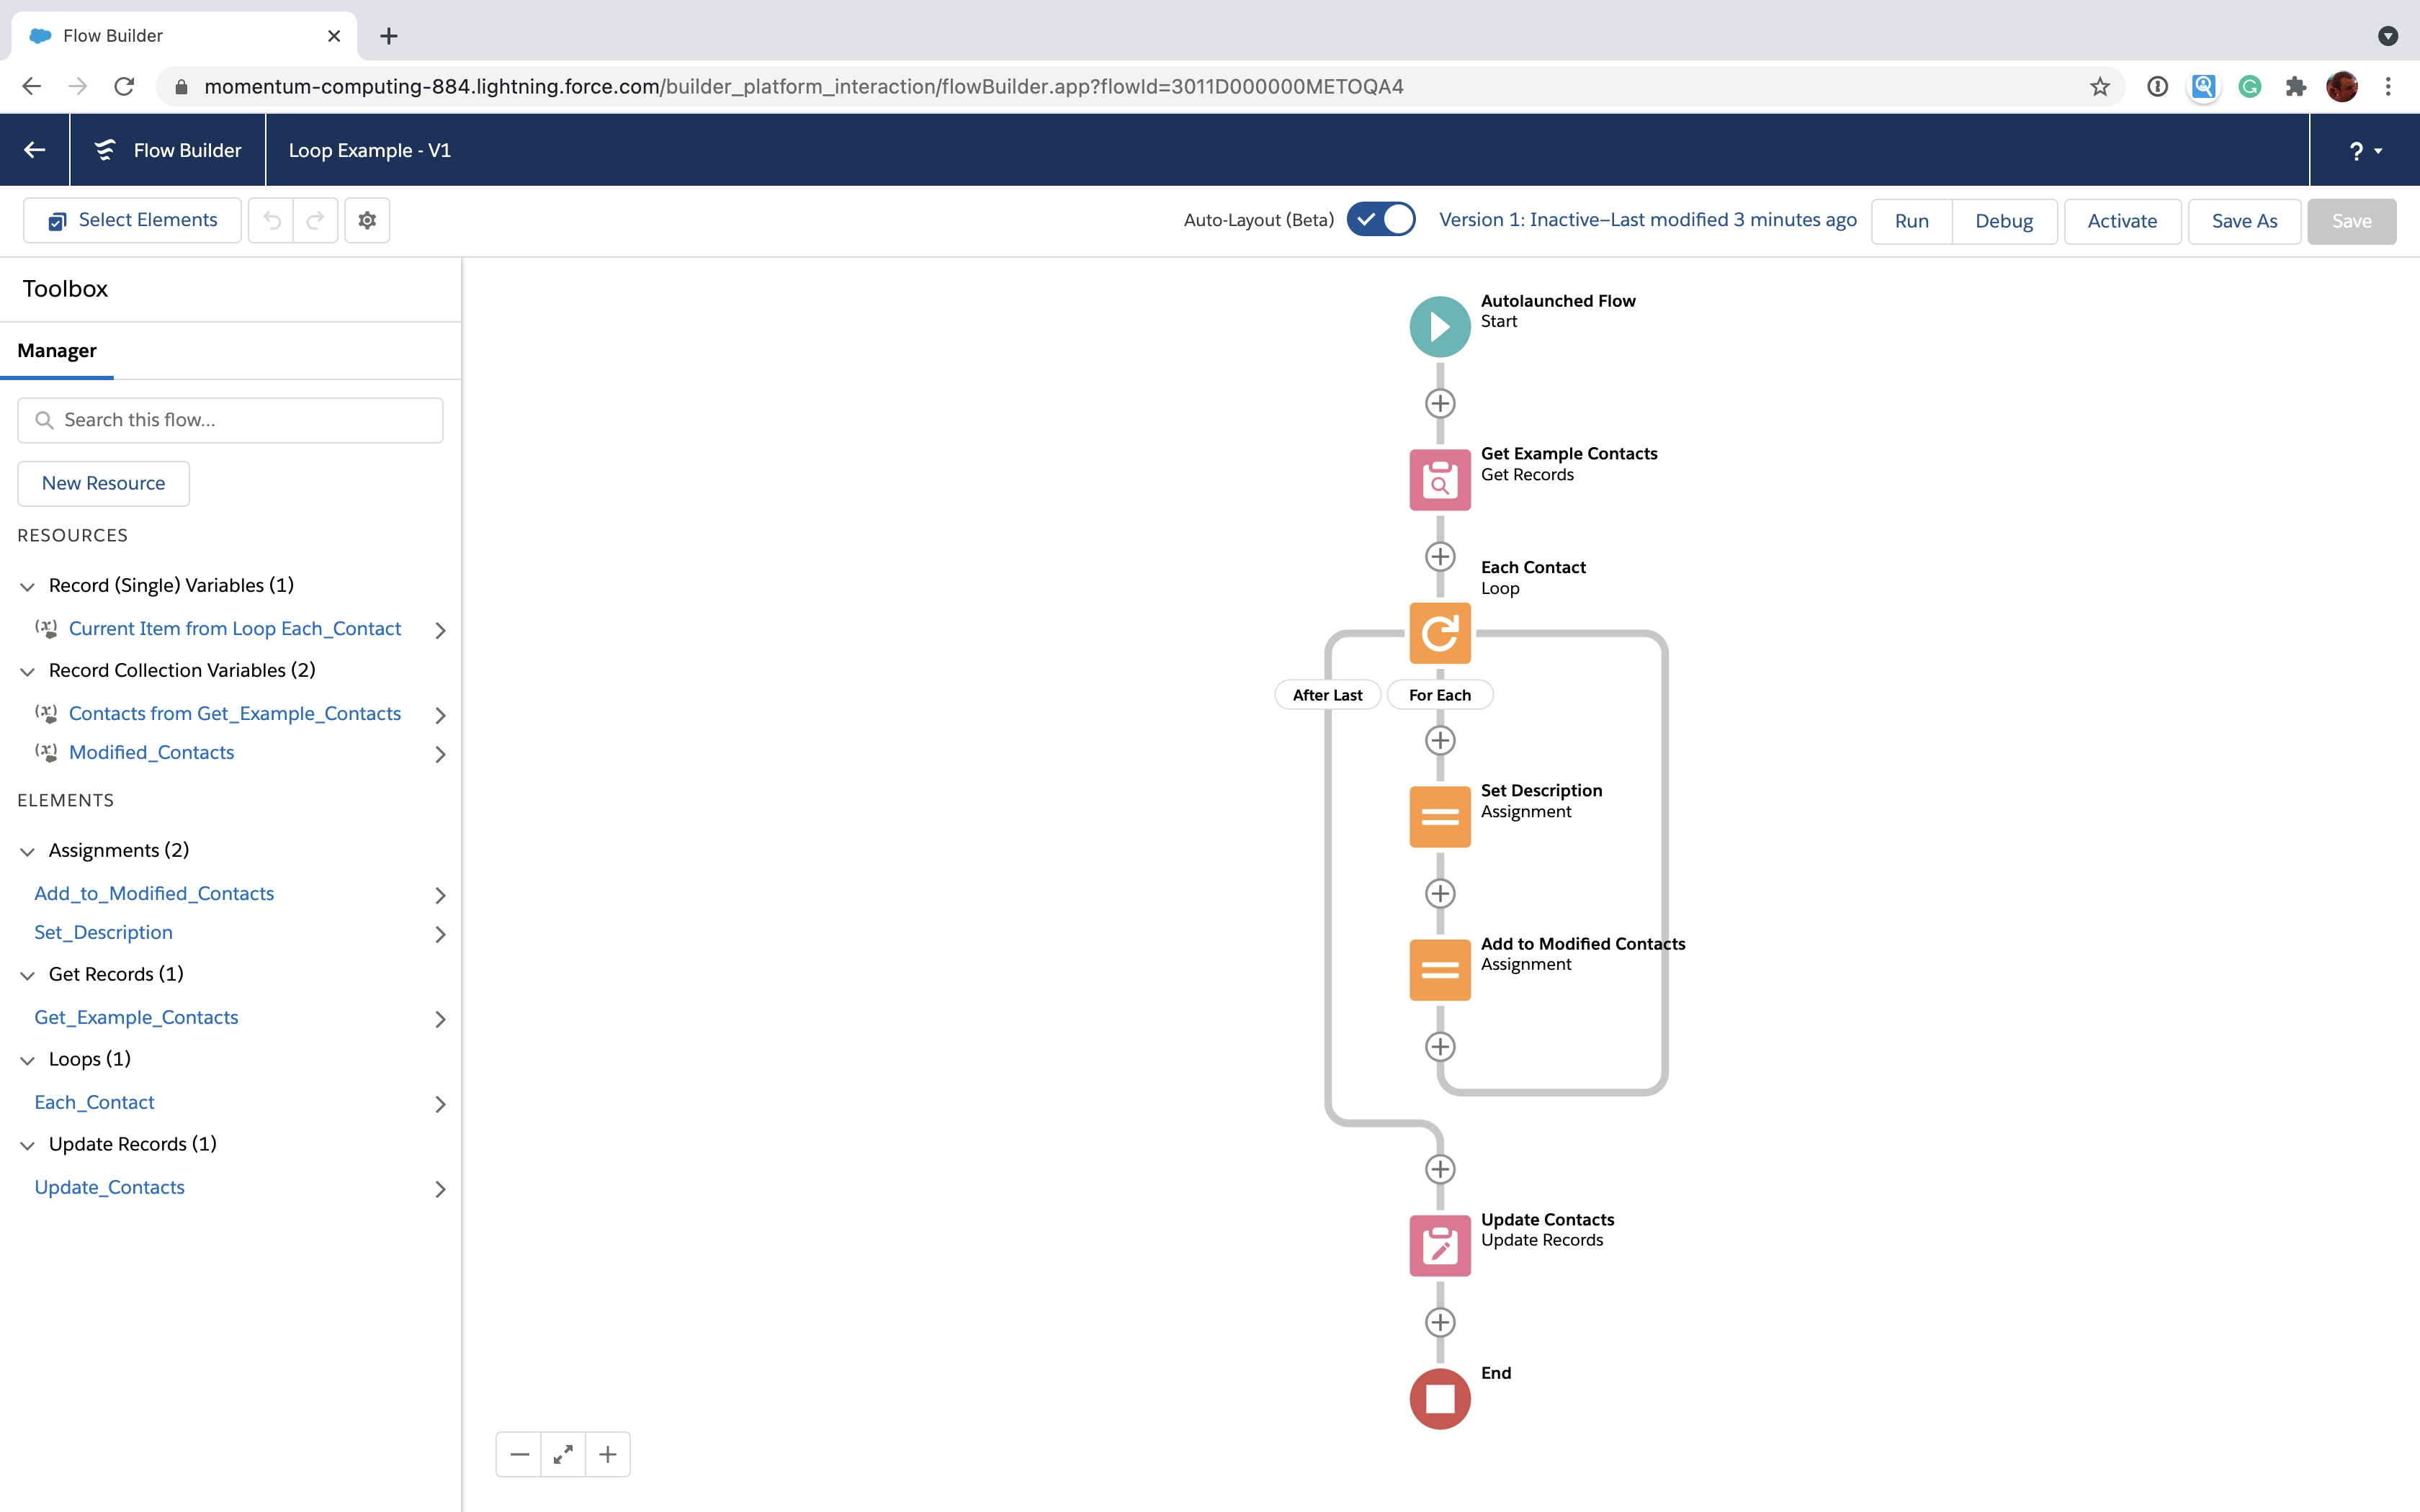
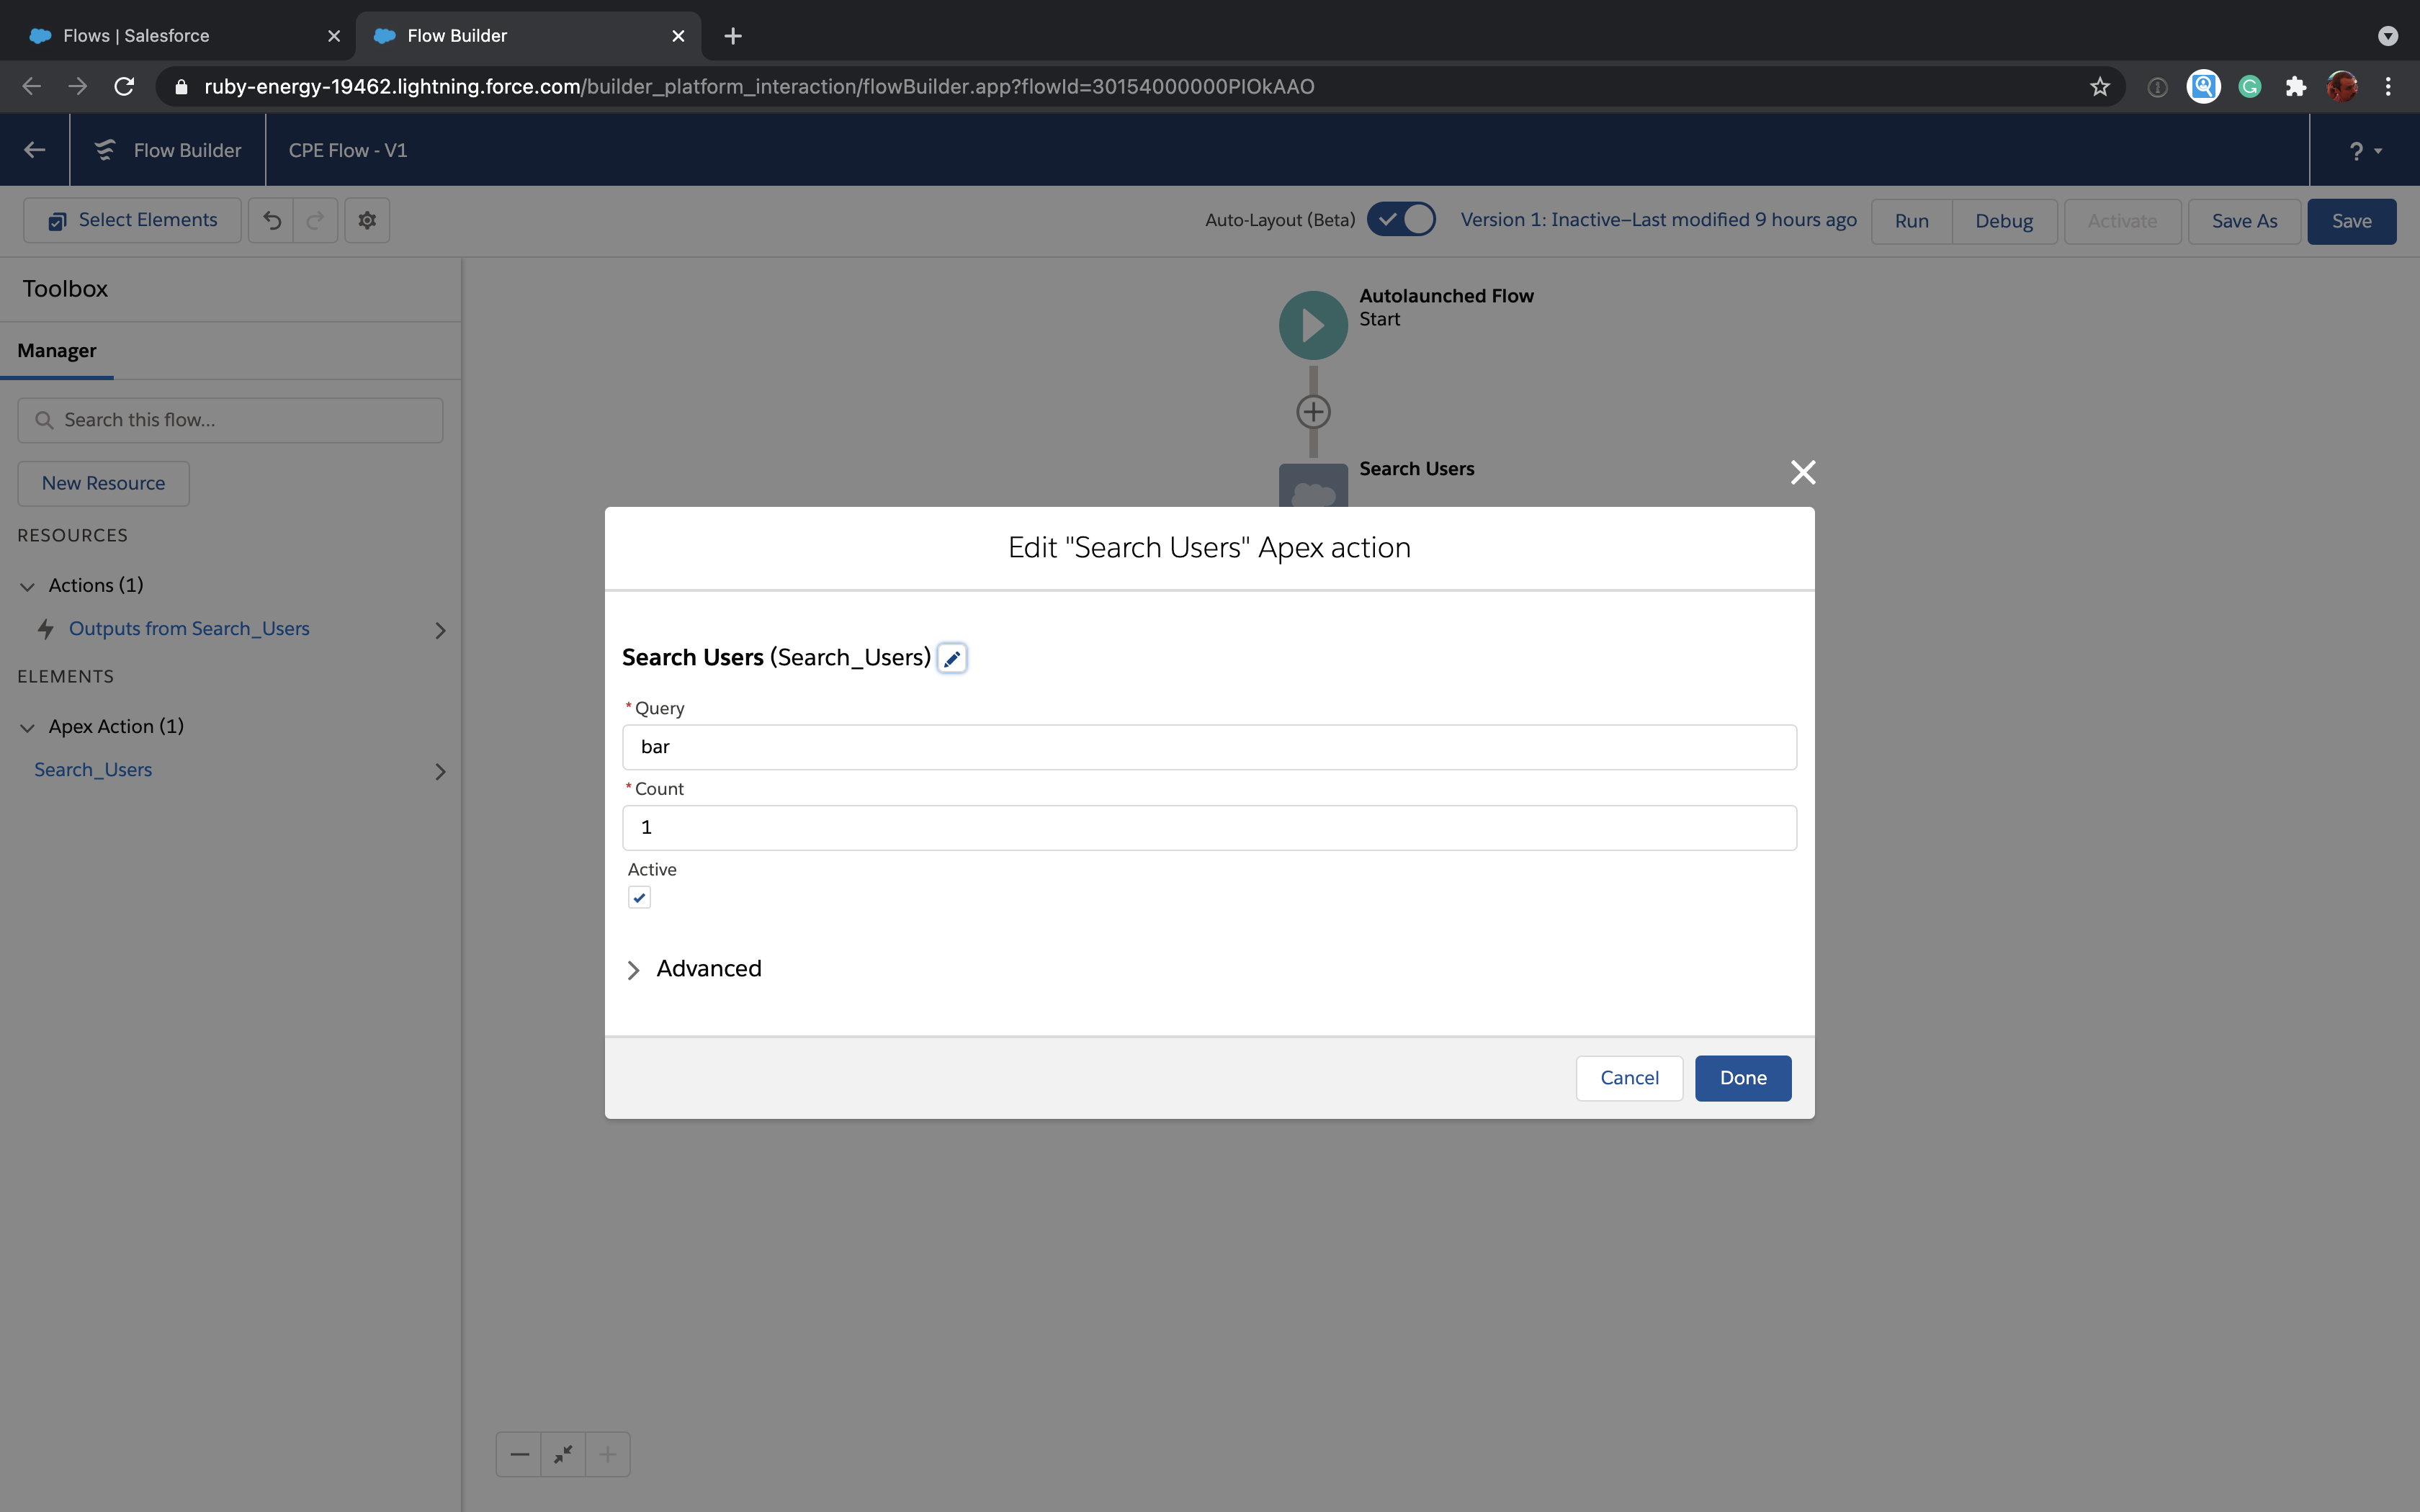
The action shows up in the Flow builder, but has a standard editor, as you can see here:

Not bad! It does the basics. However, there are a few nasty issues:
- Field order - the fields are in alphabetical order which won't make sense to the user
- Validation - the default editor prevents you from entering in a non-number for count, but is perfectly happy if you put in nonsense like 0, -10000 or 8.3333
- Booleans - to specify true or false, you have to use an extremely clunky global constant in a merge field
It works, but you really wouldn't want to just hand this to someone. It's not intuitive and it's very easy for users to make a mistake. It sure would be nice if we could improve that user experience.
Enter the custom property editor
The first thing to know about a custom property editor is that it's a Lightning Web Component. If you don't know LWC basics, I recommend you check out Trailhead.
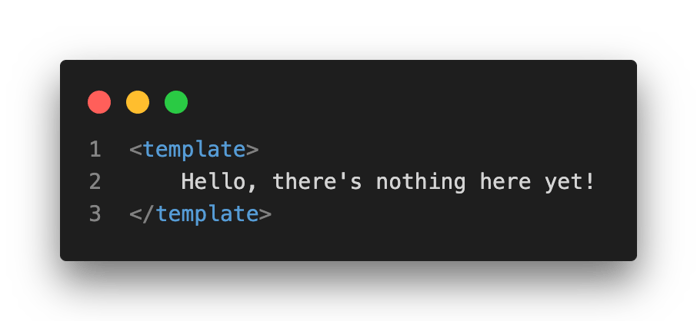
In our case, we're going to create a component named cpeActionEditor. For now, we'll just put a simple message in our template so we know it's working:
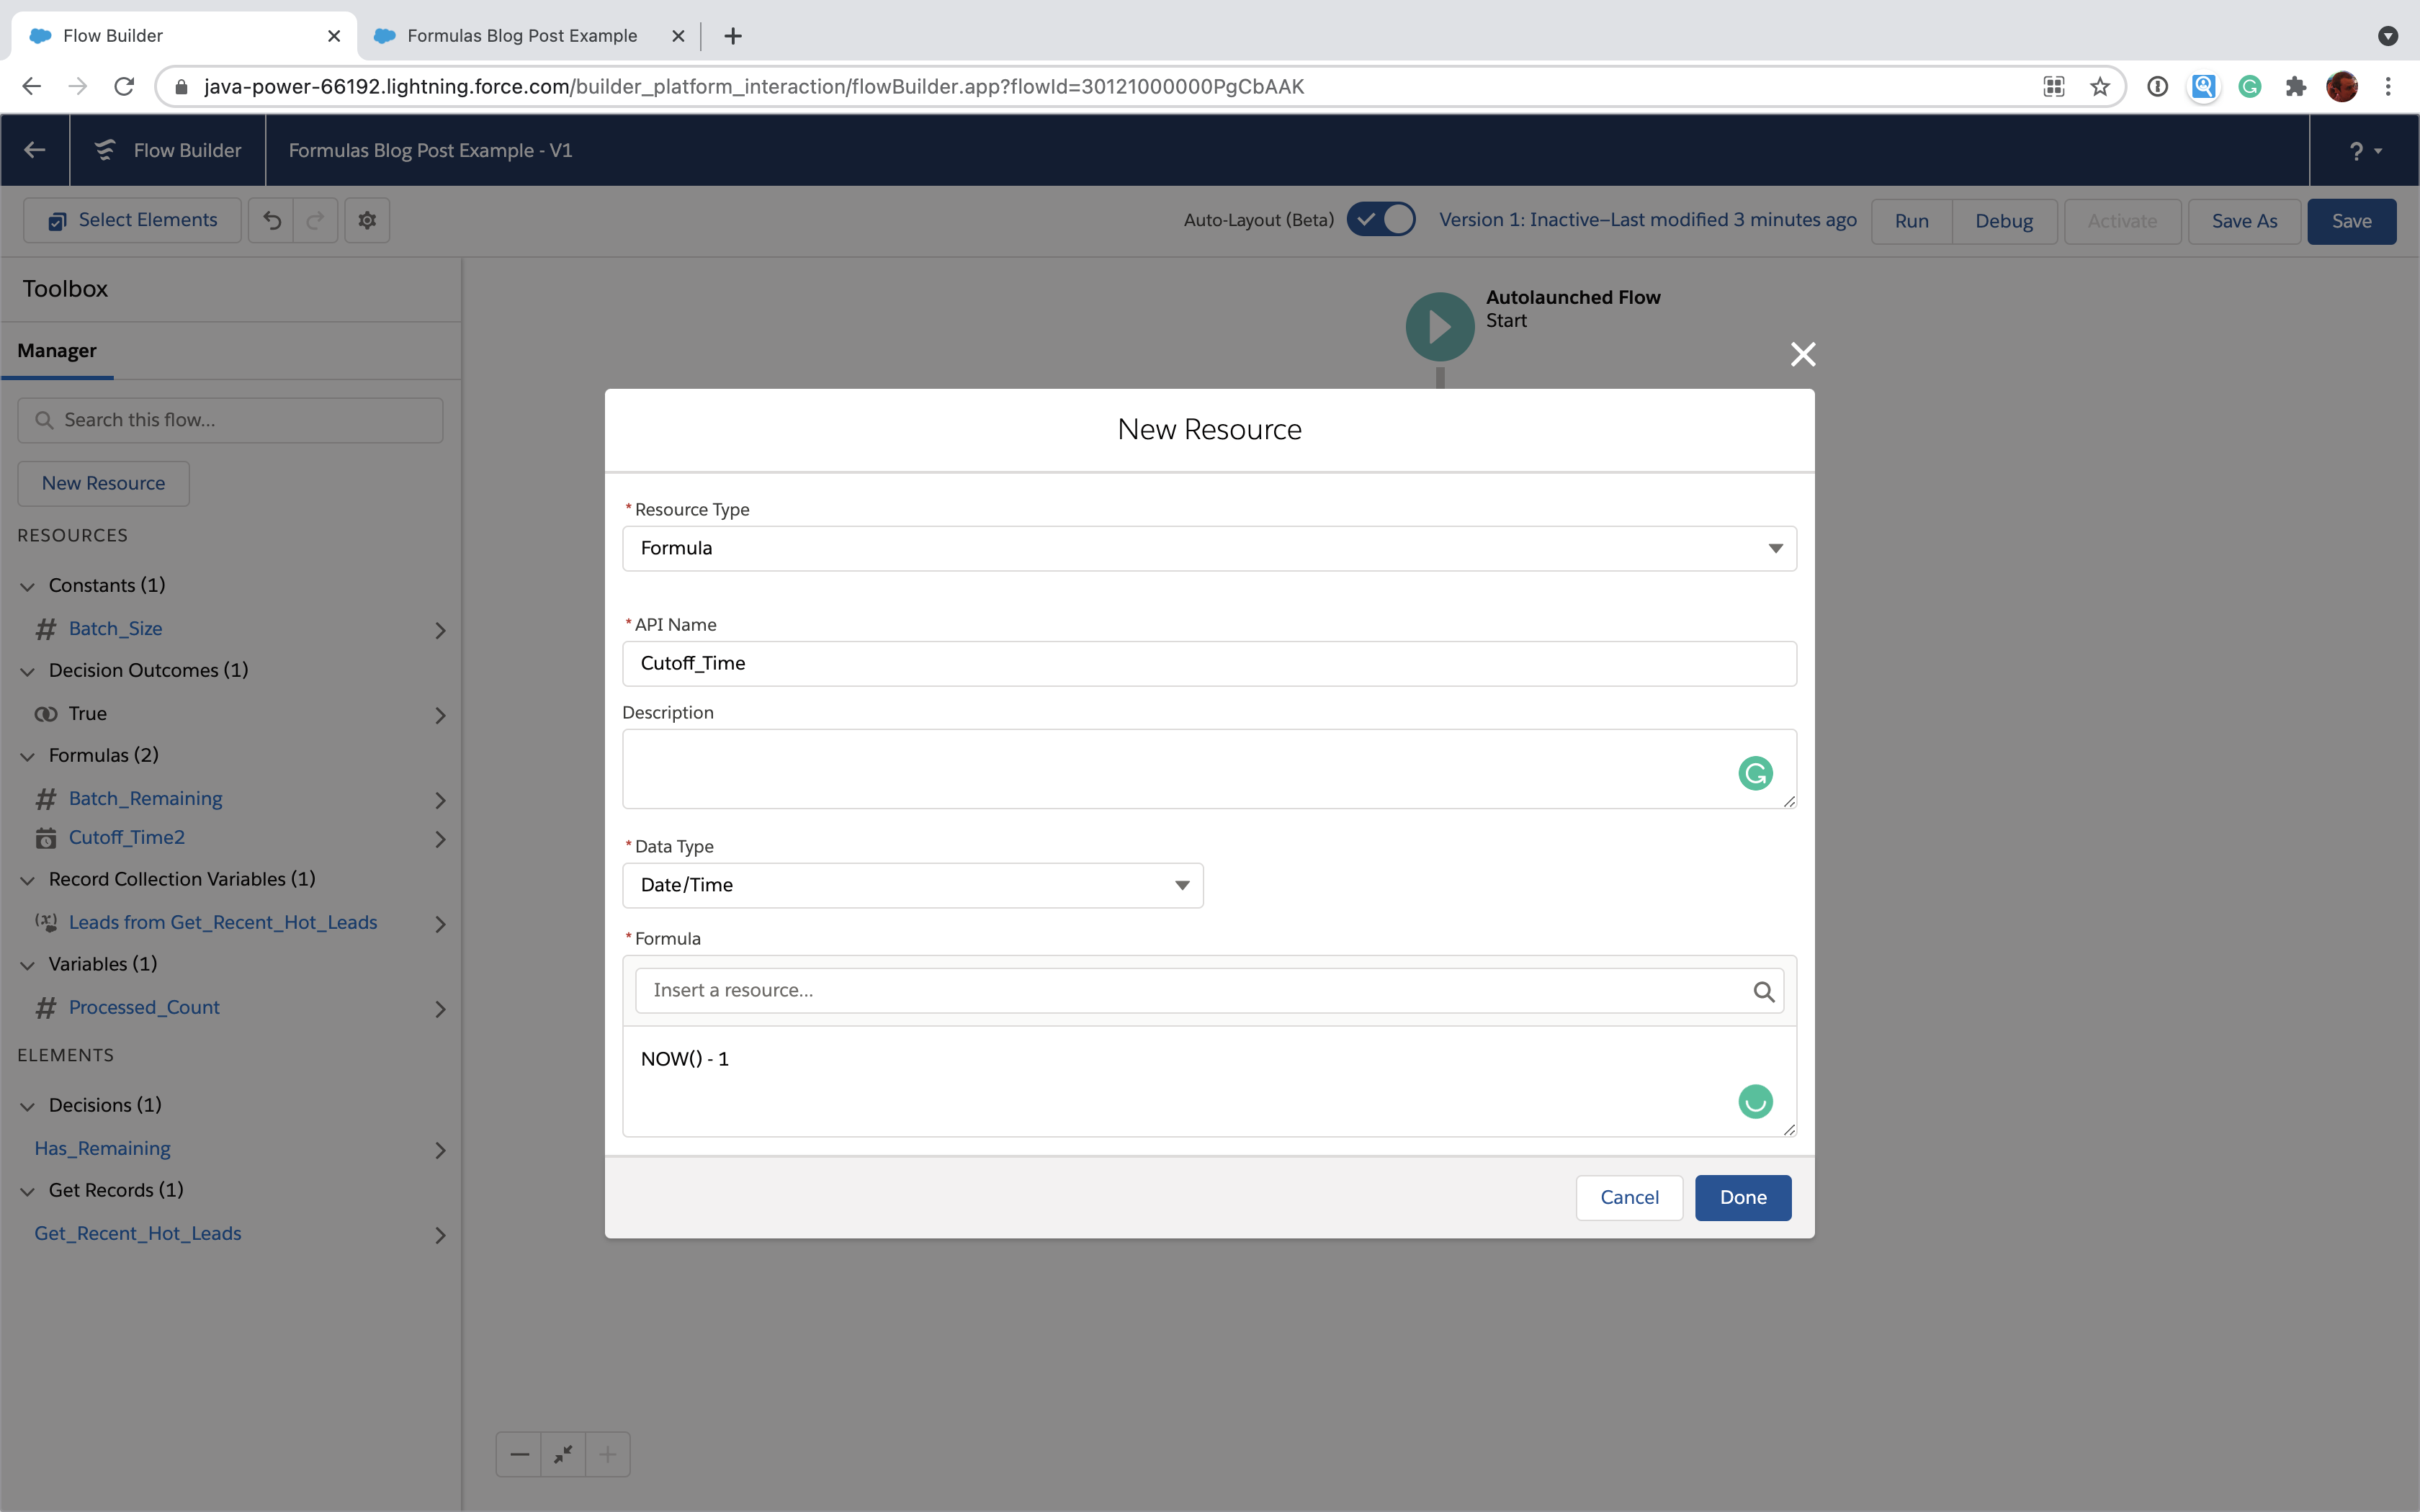
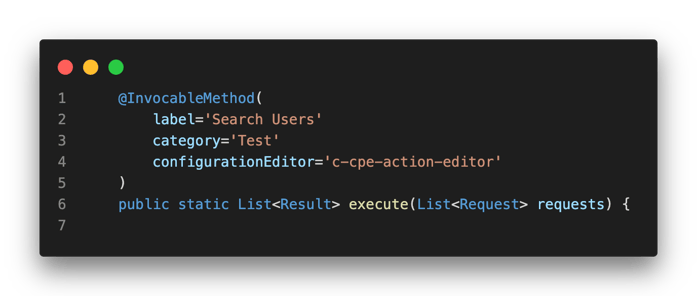
 Once we've got a CPE, we need to connect the editor and the Apex action. You do that by adding a new property called configurationEditor to the InvocableMethod annotation on the execute method.
 One frustrating issue with using CPEs is correctly specifying the configurationEditor value. It's easy to get it wrong and Salesforce won't really complain; it just won't show you your custom editor. Here are two things to remember:
- Use the right namespace - If you're working without a namespace, use "c" (e.g. "c-cpe-action-editor"). If you're working within a namespace, use your namespace (e.g. "gradientworks-cpe-action-editor").
- Kebab-case - Don't forget that you have to reference LWC components using "kebab-case" even though the components are named using camelCase. (e.g. cpeActionEditor becomes cpe-action-editor)
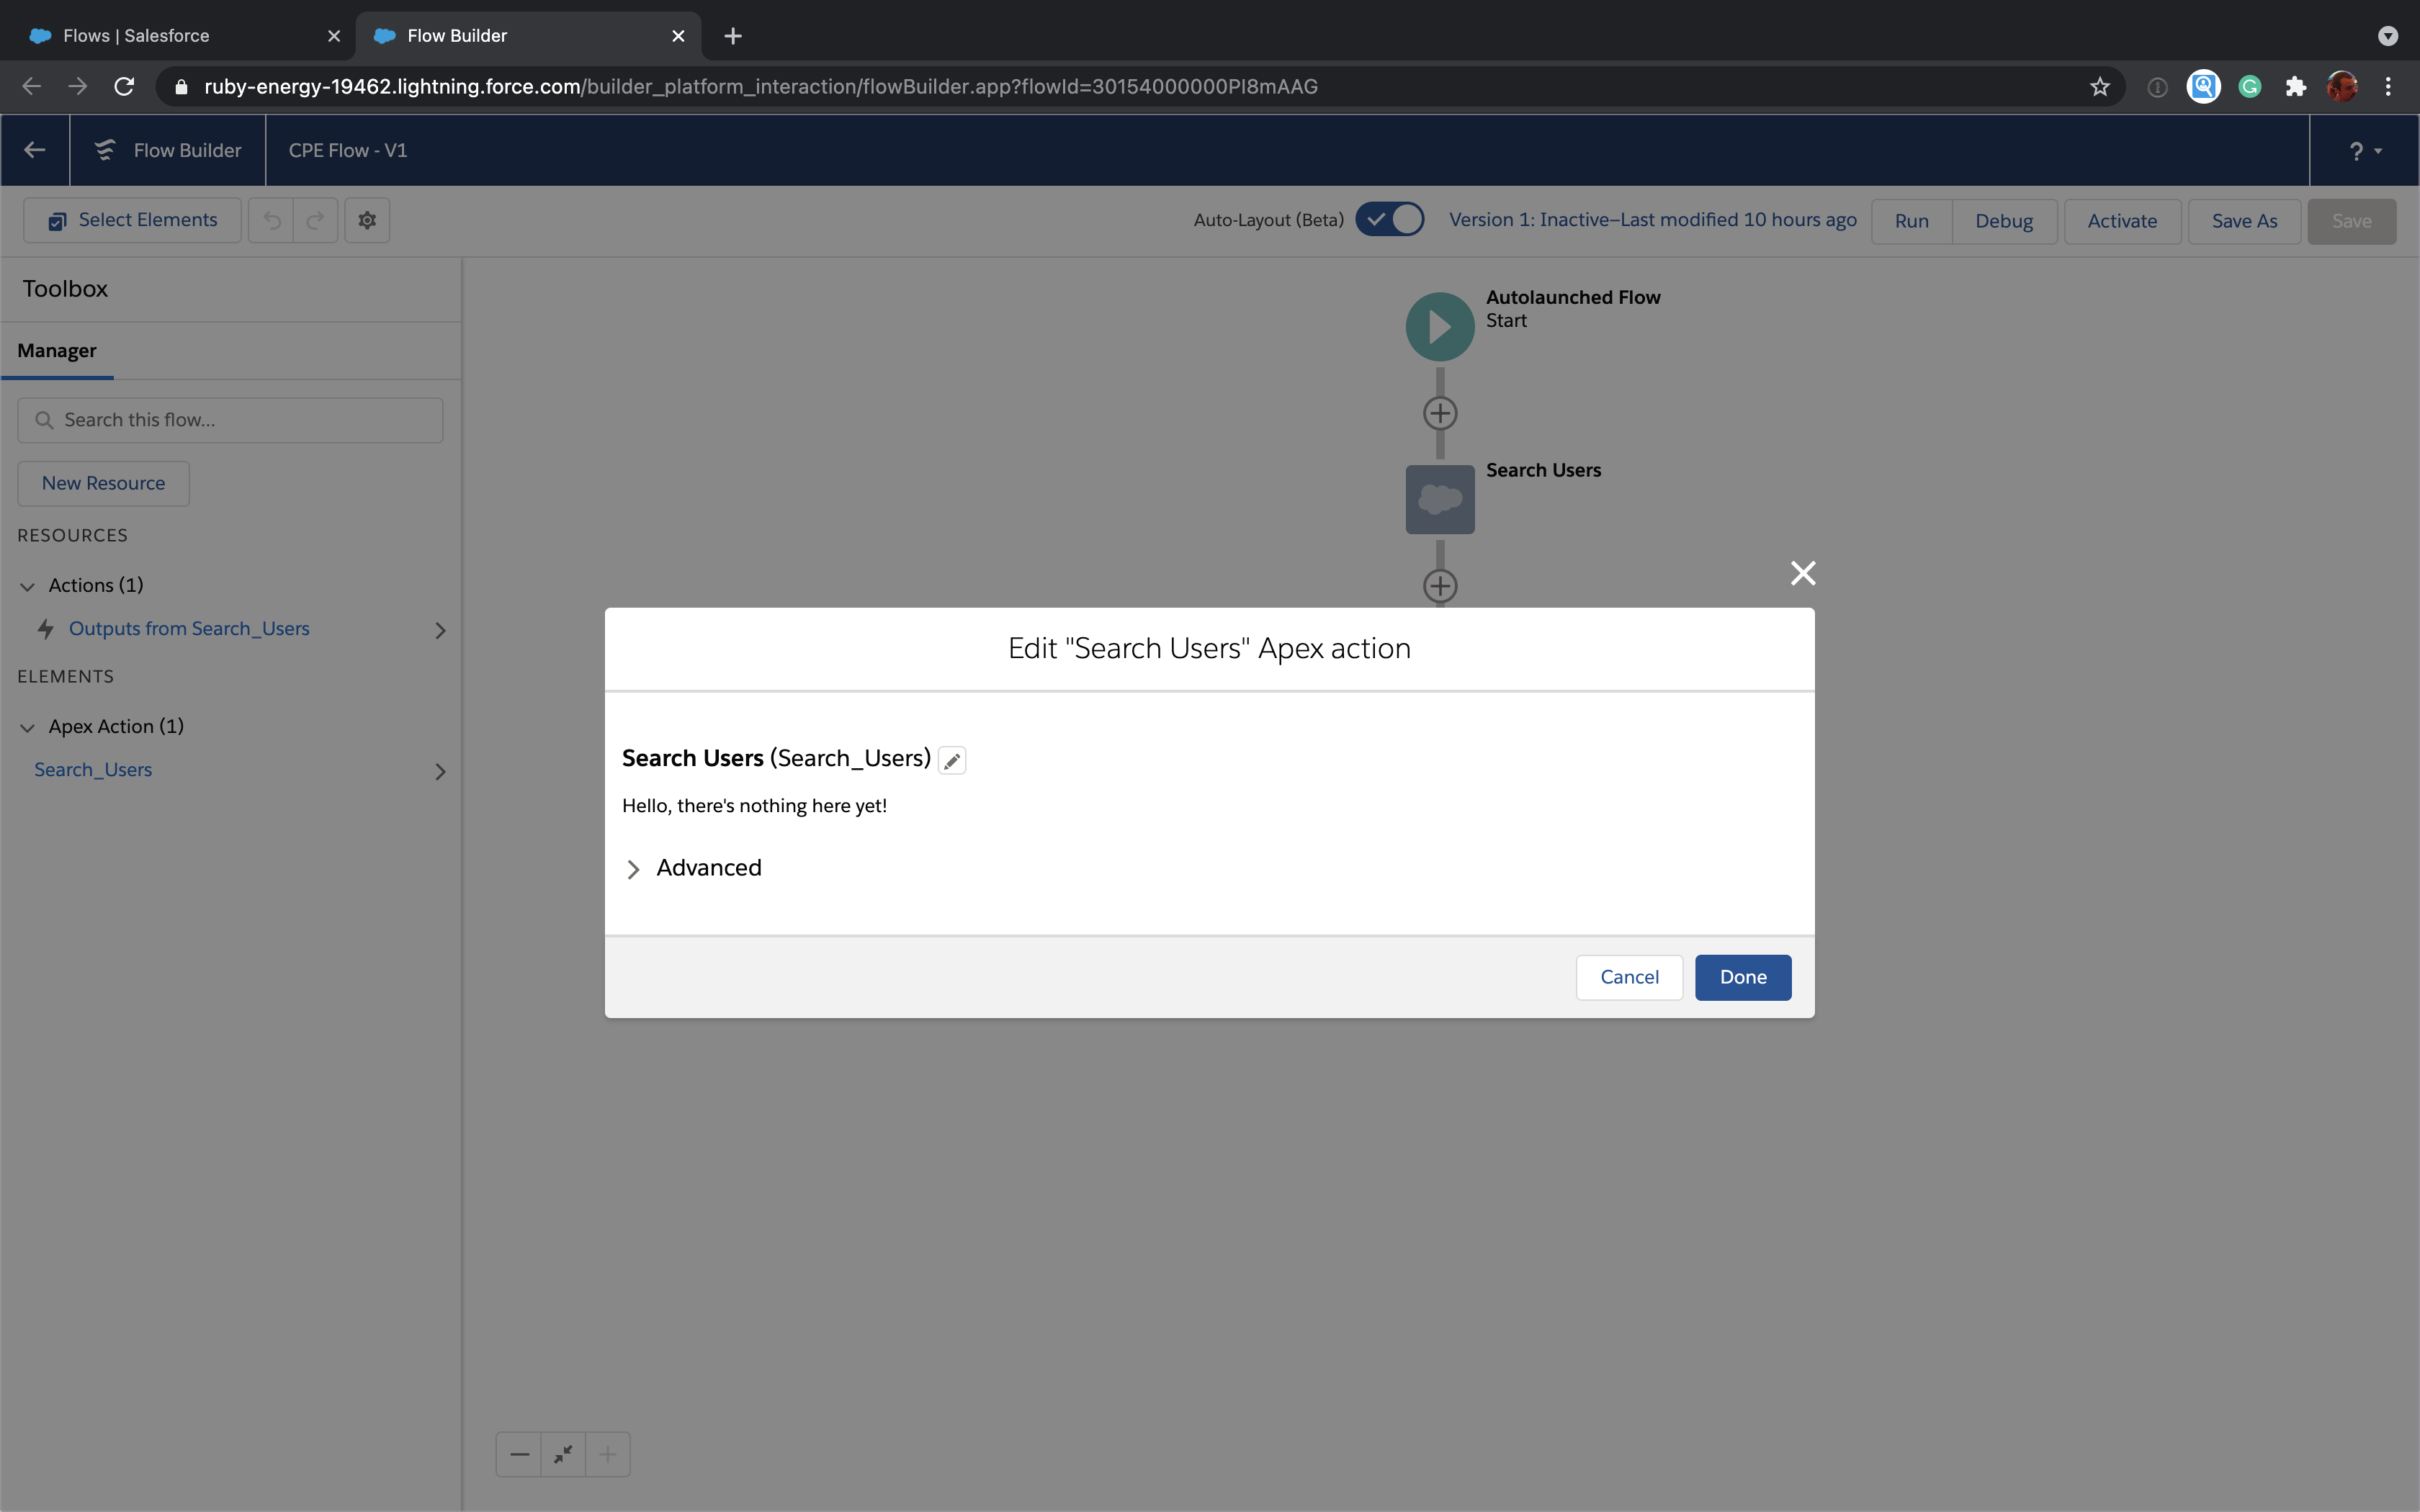
Once you've hooked all that up, here's what it looks like when you view the action in Flow Builder:
Below, we'll go through everything you need to do to turn this message into decent-looking UI complete with validation, like so:
 To get there from here, a Custom Property Editor typically has to do three key things:
- Read the current values of the inputVariables and set them in the UI
- Notify the Flow Builder when inputVariables have changed
- Validate inputs before saving the action
The rest of this post will look at each of those tasks in turn. This part will have a lot of component javascript. If you prefer to read code, check out cpeActionEditor on GitHub.
Read input variables
The CPE javascript interface docs tell you that the basic structure of the inputVariables data is an array of objects with name, value and valueDataType properties but really doesn't go into detail.
Here's what this structure actually looks like for our action:
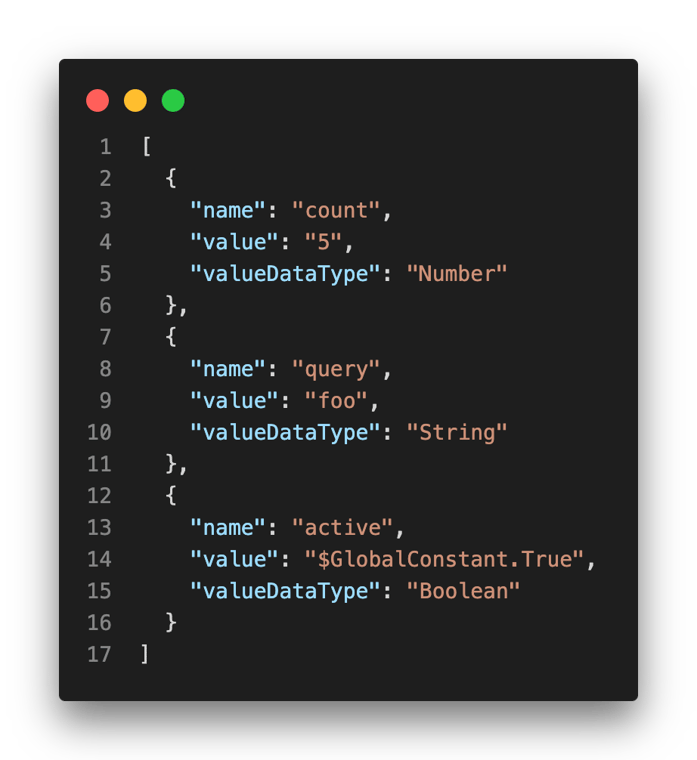 There's some weird stuff in there. Let's try to add a little bit more documentation of our own by looking at each property in turn.
The good news is that name is actually simple. This value is the name of an InvocableVariable you've specified in your Apex action.
Moving on to value, the most important thing to know is that it's always a string (even when dealing with numbers, etc). The valueDataType tells you how to interpret it.
The most mystifying property is valueDataType. I haven't been able to find any actual docs that describe this but it seems to be inspired by FlowElementReferenceOrValue in the Metadata API. Based on my own testing, it can have the following values:
- String - The value is a simple text string.
- Number - The value should be interpreted as a number. This may be an integer or a decimal number.
- DateTime - The value is a string in full ISO 8601 format (e.g. "2021-05-05T19:00:00.000+0000").
- Date - The value is a string in full ISO 8601 format but the time component is always "00:00:00.000+0000"
- Boolean - This does not have the values you'd expect. Instead of "true" or "false, the value will be one of "$GlobalConstant.True" or "$GlobalConstant.False". It's up to you to test for these Strings to convert to an actual boolean.
- reference - No this isn't a typo; it's actually all lowercase, unlike the rest of the options. The value will be the name of a resource in the Flow (like a Flow variable). In the standard editor, this value will be displayed as a merge field (e.g. a reference to "Current_User" will display as "{!Current_User}").
We typically use a pattern of "private" variables in our components that we populate from the inputVariables using a utility method. It looks like this:
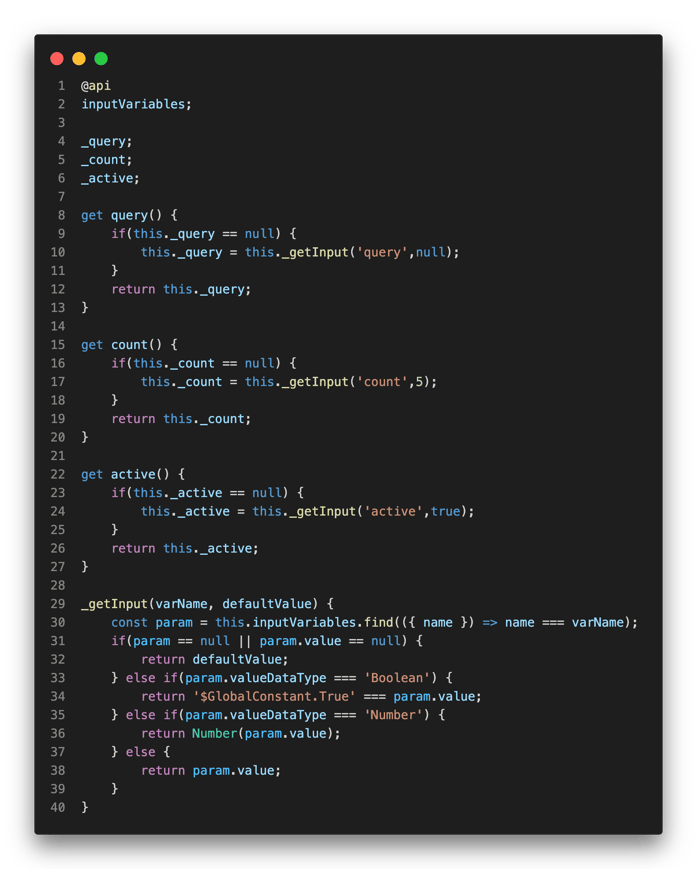 There are many other valid approaches but we find that this gives us a lot of flexibility, especially when we need to handle defaults or otherwise transform the values that come from the inputVariables.
Notify the Flow Builder when inputs change
If your CPE uses standard LWC components like lightning-input, you'll follow the normal pattern of adding an onchange handler that receives an event whenever the user edits the input field. Your handler method is then responsible for ensuring that your CPE dispatches an event to the Flow Builder indicating that a particular input variable has changed.
The name of this event is a bit unwieldy: configuration_editor_input_value_changed. We usually like to encapsulate this whole process in a method inside our CPE component like so. Here's what it looks like put together with a set of handler methods:
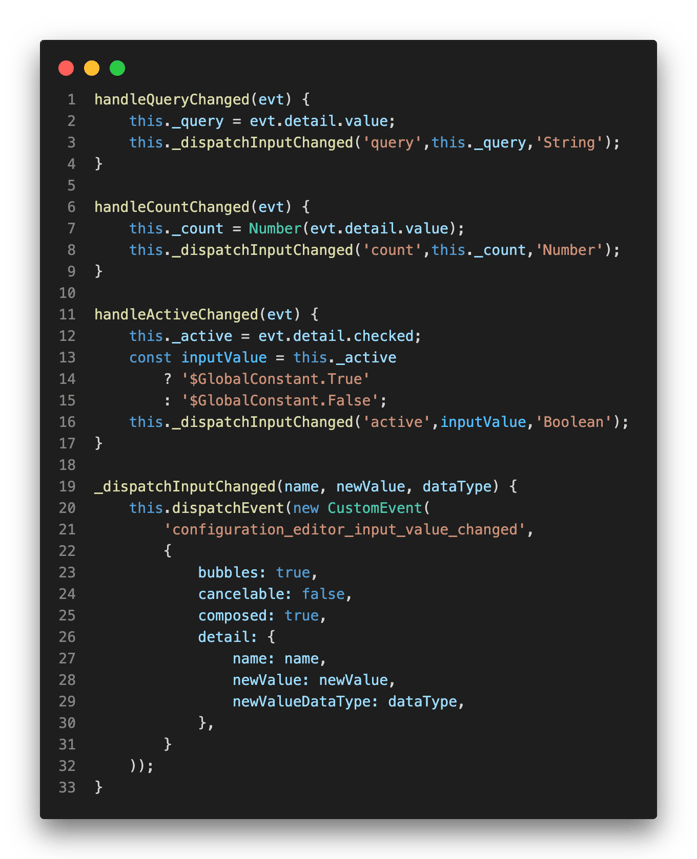 See newValueDataType there? That must be one of the valueDataType options we discussed previously. The value you specify must match the expected value format. For example, if you're dealing with a Boolean data type, you must set the newValue to be either $GlobalContant.True or $GlobalConstant.False.
Validate inputs
The CPE javascript interface defines a validate method that CPE components can implement. This method returns an array of invalid items. Each item is an object with key and errorString properties. If the array returned by validate is non-empty, the Flow Builder will notify the user that there are errors.
If you don't specify this method, the Flow Builder will allow the user to save your action even if your UI fields have validation attributes (e.g. min, max, required, etc).
Here's how that looks in code:
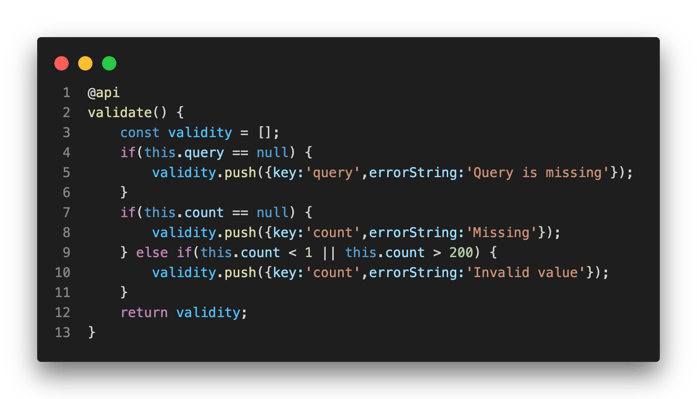 Make sure you specify the @api annotation so the Flow Builder knows to call the validate method.
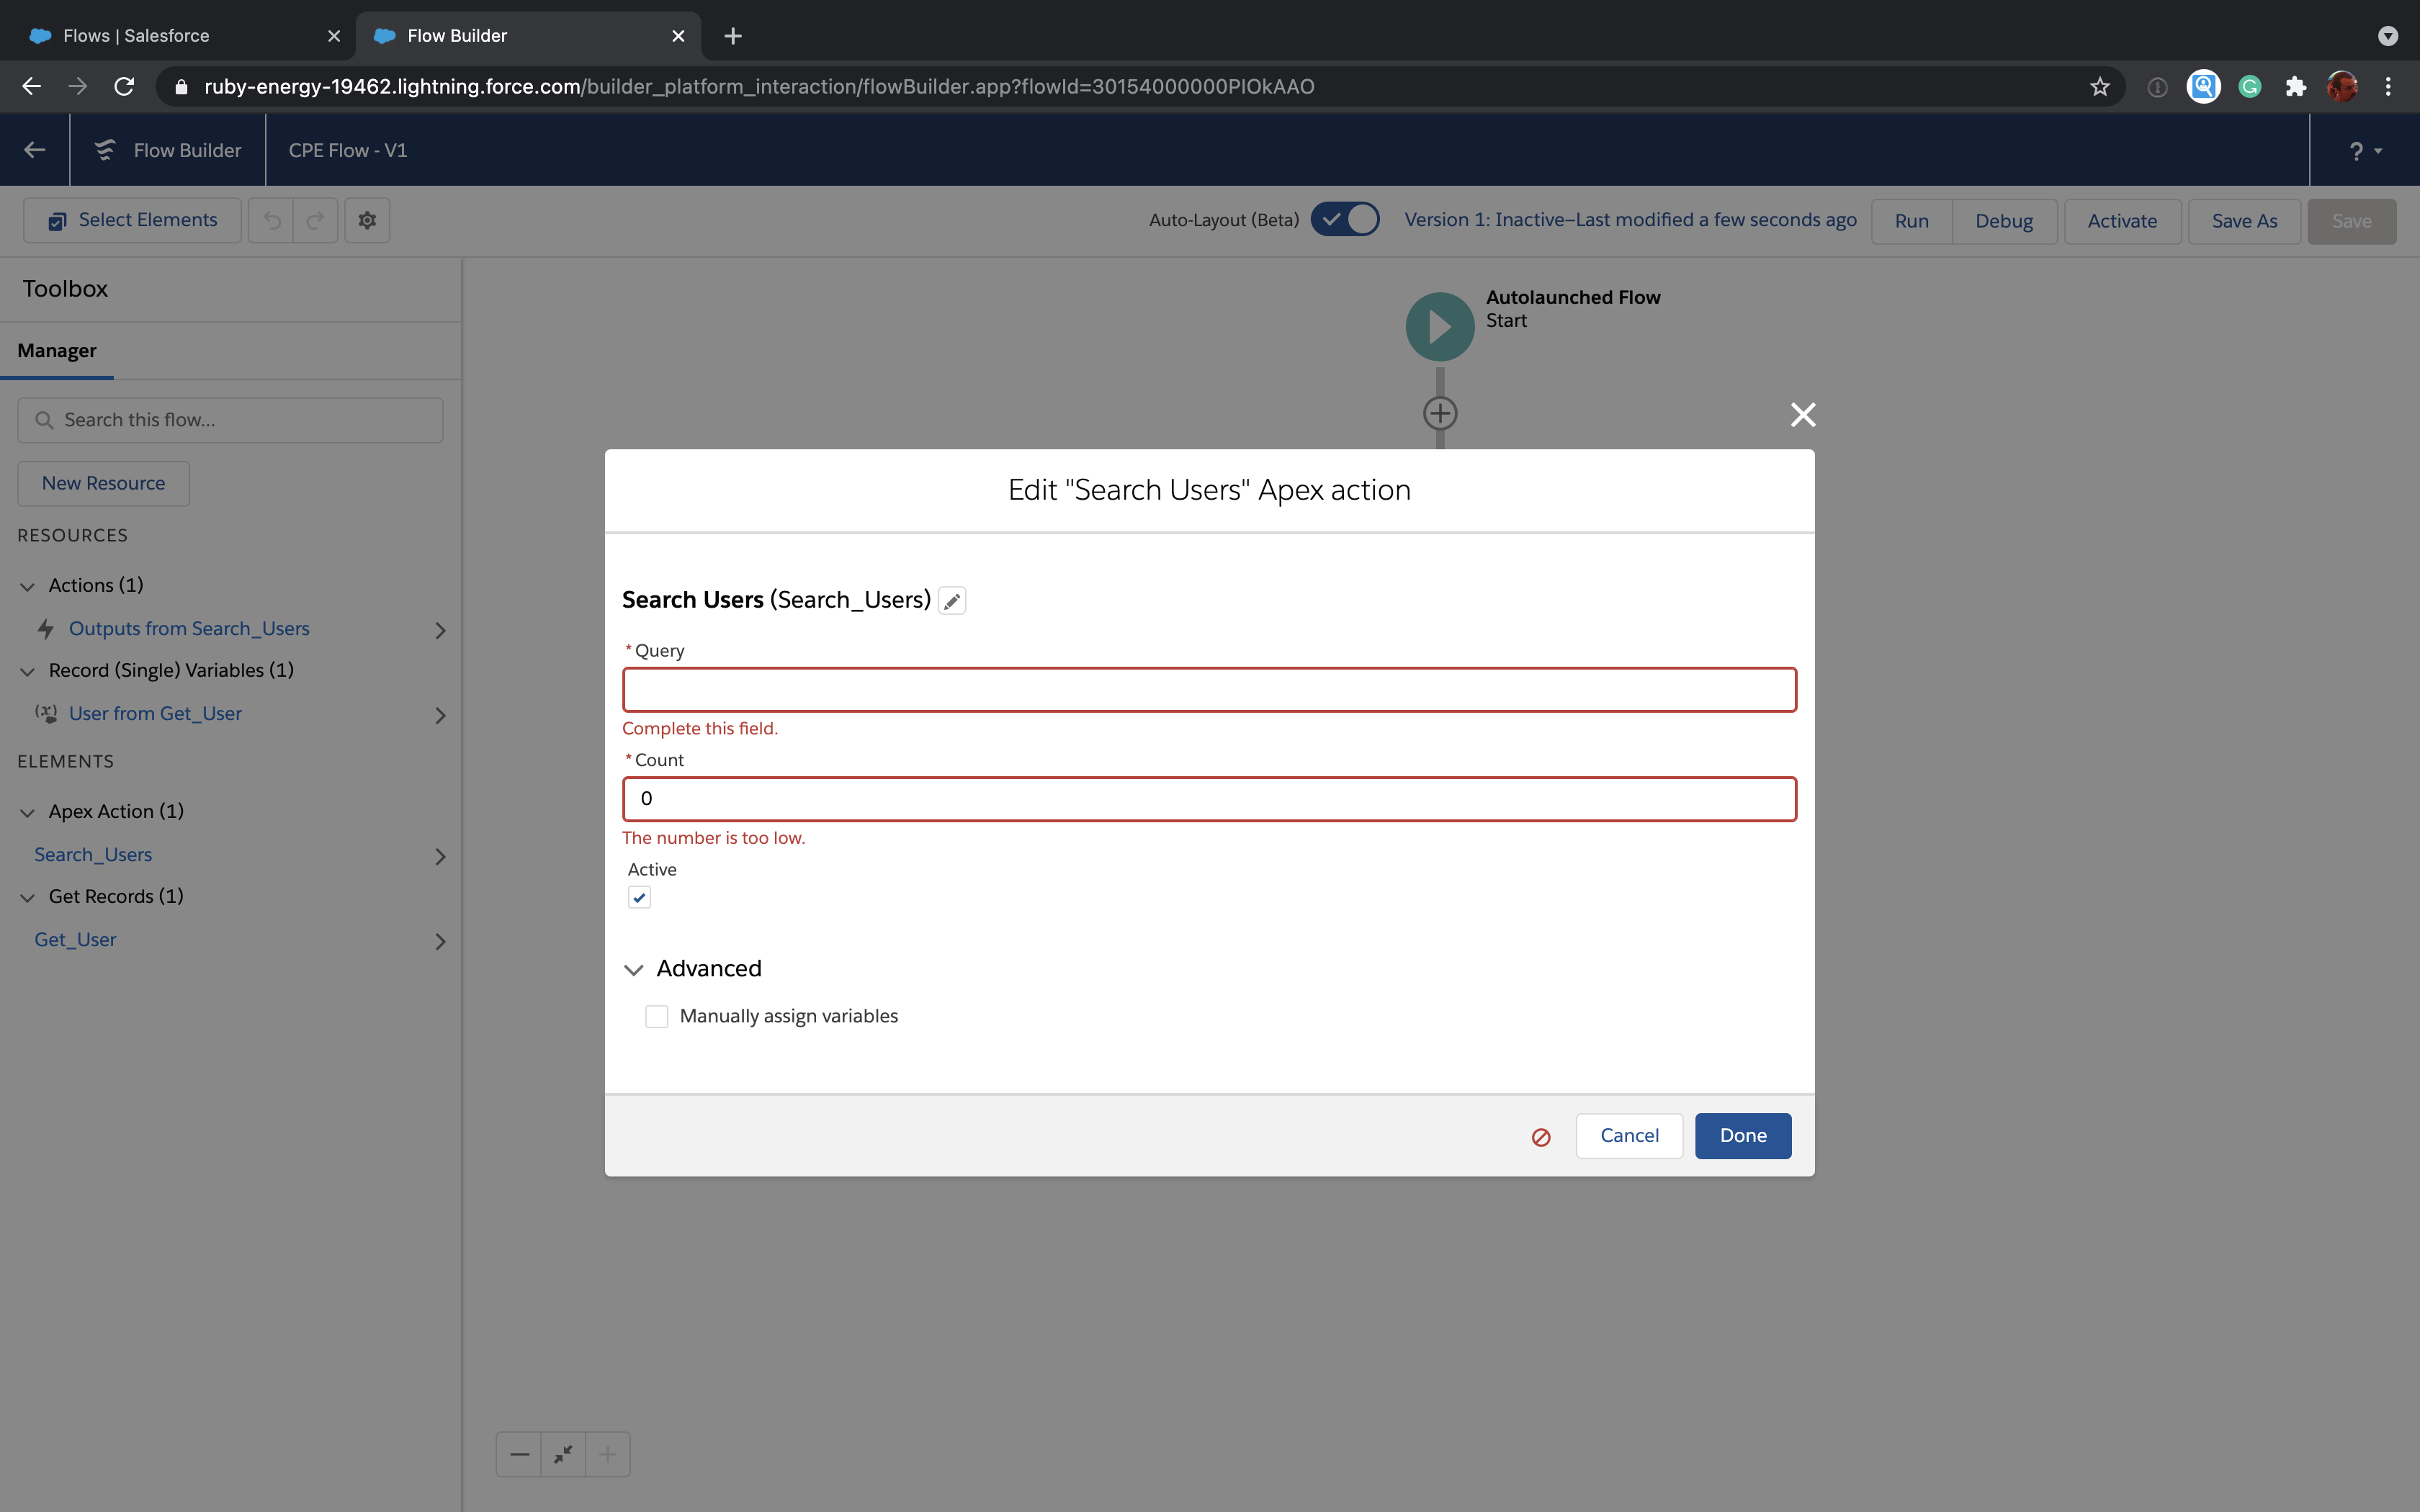
Now that you've got validation, here's what it looks like when a user tries to click done when there's invalid data:
Wrapping up
This isn't a comprehensive look at everything you can do with invocable Apex actions and Custom Property Editors but it should give you a good start. If you want to see another Apex example, learn how to deal with generic SObjects or write custom screen components, take a look at Salesforce's full Custom Property Editor documentation. You should also head over to UnofficialSF and their page devoted to building custom property editors; there are lots of good resources there including sample code.