This post is part of a technical series to help Salesforce Admins automate business processes using Flow. We're very excited to feature our new guest author, Zane McCarthy! Zane's an expert on all things Salesforce and sales operations, so read on.
Salesforce's Winter ’20 release gave declarative admins a great way to extend their reach by introducing Scheduled Flows. If you’ve ever muttered under your breath while completing a mundane task every week or month, read on to learn the power of Scheduled Flows in Salesforce!
Here's the agenda:
- What is a Scheduled Flow?
- An example of a Scheduled Flow to archive data
What is a Scheduled Flow?
A Scheduled Flow, or Schedule-Triggered Flow, is a Salesforce Flow that is autolaunched at a specified time and repeated at a specified interval. While there are many useful applications for Scheduled Flows, our example will focus on how to create a Scheduled Flow that will archive a weekly snapshot of customer data found on the Contact object. It is very easy to apply the concepts covered in this Flow example to other organizations, so read on and think about how you could solve your organization’s specific challenges!
Before we dive into creating the Scheduled Flow, we will need to create a Custom Object to house our archived data. Our Custom Object will be named “Metric,” and will hold information captured from specific Contact records.
We will need to create fields on the Metric Object for every data point we want to archive from the Contact. For example, if we wanted to track a field on our Contact Object named “MRR” that holds our Contact’s current Monthly Recurring Revenue, we would also create a “MRR” field on the Metric Object of the same field type and parameters, and repeat for any other desired field. Don’t worry if you only have one or two fields to start, you can always create new fields on your Metric Object if you think of other fields to track at a later date!
Building a Scheduled Flow to Archive data
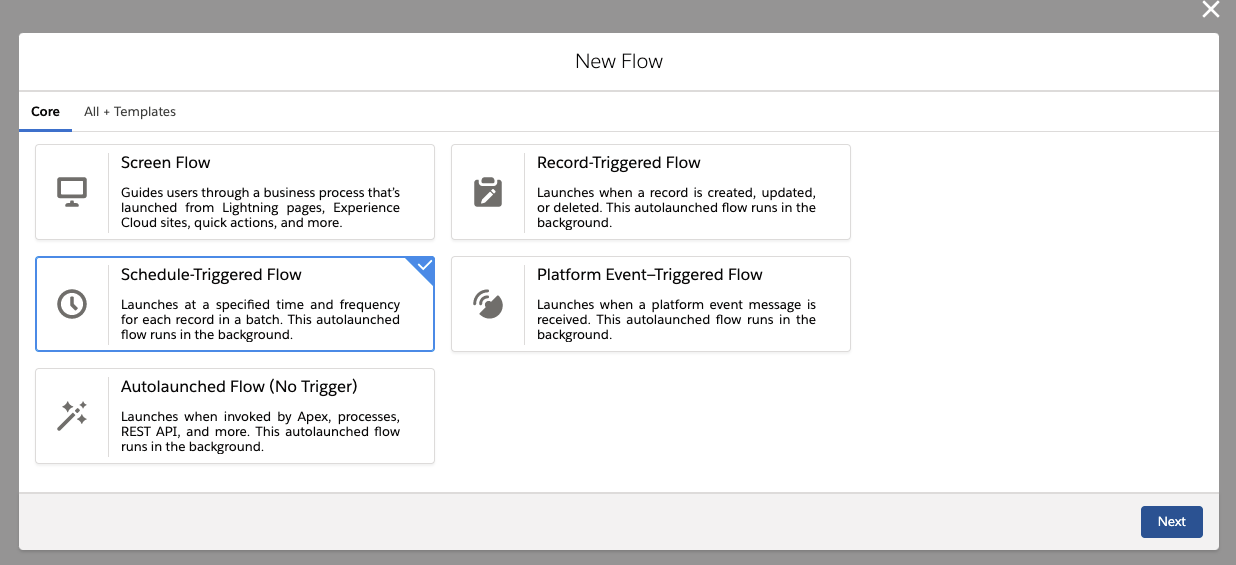
After our Metric Object and fields are created, we can create a new Flow and choose the “Scheduled-Triggered Flow” option.
Next, Set a Schedule for your Flow by determining the following:
- Start Date: Determines the first time your Flow will run (be sure to set this in the future!)
- Start Time: Determines the time of day your Flow will run.
- Frequency: Determines how often your Scheduled Flow repeats; in our example, we will set Frequency to “Weekly.”

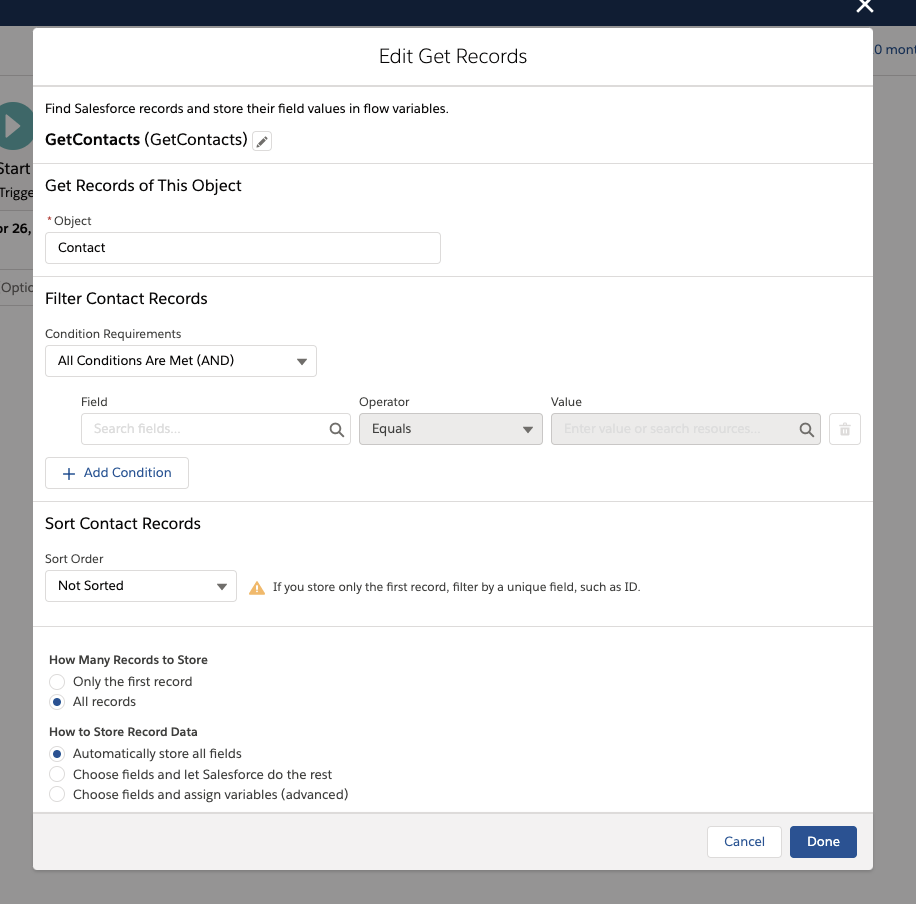
Next, we will create a Get Records element to identify the source records, in our case, Contacts. You may set any conditional requirements (ie, only Contacts who are marked as Customers, or only Contacts who have an address in North America), or simply evaluate all records.
Be sure to store all the records and all fields, as this will help you later if you decide to add fields to the Metric Object or grow the scope of your Scheduled Flow.
Although this step is optional, I highly recommend adding a Decision element to evaluate the Get Record’s results. Adding Decisions nodes is a great way to ensure we have built-in failsafe because if no records are found, our Flow will simply end with the Default Outcome instead of continuing on.
If you decide to create a Decision element, create a condition to ensure our Record Collection Variable contains at least one Contact.
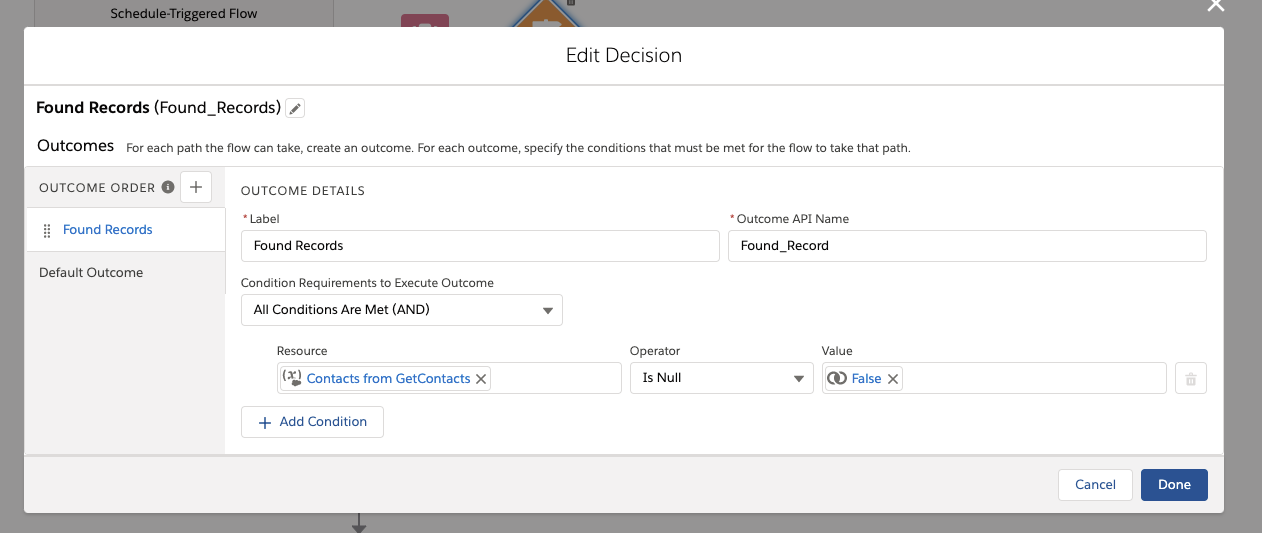
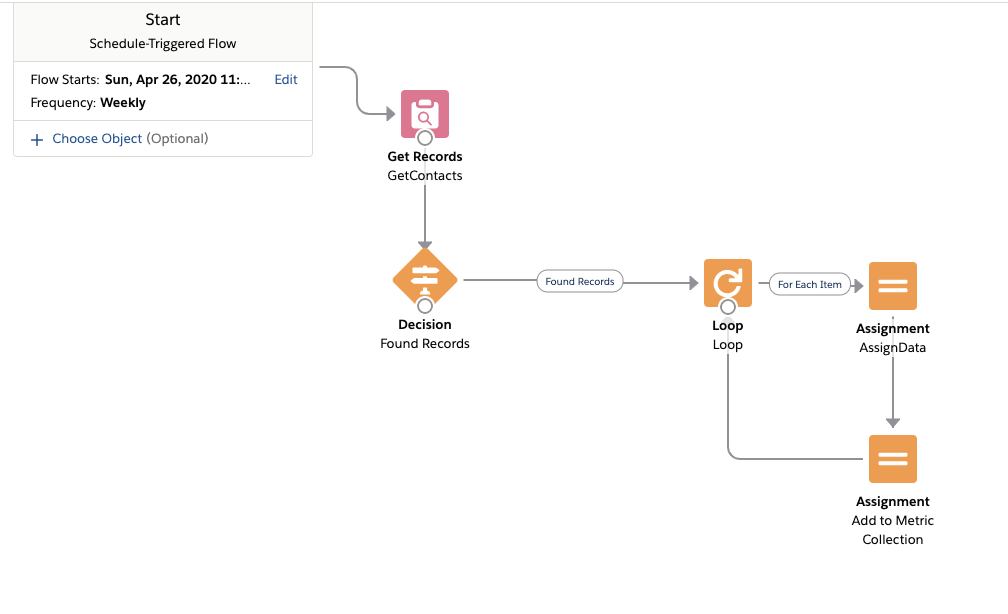
Connect the Start Element to the Get Records, and then to the Decision element. Our Flow should look something like this:

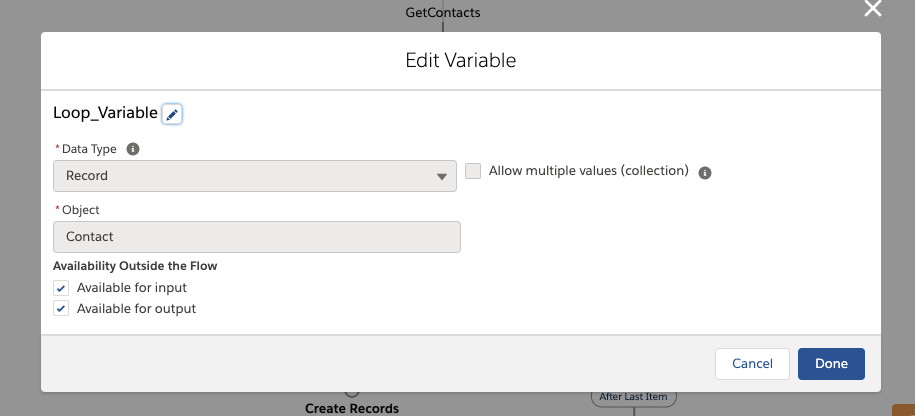
Now that we have Set the Flow’s Schedule and identified our Contacts in a Record Collection Variable, we need to Loop through each Contact record to save our specified data to a new “Metric” record. To do so, we will create two variables. The first is a Loop variable with the Data Type set to “Record,” and the Object set to “Contact.”
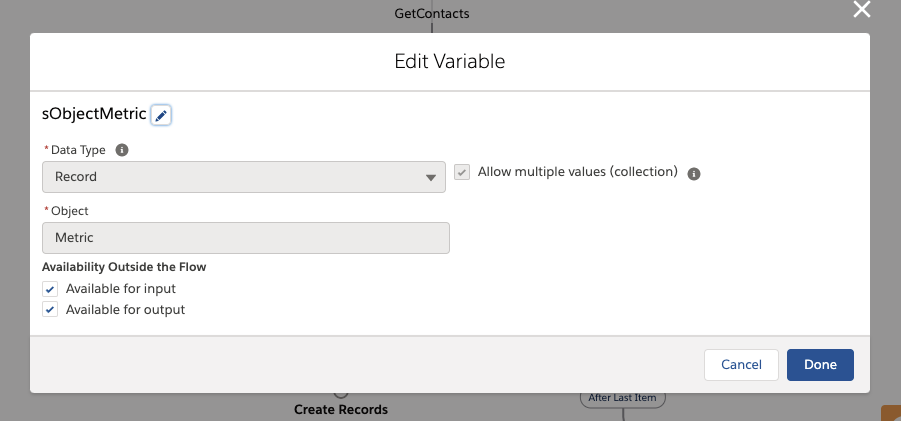
The second variable is designed to hold our Metric records, so we will set the Data Type to “Record,” and the Object to “Metric.”
Now we can create a Loop element, and set the Collection Variable as our Contact Record Collection Variable from the Get Contacts element, and the Loop Variable to our newly created “Loop Variable.”

Next, we will create an Assignment element to choose what data we want to copy from each retrieved record (our Contact), and map it to the respective “Metric” Object field. While each “Metric” field does not need to have the same name as it’s corresponding Contact field, they must be the same data type! As seen below, I have decided to save the Contact and Account Ids in two Lookup fields on the “Metric” Object, named “Contact ID” and “Account Id.” Add an Assignment for every field you wish to archive from the Contact to the Metric record.

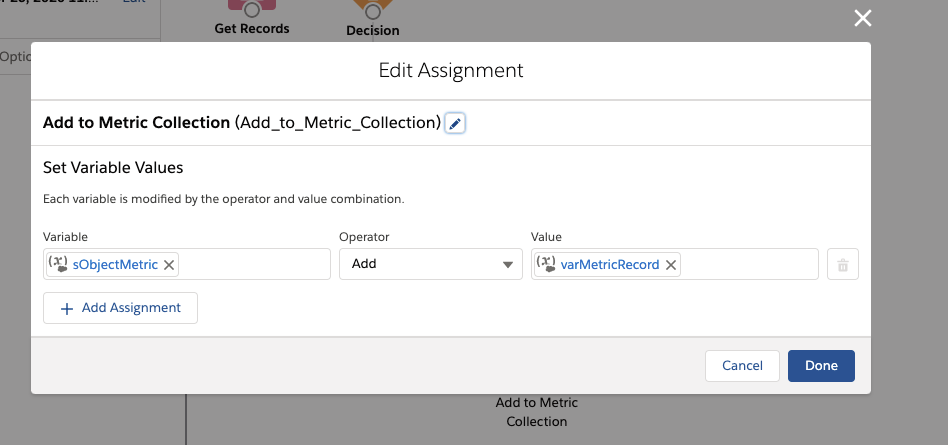
Next, create another Assignment element to add the new Metric record to the “sObjectMetric” variable we created earlier, and close the loop.
Our Flow should now look like this:
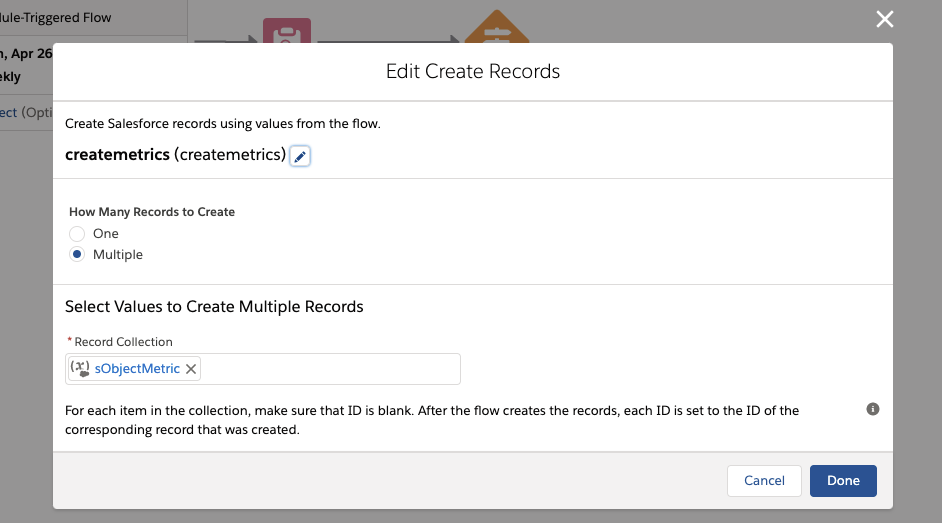
Now all that’s left is to create the records! Using a Create Records element, set the “sObjectMetric” variable as the Record Collection from which we will create multiple records.
Our finished Flow should look like this: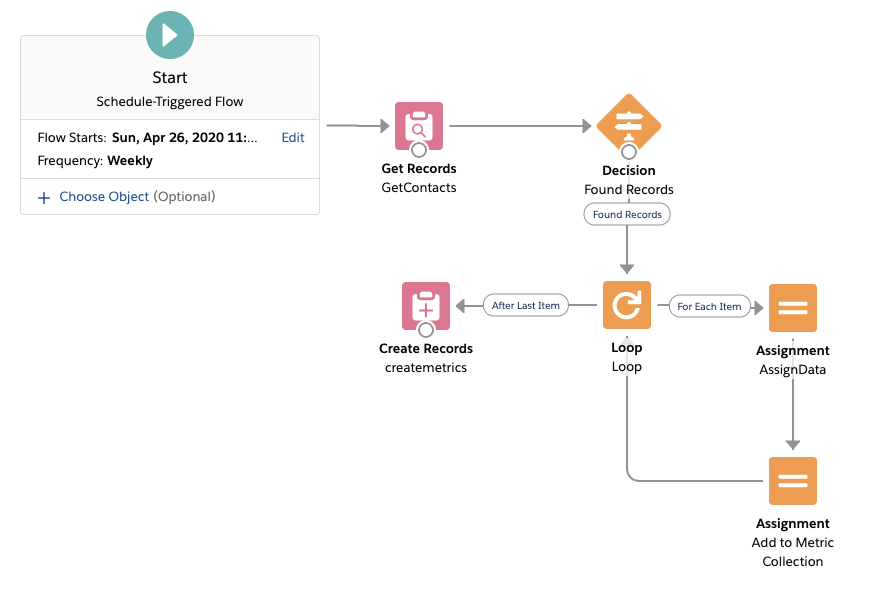
Where to go from here
This is just one of many applications of Scheduled Flows. If you’re looking for a way to reduce manual processes, consider creating a Scheduled Flow to extend your reach!